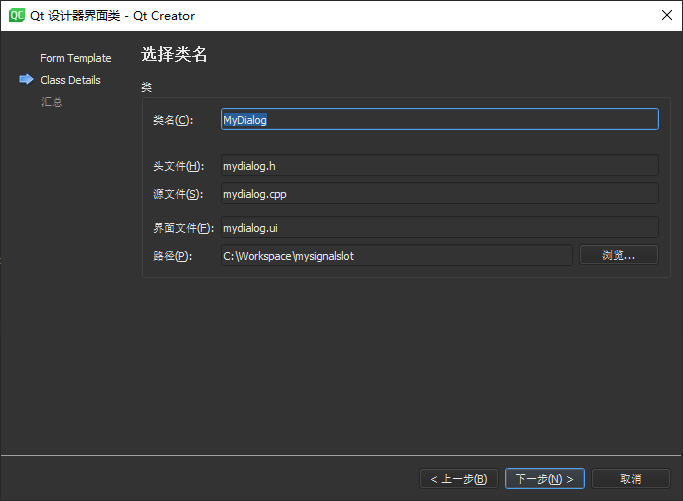
Qt
5.14.2 C++11 的经典 Qt
Widgets Qt
Quick 快速开发适用于移动端设备的用户界面,因为 Qt 5
底层图形渲染引擎基于 GPU 硬件加速,所以其能够保持与原生
C++ 近乎等同的运行效率。笔者计划通过两篇文章分别对这 2
种技术进行介绍,但是无论如何,在传统跨平台桌面应用开发领域,Qt
Widgets 依然是 Qt5 最为基础与核心的内容。
虽然 Qt 6 发布在即,但是官方声明将会依然保持 API
的兼容与稳定性,因此本文依然基于当前最新的 Qt5
稳定版本撰写。全文将会分别对 Qt Widgets
当中使用较为频繁的窗口部件、布局管理、应用主窗口、事件系统、对象模型、风格与样式、国际化等部分内容进行深入介绍,同时展示完善的示例代码以及程序运行效果,并结合《QtQuick
篇》 一文讲解混合编程相关的技术。
Hello Qt
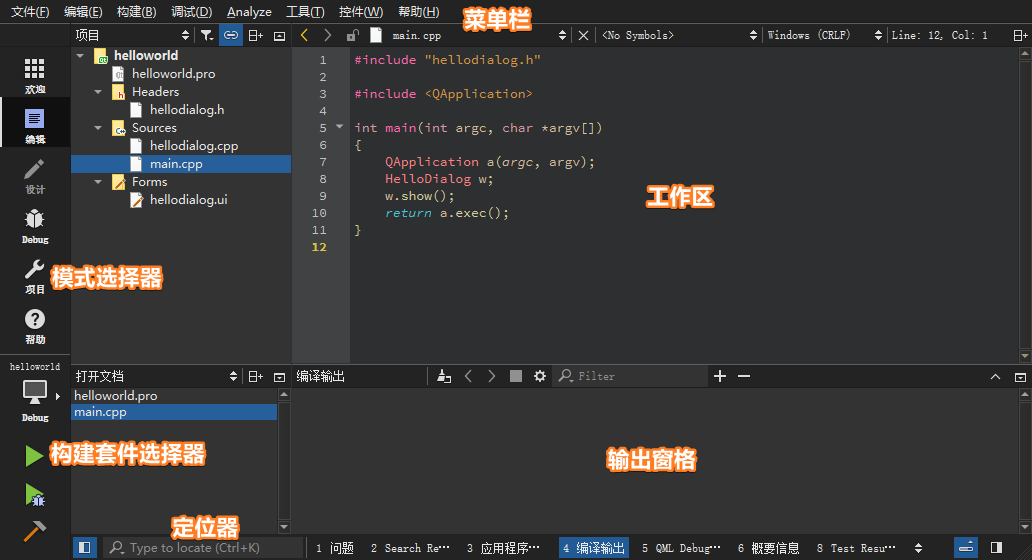
Qt Creator 是一个跨平台的的 Qt 集成开发环境,囊括了 C++
代码编辑器、项目管理工具、上下文相关的帮助系统、图形化调试器、代码管理与浏览等一系列日常开发工具。本文使用的
Qt Creator
为最新的4.11.0版本。其主要由菜单栏、模式选择器、构建套件选择器、定位器、输出窗格、工作区等部分组成,具体界面布局如下图所示:
注意 :可以通过【Ctrl +
鼠标滚轮】对工作区字体进行缩放,如果需要还原字体的默认设置,则直接接下快捷键【Ctrl
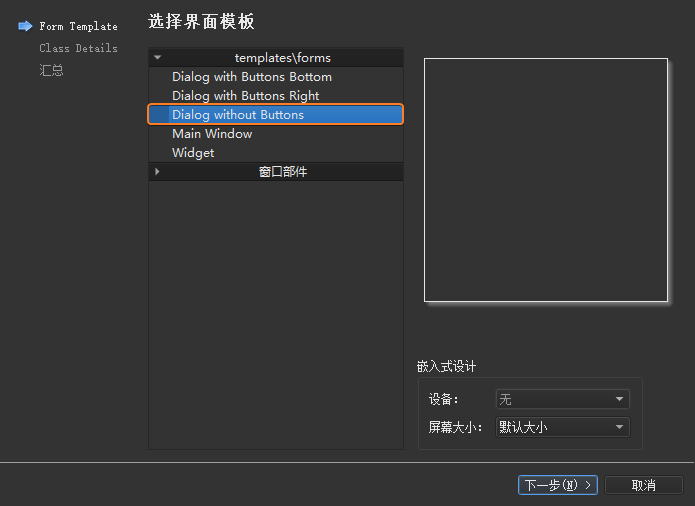
+ 0】即可。
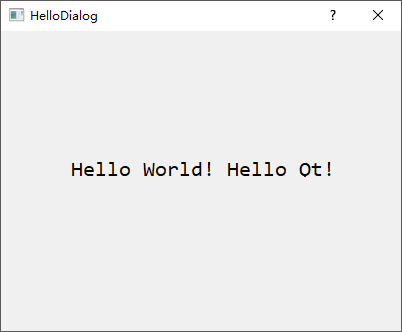
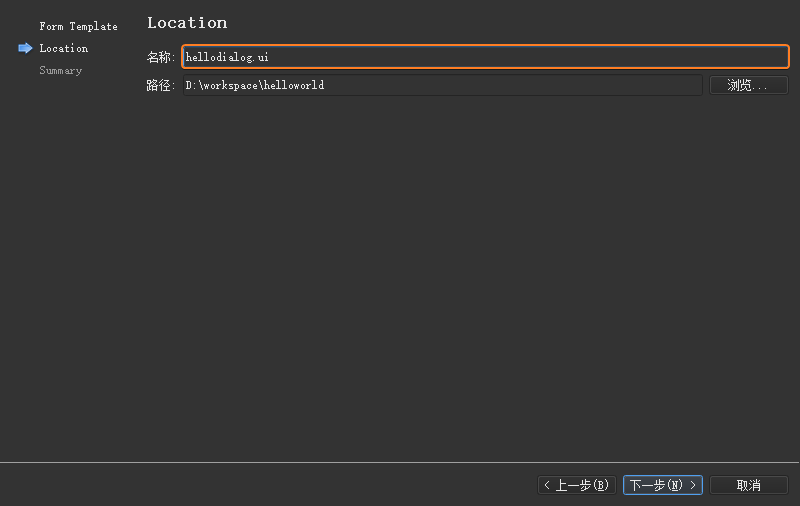
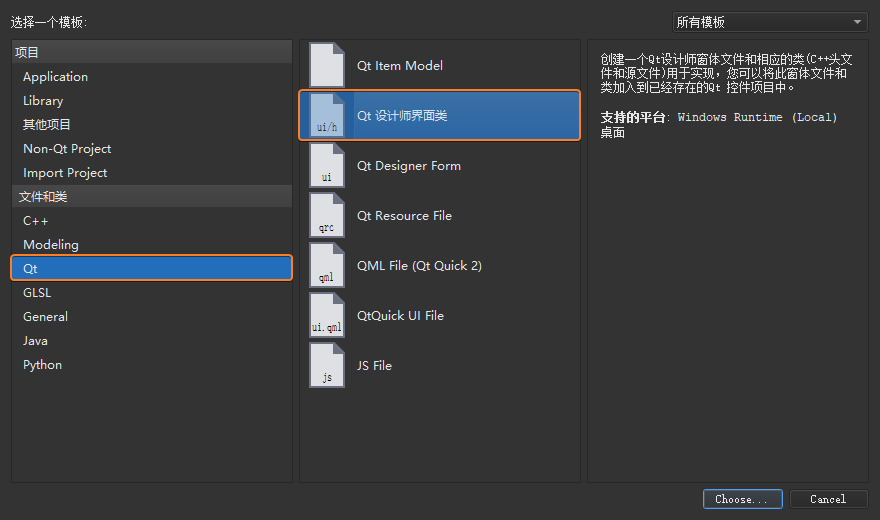
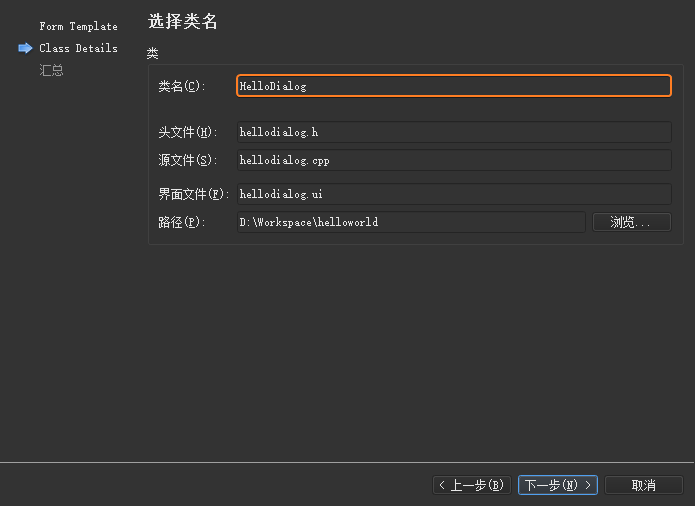
本小节将建立一个用于显示一个Hello World! Hello Qt!字符串的helloworld工程,从而体现一个
Qt Widgets
项目从创建、运行到发布的完整过程;然后从main.cpp主函数入手,到.ui图形界面文件,再到自定义的
C++ 类,逐步对示例当中的代码进行解析。
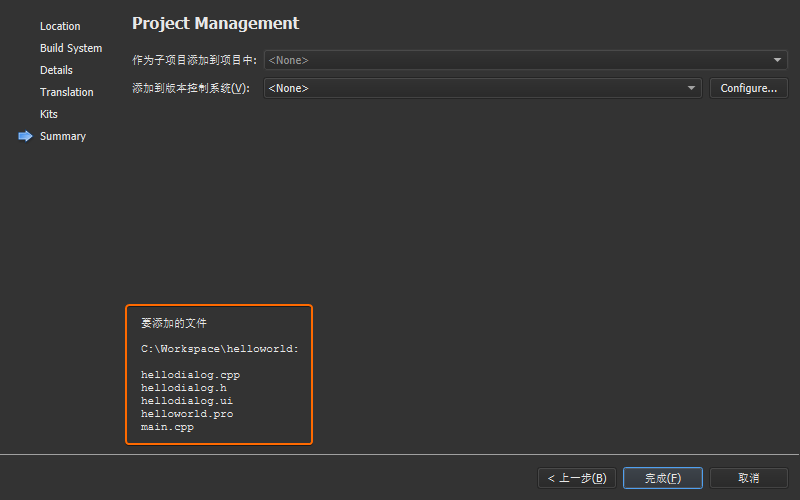
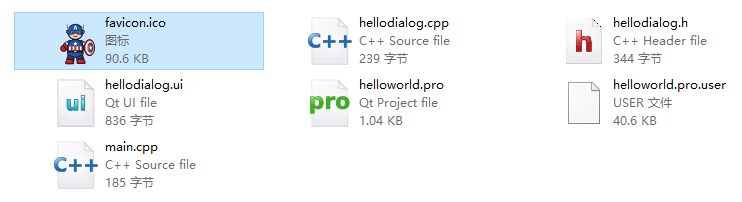
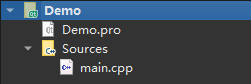
完成上述的工程创建步骤之后,打开工程所在的目录,可以看到生成了如下 6
个文件:
源文件
描述
helloworld.pro项目文件;
helloworld.pro.user用户相关的项目信息;
main.cpp主函数文件;
hellodialog.h新建的HelloDialog类头文件;
hellodialog.cpp新建的Hellodialog类源文件;
hellodialog.ui界面设计文件;
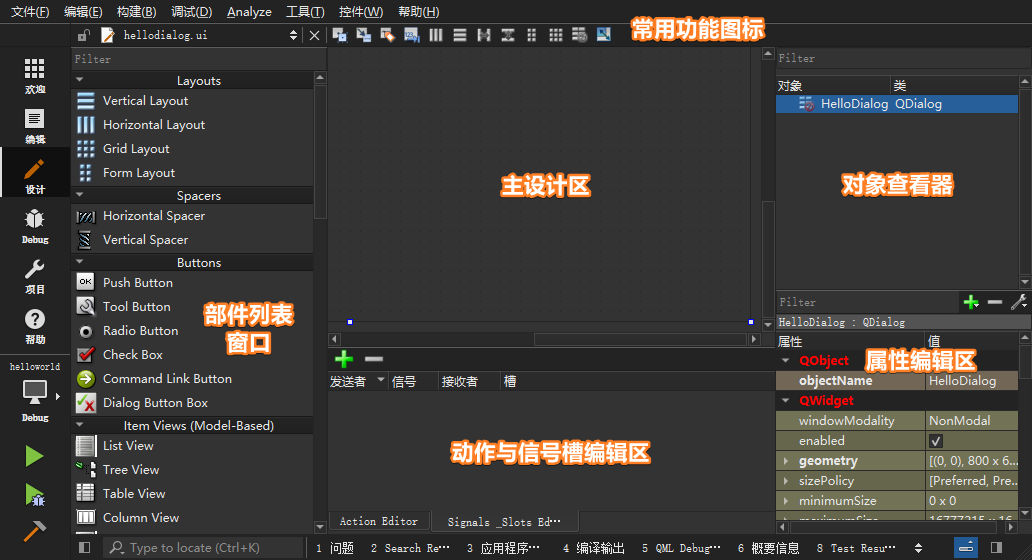
Qt Creator
当中双击上面列表中的hellodialog.ui文件即可进入【设计】模式,其功能区域分布如下图所示:
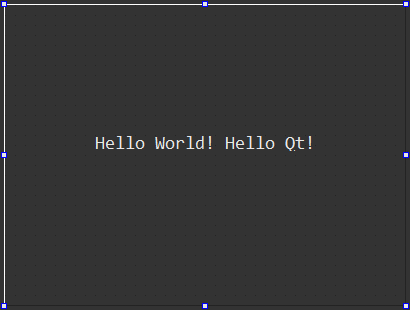
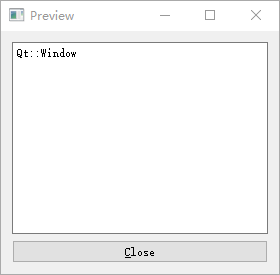
接下来,首先从【部件列表窗口】找到Label标签部件,然后按住鼠标左键将其拖动至【主设计区】,双击进入编辑状态并输入Hello World! Hello Qt!字符串,同时将外层HelloDialog对话框的宽高度分别设置为400 * 300,字体设置为大小16的Consolas,此时可以按下【Alt
+ Ctrl + R】快捷键可以对当前界面进行预览。
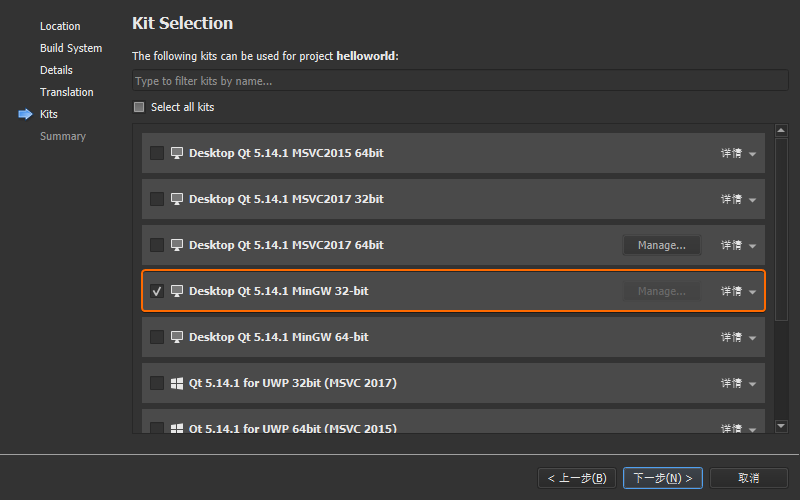
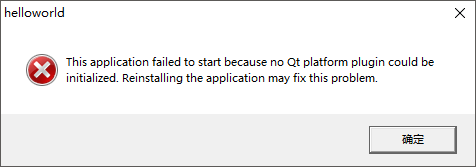
点击 Qt Creator 左下角的【构建套件选择器】,依次选择
Desktop Qt 5.14.2 MinGW 32-bit ➥ Release,然后按下【Ctrl+R】快捷键或者鼠标点击左下角运行按钮编译并运行当前程序。此时,会在工程所在目录生成一个名为build-helloworld-Desktop_Qt_5_14_2_MinGW_32_bit-Release的目录,其中release子目录下的helloworld.exe即是编译后输出的可执行程序,此时在操作系统当中鼠标双击运行该.exe文件,则会提示以下错误信息:
该问题是由于helloworld.exe程序无法找到 Qt
库 、MinGW 32 、其它第三方库
等.dll动态链接库依赖所导致,首先需要将 MinGW
32bit
所对应的D:\software\Tech\Qt\5.14.2\mingw73_32\bin和D:\software\Tech\Qt\Tools\mingw730_32\bin添加至系统环境变量PATH,然后将helloworld.exe复制到新建的D:\Workspace\Qt-build目录下,然后进入命令行执行windeployqt命令:
1
2
3
4
5
6
7
8
9
10
11
12
13
14
15
16
17
18
19
20
21
22
23
24
25
26
27
28
29
30
31
32
33
34
35
36
37
38
39
40
41
42
43
44
λ windeployqt \Workspace\Qt-build\ D:\Workspace \Qt -build \helloworld.exe 32 bit , release executable Adding Qt5Svg for qsvgicon.dll Skipping plugin qtvirtualkeyboardplugin.dll due to disabled dependencies (Qt5Qml Qt5Quick ).Skipping plugin qtvirtualkeyboard_hangul.dll due to disabled dependencies (Qt5Qml Qt5Quick ).Skipping plugin qtvirtualkeyboard_openwnn.dll due to disabled dependencies (Qt5Qml Qt5Quick ).Skipping plugin qtvirtualkeyboard_pinyin.dll due to disabled dependencies (Qt5Qml Qt5Quick ).Skipping plugin qtvirtualkeyboard_tcime.dll due to disabled dependencies (Qt5Qml Qt5Quick ).Skipping plugin qtvirtualkeyboard_thai.dll due to disabled dependencies (Qt5Qml Qt5Quick ).Direct dependencies : Qt5Core Qt5Gui Qt5Widgets All dependencies : Qt5Core Qt5Gui Qt5Widgets To be deployed : Qt5Core Qt5Gui Qt5Svg Qt5Widgets Updating Qt5Core.dll .Updating Qt5Gui.dll .Updating Qt5Svg.dll .Updating Qt5Widgets.dll .Updating libGLESv2.dll .Updating libEGL.dll .Updating D3Dcompiler_47.dll .Updating opengl32sw.dll .Updating libgcc_s_dw2 -1.dll .Updating libstdc ++-6.dll .Updating libwinpthread -1.dll .Creating directory D :/Workspace /Qt -build /iconengines .Updating qsvgicon.dll .Creating directory D :/Workspace /Qt -build /imageformats .Updating qgif.dll .Updating qicns.dll .Updating qico.dll .Updating qjpeg.dll .Updating qsvg.dll .Updating qtga.dll .Updating qtiff.dll .Updating qwbmp.dll .Updating qwebp.dll .Creating directory D :/Workspace /Qt -build /platforms .Updating qwindows.dll .Creating directory D :/Workspace /Qt -build /styles .Updating qwindowsvistastyle.dll .Creating D :\Workspace \Qt -build \translations ...Creating qt_ar.qm ...... ... ... ... ... Creating qt_zh_TW.qm ...
windeployqt 是一款用于 Windows 操作系统的 Qt
自动部署工具,可以自动补充动态链接库依赖,命令执行完成以后再次双击helloworld.exe即可正确的运行程序。
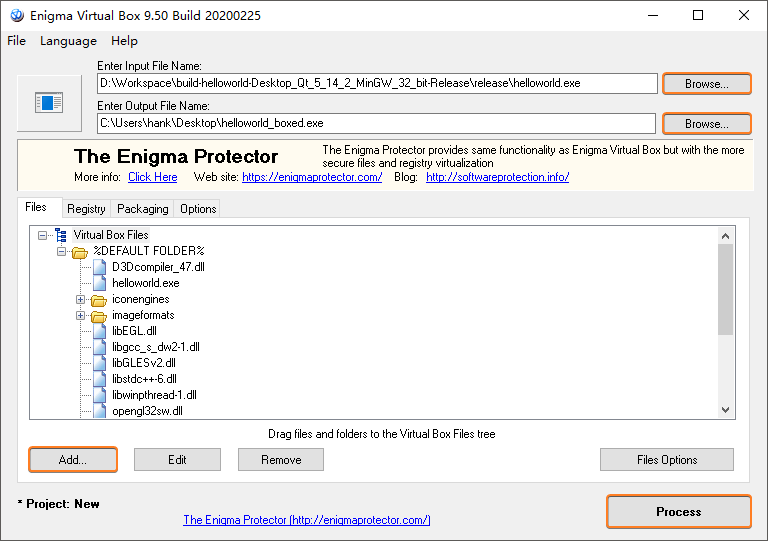
针对某些需要进行源码静态编译场景,出于方便的角度,可以考虑使用Enigma Virtual
Box ,该软件是一款文件与注册表虚拟化系统,允许将 Windows
注册表与多种类型的文件(.dll、.ocx、.avi、.mp3、.txt、.doc等)嵌入至一个独立的.exe可执行文件当中,并且在运行时不会产生任何的临时文件,从而实现类似于静态编译的效果:
程序发布时如果希望.exe拥有一个漂亮的图标,首先,需要添加一个.icon格式的位图文件到项目目录下面:
然后,打开helloworld.pro文件添加如下配置项:
重新编译运行程序,可以发现应用程序的桌面图标以及启动后的左上角图标都被更新为刚才设置的图标:
如果需要自行将.png制作为.ico图片,则可以选用(ImageMagick)[https://imagemagick.org/index.php]进行创建,安装以后执行如下命令:
1 λ magick.exe convert icon-16 .png icon-32 .png icon-256 .png icon.ico
main.cpp 版实现
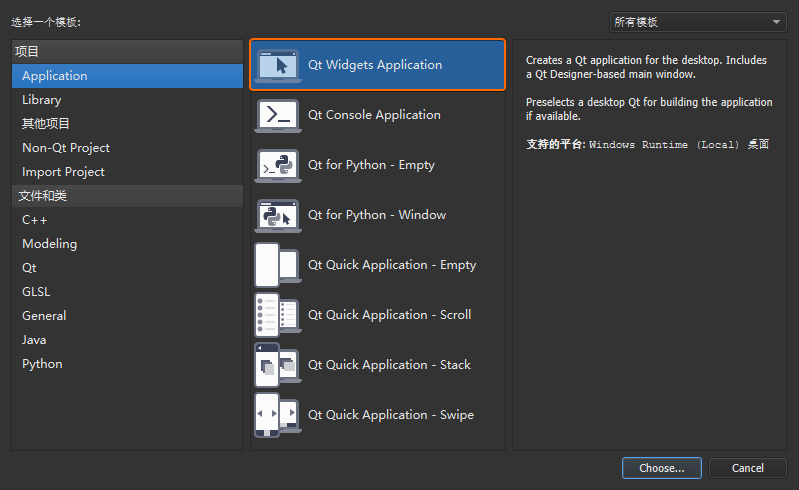
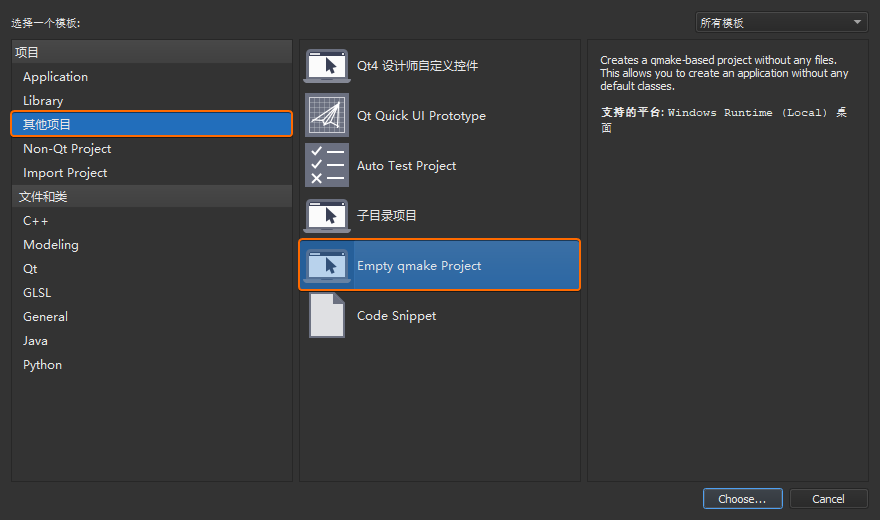
打开 Qt Creator 新建一个 Empty gmake Project
工程,并将其命名为helloworld。
完成之后,双击工程上的helloworld.pro工程配置文件,由于本示例当中使用的类都包含在widgets模块,所以需要添加下面的代码对其进行注册:
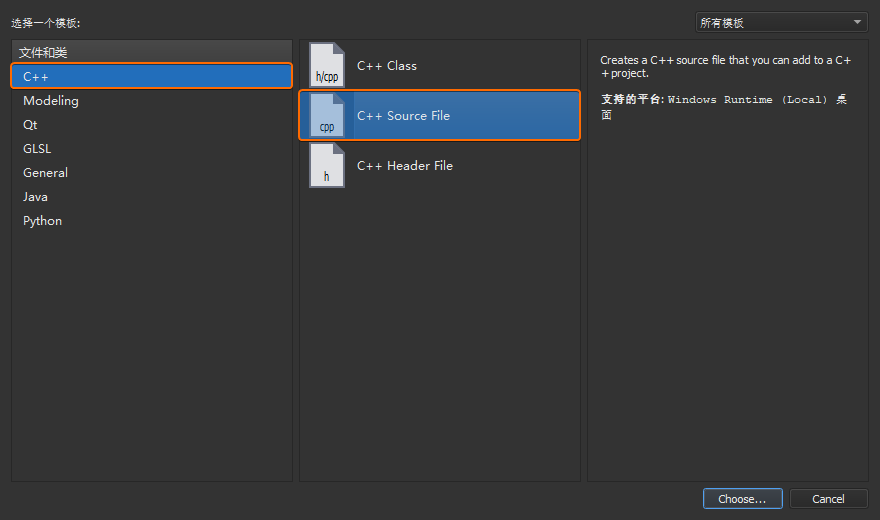
鼠标右键选择工程列表上的工程名称helloworld,在弹出的右键菜单上选择【Add
New...】,然后选择【C++ Source
File】新建一个main.cpp源文件:
向main.cpp里添加下面的源代码,然后点击 Qt Creator
左下角的【运行】按钮就可以观察到之前程序所展示的效果:
1 2 3 4 5 6 7 8 9 10 11 12 13 14 15 16 17 18 19 20 21 22 23 24 25 26 #include <QApplication> #include <QDialog> #include <QLabel> #include <QFont> int main (int argc, char * argv[]) QApplication app (argc, argv) ; QFont font; font.setFamily ("Consolas" ); font.setPixelSize (16 ); app.setFont (font); QDialog dialog; dialog.resize (400 , 300 ); QLabel label (&dialog) ; label.move (100 , 120 ); label.setText ("Hello World! Hello Qt!" ); dialog.show (); return app.exec (); }
事实上,我们也可以抛开 Qt Creator 提供的 IDE
环境,手动生成工程并编译代码。首先新建一个helloworld工程目录以及对应的main.cpp文件,然后进入helloworld执行qmake -project命令生成.pro工程配置文件:
1 2 C:\Workspace \helloworld λ qmake -project
向helloworld.pro文件添加QT += widgets配置项,然后输入qmake命令生成编译所需的
Makefile
文件,以及相应的debug和release目录:
1 2 3 4 C:\Workspace \helloworld λ qmake Info : creating stash file C :\Workspace \helloworld \.qmake.stash
执行mingw32-make命令基于 Makefile
编译程序并将helloworld.exe程序输出至release目录:
1 2 3 4 5 6 7 8 9 C:\Workspace \helloworld λ mingw32 -make C :/Software /Tech /Qt /5.14.2/mingw73_32 /bin /qmake.exe -o Makefile helloworld.pro mingw32 -make -f Makefile.Release mingw32 -make [1]: Entering directory 'C :/Workspace /helloworld 'g ++ -c -fno -keep -inline -dllexport -O2 -Wall -Wextra -Wextra -fexceptions -mthreads -DUNICODE -D_UNICODE -DWIN32 -DMINGW_HAS_SECURE_API =1 -DQT_NO_DEBUG -DQT_WIDGETS_LIB -DQT_GUI_LIB -DQT_CORE_LIB -DQT_NEEDS_QMAIN -I . -I . -I ../../Software /Tech /Qt /5.14.2/mingw73_32 /include -I ../../Software /Tech /Qt /5.14.2/mingw73_32 /include /QtWidgets -I ../../Software /Tech /Qt /5.14.2/mingw73_32 /include /QtGui -I ../../Software /Tech /Qt /5.14.2/mingw73_32 /include /QtANGLE -I ../../Software /Tech /Qt /5.14.2/mingw73_32 /include /QtCore -Irelease -I ../../Software /Tech /Qt /5.14.2/mingw73_32 /mkspecs /win32 -g ++ -o release /main.o main.cpp g ++ -Wl ,-s -Wl ,-subsystem ,windows -mthreads -o release /helloworld.exe release /main.o C :/Software /Tech /Qt /5.14.2/mingw73_32 /lib /libQt5Widgets.a C :/Software /Tech /Qt /5.14.2/mingw73_32 /lib /libQt5Gui.a C :/Software /Tech /Qt /5.14.2/mingw73_32 /lib /libQt5Core.a -lmingw32 C :/Software /Tech /Qt /5.14.2/mingw73_32 /lib /libqtmain.a -LC :/openssl /lib -LC :/Utils /my_sql /mysql -5.7.25-win32 /lib -LC :/Utils /postgresql /pgsql /lib -lshell32 mingw32 -make [1]: Leaving directory 'C :/Workspace /helloworld '
hellodialog.ui 版实现
延用上一步的工程,根据如下步骤新建一个hellodialog.ui文件,并自动进入【设计】模式:
首先,将外层QDialog对话框的objectName属性名称修改为HelloDialog。然后,添加一个Label部件然后设置字体为14像素的Consolas,完成后保存并按下快捷键【Ctrl
+ 2】切换回【编辑】界面,此时可以看到.ui本质是一个 XML
文件:
1
2
3
4
5
6
7
8
9
10
11
12
13
14
15
16
17
18
19
20
21
22
23
24
25
26
27
28
29
30
31
32
33
34
35
36
37
38
<?xml version="1.0" encoding="UTF-8" ?> <ui version ="4.0" > <class > Dialog</class > <widget class ="QDialog" name ="Dialog" > <property name ="geometry" > <rect > <x > 0</x > <y > 0</y > <width > 400</width > <height > 300</height > </rect > </property > <property name ="windowTitle" > <string > Dialog</string > </property > <widget class ="QLabel" name ="label" > <property name ="geometry" > <rect > <x > 90</x > <y > 130</y > <width > 221</width > <height > 21</height > </rect > </property > <property name ="font" > <font > <family > Consolas</family > <pointsize > 14</pointsize > </font > </property > <property name ="text" > <string > Hello World! Hello Qt!</string > </property > </widget > </widget > <resources /> <connections /> </ui >
按下快捷键【Ctrl + Shift + B】或者鼠标点击 Qt Creator
左下角的【构建项目】按钮,会将hellodialog.ui解析为build-helloworld-Desktop_Qt_5_14_2_MinGW_32_bit-Release目录下的一个名为ui_hellodialog.h头文件:
1 2 3 4 5 6 7 8 9 10 11 12 13 14 15 16 17 18 19 20 21 22 23 24 25 26 27 28 29 30 31 32 33 34 35 36 37 38 39 40 41 42 43 44 45 46 47 48 49 50 #ifndef UI_HELLODIALOG_H #define UI_HELLODIALOG_H #include <QtCore/QVariant> #include <QtWidgets/QApplication> #include <QtWidgets/QDialog> #include <QtWidgets/QLabel> QT_BEGIN_NAMESPACE class Ui_HelloDialog { public : QLabel *label; void setupUi (QDialog *HelloDialog) if (HelloDialog->objectName ().isEmpty ()) HelloDialog->setObjectName (QString::fromUtf8 ("HelloDialog" )); HelloDialog->resize (400 , 300 ); label = new QLabel (HelloDialog); label->setObjectName (QString::fromUtf8 ("label" )); label->setGeometry (QRect (90 , 130 , 221 , 21 )); QFont font; font.setFamily (QString::fromUtf8 ("Consolas" )); font.setPointSize (14 ); label->setFont (font); retranslateUi (HelloDialog); QMetaObject::connectSlotsByName (HelloDialog); } void retranslateUi (QDialog *HelloDialog) HelloDialog->setWindowTitle (QCoreApplication::translate ("HelloDialog" , "Dialog" , nullptr )); label->setText (QCoreApplication::translate ("HelloDialog" , "Hello World! Hello Qt!" , nullptr )); } }; namespace Ui {class HelloDialog : public Ui_HelloDialog {};} QT_END_NAMESPACE #endif
从上面代码可以看出,Qt
在【设计】模式下实现的.ui文件,在编译过程当中会最终转换为.h头文件。接下来修改main.cpp的源代码,导入这个转换之后的.h头文件:
1 2 3 4 5 6 7 8 9 10 11 12 #include "ui_hellodialog.h" int main (int argc, char *argv[]) QApplication app (argc, argv) ; QDialog dialog; Ui::HelloDialog ui; ui.setupUi (&dialog); dialog.show (); return app.exec (); }
同样的,我们也可以直接借助命令行工具完成hellodialog.ui和main.cpp文件的编译,保留这两个文件并且清除其它的工程文件,然后打开命令行工具,使用uic命令将hellodialog.ui解析为ui_hellodialog.h头文件:
1 2 3 4 5 6 7 8 9 10 D:\Workspace \helloworld λ ls hellodialog.ui main.cpp D :\Workspace \helloworld λ uic -o ui_hellodialog.h hellodialog.ui D :\Workspace \helloworld λ ls hellodialog.ui main.cpp ui_hellodialog.h
ui_hellodialog.h头文件解析完成之后,同样通过执行qmake -project命令生成helloworld.pro工程配置文件:
1 2 3 4 5 6 D:\Workspace \helloworld λ qmake -project D :\Workspace \helloworld λ ls hellodialog.ui helloworld.pro main.cpp ui_hellodialog.h
向helloworld.pro文件添加QT += widgets配置项,然后输入qmake命令生成编译所需的
Makefile:
1 2 3 4 5 6 7 8 D:\Workspace \helloworld λ qmake Info : creating stash file D :\Workspace \helloworld \.qmake.stash D :\Workspace \helloworld λ ls debug / helloworld.pro Makefile Makefile.Release ui_hellodialog.h hellodialog.ui main.cpp Makefile.Debug release /
依然运行mingw32-make命令基于 Makefile
编译程序并将helloworld.exe输出到release目录:
1 2 3 4 5 6 7 8 9 10 11 D:\Workspace \helloworld λ mingw32 -make mingw32 -make -f Makefile.Release mingw32 -make [1]: Entering directory 'D :/Workspace /helloworld 'g ++ -c -fno -keep -inline -dllexport -O2 -Wall -Wextra -Wextra -fexceptions -mthreads -DUNICODE -D_UNICODE -DWIN32 -DMINGW_HAS_SECURE_API =1 -DQT_NO_DEBUG -DQT_WIDGETS_LIB -DQT_GUI_LIB -DQT_CORE_LIB -DQT_NEEDS_QMAIN -I . -I . -I ../../software /Tech /Qt /5.14.2/mingw73_32 /include -I ../../software /Tech /Qt /5.14.2/mingw73_32 /include /QtWidgets -I ../../software /Tech /Qt /5.14.2/mingw73_32 /include /QtGui -I ../../software /Tech /Qt /5.14.2/mingw73_32 /include /QtANGLE -I ../../software /Tech /Qt /5.14.2/mingw73_32 /include /QtCore -Irelease -I . -I ../../software /Tech /Qt /5.14.2/mingw73_32 /mkspecs /win32 -g ++ -o release /main.o main.cpp g ++ -Wl ,-s -Wl ,-subsystem ,windows -mthreads -o release /helloworld.exe release /main.o D :/software /Tech /Qt /5.14.2/mingw73_32 /lib /libQt5Widgets.a D :/software /Tech /Qt /5.14.2/mingw73_32 /lib /libQt5Gui.a D :/software /Tech /Qt /5.14.2/mingw73_32 /lib /libQt5Core.a -lmingw32 D :/software /Tech /Qt /5.14.2/mingw73_32 /lib /libqtmain.a -LC :/openssl /lib -LC :/Utils /my_sql /mysql -5.7.25-win32 /lib -LC :/Utils /postgresql /pgsql /lib -lshell32 mingw32 -make [1]: Leaving directory 'D :/Workspace /helloworld 'D :\Workspace \helloworld λ ls release \ helloworld.exe * main.o
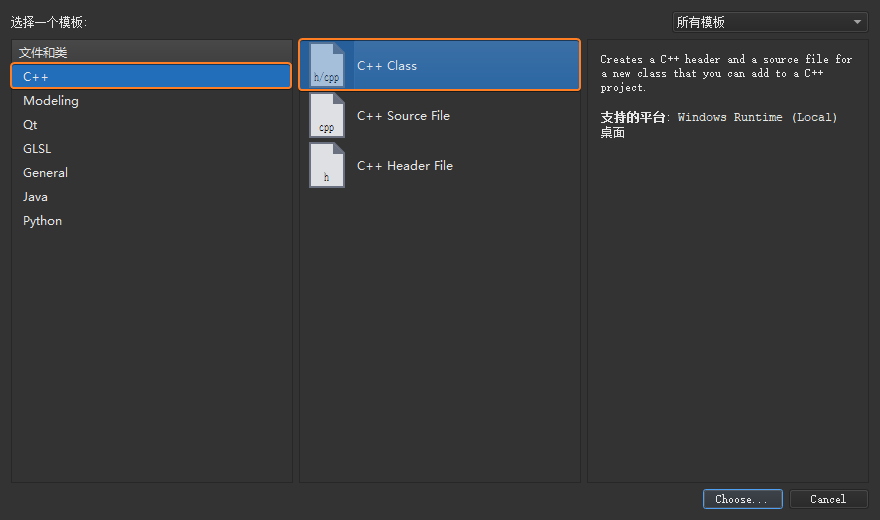
hellodialog.cpp 版实现
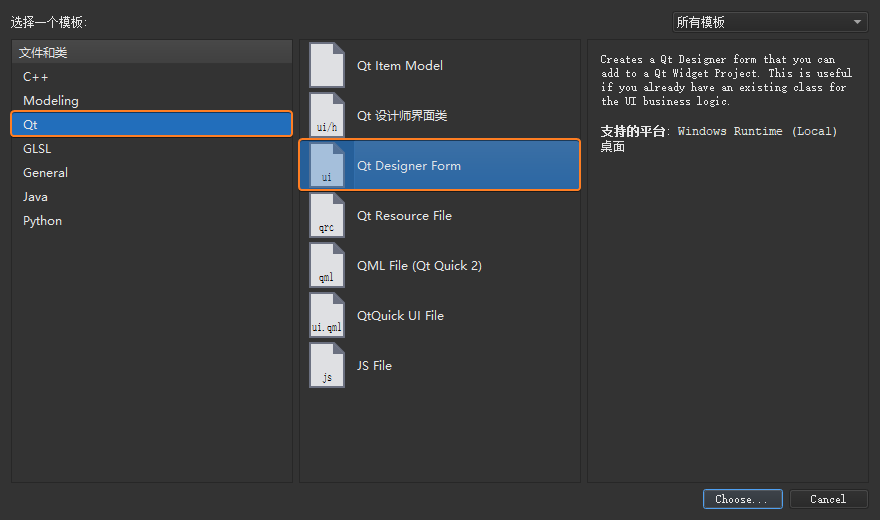
首先,打开 Qt Creator 新建一个 Empty gmake Project
工程,依然将其命名为helloworld。完成以后打开自动生成的helloworld.pro添加QT += widgets并保存。然后,在工程中新建一个
C++ Class 文件:
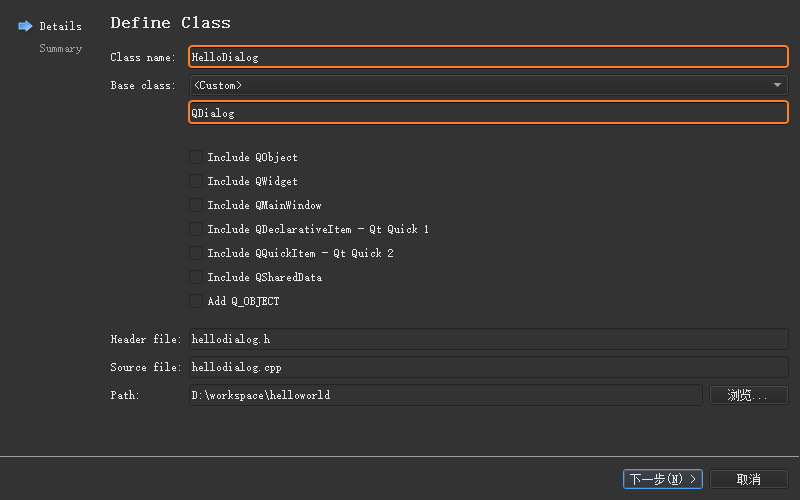
将该类的名称定义为HelloDialog,基类指定为QDialog,然后由
Qt Creator
自动生成相应的hellodialog.h和hellodialog.cpp源文件:
然后再添加一个main.cpp源文件,并且加入如下代码:
1 2 3 4 5 6 7 8 9 #include <QApplication> #include "hellodialog.h" int main (int argc, char *argv[]) QApplication app (argc, argv) ; HelloDialog dialog; dialog.show (); return app.exec (); }
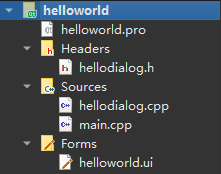
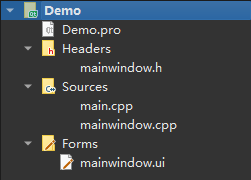
接着将上一小节建立的hellodialog.ui文件复制到当前目录,然后使用
Qt Creator
上的【添加现有文件...】将该.ui添加至当前工程,最终形成如下项目结构:
接下来,向hellodialog.h添加如下代码:
1 2 3 4 5 6 7 8 9 10 11 12 13 14 15 16 17 18 19 20 21 22 23 #ifndef HELLODIALOG_H #define HELLODIALOG_H #include <QDialog> namespace Ui { class HelloDialog ; } class HelloDialog : public QDialog { Q_OBJECT public : explicit HelloDialog (QWidget *parent = 0 ) ~HelloDialog (); private : Ui::HelloDialog *ui; }; #endif
然后,继续向hellodialog.cpp添加下面的代码:
1 2 3 4 5 6 7 8 9 10 11 #include "hellodialog.h" #include "ui_hellodialog.h" HelloDialog::HelloDialog (QWidget * parent) : QDialog (parent){ ui = new Ui::HelloDialog; ui->setupUi (this ); } HelloDialog::~HelloDialog (){ delete ui; }
最后编译上述工程代码,可以观察到与前面小节相同的示例效果。
设计师界面类版实现
依然打开 Qt Creator 新建一个 Empty gmake Project
工程,同样将其命名为helloworld,然后添加QT += widgets保存,接下来在工程中新建一个
Qt 设计师界面类 :
将界面模板选择为 Dialog without Buttons :
设置类名为HelloDialog,然后 Qt Creator
将会同时自动生成helloworld.ui、helloworld.h、helloworld.cpp源代码文件:
按下快捷键【Ctrl +
3】进入【设计】模式,鼠标拖拽一个Label部件并且修改其文本为Hello World! Hello Qt!与字体为16像素的Consolas。
接着往工程当中添加一个main.cpp源文件,并且加入如下代码:
1 2 3 4 5 6 7 8 9 #include <QApplication> #include "hellodialog.h" int main (int argc, char *argv[]) QApplication app (argc, argv) ; HelloDialog dialog; dialog.show (); return app.exec (); }
本小节的内容就是前一小节操作的简化或者说自动化版本,因为 Qt
设计师界面类 本质上就是之前小节中 C++ 类与 .ui
文件的结合,Qt Creator 只是自动化的完成了源文件创建的步骤。
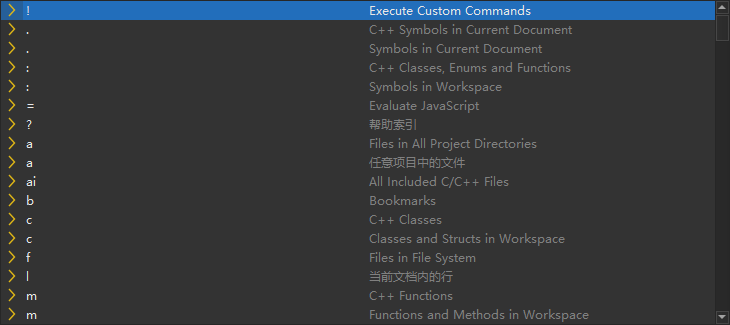
Qt Creator 定位器
Qt Creator
与其它开源编辑器最大的不同之处在于,其在主界面左下方提供了一个定位器 功能,可以方便的打开文件、定位到指定行、打开特定的帮助文档、查找项目中的函数等。定位器通过多种过滤器 来实现不同的功能,按下快捷键【Ctrl
+
K】就会显示这些过滤器的前缀及其功能,使用的格式为前缀符号 待定位内容。
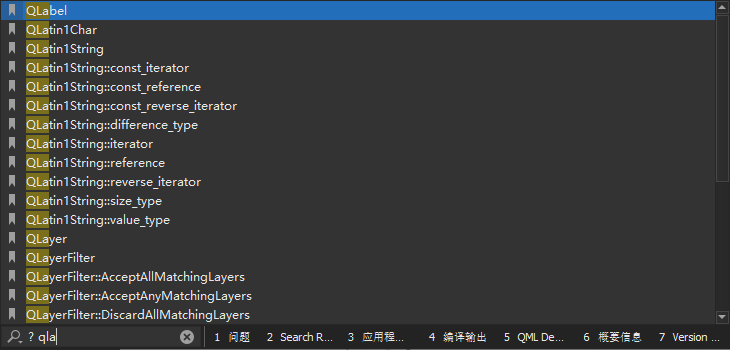
例如:在 Qt Creator 主界面按下【Ctrl + K】
进入定位器并输入l 8,即可跳转到编辑模式当前打开源文件的第 8
行。再次按下【Ctrl + K】
并且输入? qla,回车后即可打开QLabel的帮助文档。
项目模板
Console Application
Demo.pro
1
2
3
4
5
6
7
8
9
10
11
12
13
14
15
16
17
18
QT -= gui CONFIG += c++11 console CONFIG -= app_bundle # 让标记为【deprecated】的 Qt 特性,由编译器发出警告信息 DEFINES += QT_DEPRECATED_WARNINGS # 让标记为【deprecated】的 Qt 特性无法通过编译 # DEFINES += QT_DISABLE_DEPRECATED_BEFORE=0x060000 # 禁用 Qt 6.0.0 之前的所有废弃 API SOURCES += \ main.cpp # 默认的部署规则 qnx: target.path = /tmp/$${TARGET}/bin else: unix:!android: target.path = /opt/$${TARGET}/bin !isEmpty(target.path): INSTALLS += target
main.cpp
1 2 3 4 5 6 7 #include <QCoreApplication> int main (int argc, char *argv[]) QCoreApplication a (argc, argv) ; return a.exec (); }
Demo.pro
1
2
3
4
5
6
7
8
9
10
11
12
13
14
15
16
17
18
19
20
21
22
23
24
25
26
QT += core gui greaterThan(QT_MAJOR_VERSION, 4): QT += widgets CONFIG += c++11 # 让标记为【deprecated】的 Qt 特性,由编译器发出警告信息 DEFINES += QT_DEPRECATED_WARNINGS # 让标记为【deprecated】的 Qt 特性无法通过编译 # DEFINES += QT_DISABLE_DEPRECATED_BEFORE=0x060000 # 禁用 Qt 6.0.0 之前的所有废弃 API SOURCES += \ main.cpp \ mainwindow.cpp HEADERS += \ mainwindow.h FORMS += \ mainwindow.ui # 默认的部署规则 qnx: target.path = /tmp/$${TARGET}/bin else: unix:!android: target.path = /opt/$${TARGET}/bin !isEmpty(target.path): INSTALLS += target
mainwindow.h
1 2 3 4 5 6 7 8 9 10 11 12 13 14 15 16 17 18 19 20 #ifndef MAINWINDOW_H #define MAINWINDOW_H #include <QMainWindow> QT_BEGIN_NAMESPACE namespace Ui { class MainWindow ; }QT_END_NAMESPACE class MainWindow : public QMainWindow { Q_OBJECT public : MainWindow (QWidget *parent = nullptr ); ~MainWindow (); private : Ui::MainWindow *ui; }; #endif
mainwindow.cpp
1 2 3 4 5 6 7 8 9 10 #include "mainwindow.h" #include "ui_mainwindow.h" MainWindow::MainWindow (QWidget *parent) : QMainWindow (parent), ui (new Ui::MainWindow) { ui->setupUi (this ); } MainWindow::~MainWindow () { delete ui; }
main.cpp
1 2 3 4 5 6 7 8 9 #include "mainwindow.h" #include <QApplication> int main (int argc, char *argv[]) QApplication a (argc, argv) ; MainWindow w; w.show (); return a.exec (); }
mainwindow.ui
1
2
3
4
5
6
7
8
9
10
11
12
13
14
15
16
17
18
19
20
21
22
23
24
25
26
27
28
29
30
31
<?xml version="1.0" encoding="UTF-8" ?> <ui version ="4.0" > <class > MainWindow</class > <widget class ="QMainWindow" name ="MainWindow" > <property name ="geometry" > <rect > <x > 0</x > <y > 0</y > <width > 800</width > <height > 600</height > </rect > </property > <property name ="windowTitle" > <string > MainWindow</string > </property > <widget class ="QWidget" name ="centralwidget" /> <widget class ="QMenuBar" name ="menubar" > <property name ="geometry" > <rect > <x > 0</x > <y > 0</y > <width > 800</width > <height > 22</height > </rect > </property > </widget > <widget class ="QStatusBar" name ="statusbar" /> </widget > <resources /> <connections /> </ui >
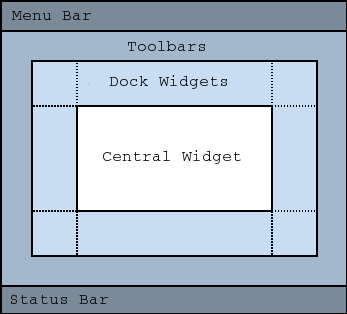
窗口部件
Qt 小部件(Qt
Widgets )是用于放置其它部件的容器,通常由 1 个框架和 1
个标题栏组成。常用的窗口类型有QWidget(基础窗口部件,所有窗口部件的基类)、QMainWindow(带有菜单栏和工具栏的主窗口类)、Dialog(各种对话框的基类)三种。
QWidget类是所有用户界面对象的基类,它分别继承自QObject类(所有支持
Qt
对象模型的对象的基类)和QPaintDevice类(所有可以绘制的对象的基类),因此提供有界面绘制与用户输入处理等基本功能,如果需要设计自定义的窗口部件,则可以考虑继承QWidget及其子类。
下面的程序当中定义了 1
个Qwidget类对象的指针变量widget,2
个QLabel对象指针label1和label2,其中label1没有父窗口,而label2被放置在widget父窗口内部:
1 2 3 4 5 6 7 8 9 10 11 12 13 14 15 16 17 18 19 20 21 22 23 24 25 26 27 28 29 #include <QtWidgets> int main (int argc, char *argv[]) QApplication a (argc, argv) ; QWidget *widget = new QWidget (); widget->setWindowTitle (QObject::tr ("我是 widget" )); QLabel *label1 = new QLabel (); label1->setWindowTitle (QObject::tr ("我是 label" )); label1->setText (QObject::tr ("label1 : 我是一个窗口。" )); label1->resize (250 , 20 ); QLabel *label2 = new QLabel (widget); label2->setText (QObject::tr ("label2 : 我不是独立窗口,只是 widget 的子部件。" )); label2->resize (300 , 20 ); label1->show (); widget->show (); int ret = a.exec (); delete label1; delete widget; return ret; }
注意 :上面代码使用new操作符实例化类,但是并未使用delete进行释放,因为
Qt
里销毁父对象时会自动销毁子对象。例如指定label2的父部件为widget,所以执行delete widget就会自动销毁label2。
QWidget类的构造函数可以接收 2 个参数:
1 QWidget::QWidget (QWidget *parent = nullptr , Qt::WindowFlags f = Qt::WindowFlags ())
QWidget *parent:如果值为nullptr,则该部件为一个窗口。如果值为其它部件,则此该部件将会成为子窗口。当父部件被删除时,该部件也将被删除;Qt::WindowFlags f:通常为0,可以将其设置为自定义窗口的框架(此时父窗口必须为nullptr),如果自定义框架,则需要采用
2 个窗口标志位之间的按位异或值;
例如:Qt::FramelessWindowHint可以生成一个无边框的窗口,Qt::WindowStaysOnTopHint用于让指定窗口停留在其它所有窗口最上层。
1 2 3 4 5 6 7 8 9 10 11 12 13 14 15 16 17 #include <QtWidgets> int main (int argc, char *argv[]) QApplication a (argc, argv) ; QWidget *widget = new QWidget (0 , Qt::Dialog | Qt::FramelessWindowHint); QLabel *label1 = new QLabel (0 , Qt::SplashScreen | Qt::WindowStaysOnTopHint); QLabel *label2 = new QLabel (widget); }
Qt Creator
提供的示例程序Window Flags Example演示了几乎所有的窗口类型,下图是这些示例的运行效果:
QWidget当中还提供了一个void QWidget::setWindowState(Qt::WindowStates windowState)函数用于设置窗口状态,其中参数Qt::WindowStates是用于设置当前窗口状态的枚举值:
Qt::WindowNoTate默认正常状态
Qt::WindowMaximized窗口最大化
Qt::Windowminimized窗口最小化
Qt::WindowFullScreen全屏显示
Qt::WindowActive活动窗口
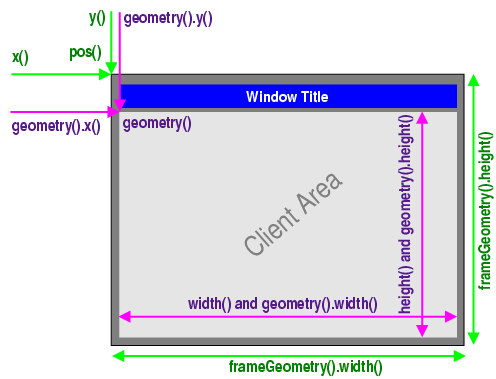
窗口几何结构 是指窗口的大小尺寸以其出现的位置,默认情况下,窗口部件的尺寸等于其所包含子部件的大小尺寸;QWidget
提供了几个用于处理窗口几何结构的函数,其中一些函数作用于不包括窗口框架 (Window
Frame)的区域,例如:geometry()width()height()rect()size()包括窗口框架 ,例如:x()y()frameGeometry()pos()move()
Debug 调试
本小节会在讲解窗口几何结构相关函数的同时,展现 Qt Creator
中程序调试相关的内容。
1 2 3 4 5 6 7 8 9 10 11 12 13 14 15 #include <QApplication> #include <QWidget> int main (int argc, char *argv[]) QApplication a (argc, argv) ; QWidget widget; int x = widget.x (); int y = widget.y (); QRect geometry = widget.geometry (); QRect frame = widget.frameGeometry (); return a.exec (); }
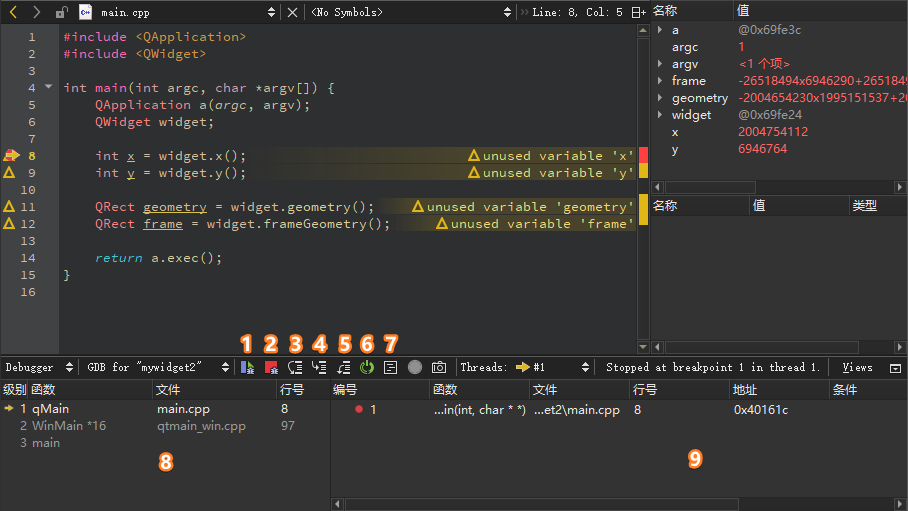
选中上面代码里的类或者函数名称,按下按键【F1】就可以查看到其对应的文档帮助信息,或者按下【F2】跳转到其源代码。单击鼠标右键在第
8 行设置断点,然后按下左下角【Start debugging of startup
project】按钮或者按下快捷键【F5】进入调试模式界面:
【继续执行
Continue 】:继续执行后面的代码,直至遇到下一个断点或者程序运行结束;
【停止调试
Stop 】:按下该按钮以后立即结束调试;
【单步跳过 Step
Over 】:执行本行代码,然后指向下一行代码。
【单步进入 Step
Into 】:进入当前调用函数的内部;
【单步跳出 Step
Out 】:当进入函数内部时,用于跳出该函数,通常与【单步进入】配合使用;
【重启调试会话
Restarts 】:重新启动当前的调试会话;
【显示对应汇编指令 】:可以继续进行单步调试;
【堆栈视图 】:显示从程序开始到断点位置,所有嵌套调用函数所在的源文件名称与行号。
【其他视图 】:可选择多种视图,例如:用于显示局部变量及其类型和数值的局部变量和表达式视图 (locals
and
Expressions);用来显示所有断点,并且添加或删除断点的断点视图 (Breakpoints);显示所有线程以及当前所在线程的线程视图(Threads);用于管理保存当前调试状态的快照视图 (Snapshots);
鼠标点击【单步进入 Step
Into 】按钮,或者按下【F11】快捷键,则堆栈视图中会显示geometry()函数在源代码当中的位置。接下来,单击【单步跳出
Step Out 】按钮回到主函数断点处,然后持续单击【单步跳过
Step
Over 】按钮单步执行程序,同时查看局部变量和表达式视图 中相应变量的变化情况。最后,当执行流程到达return a.exec()语句时,单击【停止调试
Stop 】按钮结束本次调试。
从上面变量监视器的动图当中可以观察到:x、y、geometry、frame这
4
个变量的初始值是一个随机数,调试完成以后x、y的值都为默认值0,而geometry = 640×480+0+0,frame = 639×479+0+0。这里造成x、y的值为0的原因是由于窗口没有能够显示。接下来在QWidget widget语句后面添加用于显示窗口的代码widget.show():
1 2 3 4 5 6 7 8 9 10 11 12 13 14 15 16 #include <QApplication> #include <QWidget> int main (int argc, char *argv[]) QApplication a (argc, argv) ; QWidget widget; widget.show (); int x = widget.x (); int y = widget.y (); QRect geometry = widget.geometry (); QRect frame = widget.frameGeometry (); return a.exec (); }
修改完成以后,再次进入调试模式,会发现窗口只会在任务栏显示了一个标题,此时继续单击【单步跳过
Step
Over 】。当程序运行到最后的return a.exec()语句时,再次单击【单步跳过
Step
Over 】以后,程序窗口终于得以完整呈显。出现这种现象的原因,是由于仅当程序进入主事件循环 以后才可以接收事件,而widget.show()函数会触发一个显示事件,所以上面代码只会在完成a.exe()函数的调用,并且进入主事件循环以后才能被正常显示。
Qt
程序调试过程当中,还可以使用qDebug()函数将调试信息直接输出至控制台,请观察下面的示例代码:
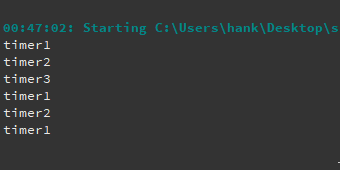
1 2 3 4 5 6 7 8 9 10 11 12 13 14 15 16 17 18 19 20 21 22 23 24 #include <QApplication> #include <QWidget> #include <QDebug> int main (int argc, char *argv[]) QApplication a (argc, argv) ; QWidget widget; widget.resize (400 , 300 ); widget.move (200 , 100 ); widget.show (); int x = widget.x (); qDebug ("x: %d" , x); int y = widget.y (); qDebug ("y: %d" , y); QRect geometry = widget.geometry (); QRect frame = widget.frameGeometry (); qDebug () << "geometry: " << geometry << "frame: " << frame; return a.exec (); }
上面代码分别采用了qDebug()函数的 2 种输出方法:
将字符串作为参数传递给qDebug()函数,这种方式不需要#include <QDebug>头文件,上面使用这种方法输出x和y的值;
以输出流的方式让qDebug()一次性输出多个值,必须 添加#include <QDebug>头文件,上面代码采用该方式输出geometry和frame的值;
1
2
3
4
5
10 :48 :33 : Starting D:\Workspace\build-mywidget2-Desktop_Qt_5_14_2_MinGW_32_bit-Debug\debug\mywidget2.exe ...x: 200 y : 100geometry : QRect (201,131 400x300 ) frame : QRect (200,100 402x332 )10:48:37: D :\Workspace \build -mywidget2 -Desktop_Qt_5_14_2_MinGW_32_bit -Debug \debug \mywidget2.exe exited with code 0
以输出流方式使用qDebug()时,还可以添加endl标识符让调试信息自动换行:
1 qDebug () << "geometry: " << geometry << endl << "frame: " << frame;
加入endl之后,geometry与frame将会分为两行进行显示:
1
2
geometry: QRect (201,131 400x300 ) frame : QRect (200,100 402x332 )
QDialog 对话框
本小节首先会讲述两种不同类型的对话框,然后分析一个由多窗口组成并且窗口间可以相互切换的程序,最后介绍
Qt 提供的几个标准对话框,并涉及信号和槽的初步知识。
模态与非模态
QDialog类是所有对话框 的基类,对话框通常用于与用户进行简单的交互。根据能否与程序其它窗口进行交互,可以将对话框分为模态 (Modal)和非模态 的(Modeless)两类。
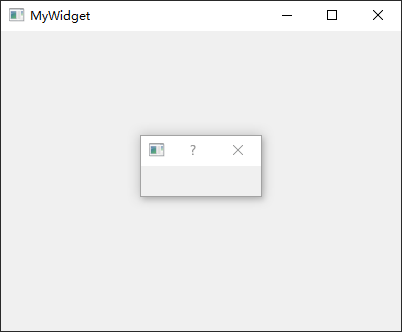
下面MyWidget类的构造函数当中,定义了一个QDialog类对象,并通过this参数指定其父窗口为MyWidget类对象,最后调用show()函数显示对话框。
1 2 3 4 5 6 7 8 9 10 11 12 13 14 #include "mywidget.h" #include "ui_mywidget.h" #include <QDialog> MyWidget::MyWidget (QWidget *parent) : QWidget (parent), ui (new Ui::MyWidget) { ui->setupUi (this ); QDialog dialog (this ) ; dialog.show (); } MyWidget::~MyWidget () { delete ui; }
上述程序运行之后,会发现对话框一闪而过,然后屏幕只显示MyWidget父窗口。这是由于
C++
函数中定义的变量,会在该函数执行完成后自动释放。因此,这里的dialog对象只会在该构造函数当中有效,该构造函数执行完成之后dialog就被自动销毁。避免这个问题,需要进行如下修改:
1 2 3 4 5 6 MyWidget::MyWidget (QWidget *parent) : QWidget (parent), ui (new Ui::MyWidget) { ui->setupUi (this ); QDialog *dialog = new QDialog (this ); dialog->show (); }
上面代码使用了dialog对象的指针,并采用运算符new开辟了内存空间,再次运行程序就可以正常显示。
事实上,不采用指针也可以正常显示对话框,继续对上面的示例代码进行修改:
1 2 3 4 5 6 MyWidget::MyWidget (QWidget *parent) : QWidget (parent), ui (new Ui::MyWidget) { ui->setupUi (this ); QDialog dialog (this ) ; dialog.exec (); }
再次运行程序,会发现首先弹出对话框,关闭之后才会再弹出MyWidget窗口,这种对话框就可以称为模态对话框 ,而之前的对话框则称为非模态对话框 。
模态对话框 :不能与程序中其它窗口进行交互,由对话框自身调用exec()函数产生;非模态对话框 :可以与程序内其它窗口交互,使用new操作符进行创建,然后调用show()函数显示;
事实上,show()函数也可以用于建立模态对话框,只需在其前面调用setModal(true)函数即可:
1 2 3 4 5 6 7 MyWidget::MyWidget (QWidget *parent) : QWidget (parent), ui (new Ui::MyWidget) { ui->setupUi (this ); QDialog *dialog = new QDialog (this ); dialog->setModal (true ); dialog->show (); }
观察程序的运行,虽然生成的对话框是模态的,但是与调用exec()函数时的效果有所不同。因为MyWidget窗口也同时被显示出来,这是由于show()调用完毕之后,函数会立即将控制权交给调用者,程序可以继续往下执行。然而在调用exec()函数的时候,只有当对话框被关闭时才会返回。
上面代码中的setModal()函数用于设置以模态还是非模态方式打开对话框,默认为false,即对话框的show()展示为非模态;将该属性置为true等于将QWidget::windowModality设置为Qt::ApplicationModal。
注意 :QWidget提供的setWindowModality()函数用于设置被模态部件阻塞的窗口,可以是Qt::NonModal(默认值,不阻塞任何窗口,即非模态)、Qt::WindowModal(阻塞其父窗口和所有祖先窗口以及子窗口)、Qt::ApplicationModal(阻塞当前应用程序的所有窗口)之一。
多窗口切换
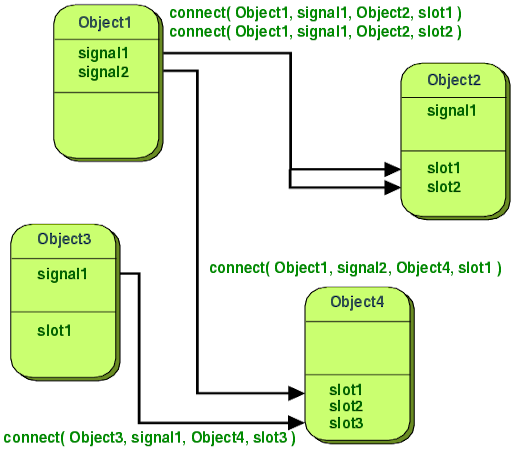
Qt
采用信号槽 机制来完成对象之间的通信,例如单击窗口上的按钮弹出对话框,那可以将该按钮的单击信号与槽中定义的对话框关联起来,单击按钮时就会发射信号,从而显示槽中定义的对话框。
1 2 3 4 5 6 7 8 9 10 11 12 #include "mywidget.h" #include <QApplication> int main (int argc, char *argv[]) QApplication a (argc, argv) ; MyWidget w; w.show (); return a.exec (); }
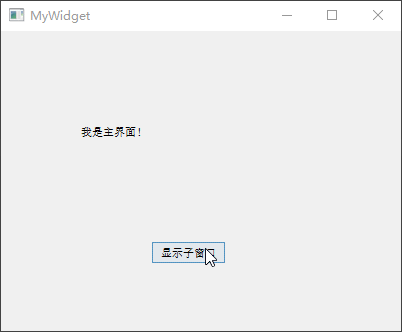
向mywidget.ui界面添加 1
个Label(修改显示的文本内容我是主界面!)和 1
个Push Button(将object Name修改为showChildButton,显示文本内容为显示子窗口),
1
2
3
4
5
6
7
8
9
10
11
12
13
14
15
16
17
18
19
20
21
22
23
24
25
26
27
28
29
30
31
32
33
34
35
36
37
38
39
40
41
42
43
44
45
46
<?xml version="1.0" encoding="UTF-8" ?> <ui version ="4.0" > <class > MyWidget</class > <widget class ="QWidget" name ="MyWidget" > <property name ="geometry" > <rect > <x > 0</x > <y > 0</y > <width > 400</width > <height > 300</height > </rect > </property > <property name ="windowTitle" > <string > MyWidget</string > </property > <widget class ="QPushButton" name ="showChildButton" > <property name ="geometry" > <rect > <x > 150</x > <y > 210</y > <width > 75</width > <height > 23</height > </rect > </property > <property name ="text" > <string > 显示子窗口</string > </property > </widget > <widget class ="QLabel" name ="label" > <property name ="geometry" > <rect > <x > 80</x > <y > 80</y > <width > 141</width > <height > 41</height > </rect > </property > <property name ="text" > <string > 我是主界面!</string > </property > </widget > </widget > <layoutdefault spacing ="6" margin ="11" /> <resources /> <connections /> </ui >
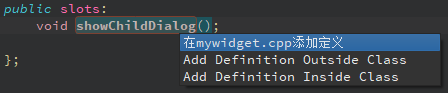
然后在mywidget.h文件的MyWidget类定义的最后,用slot关键字声明一个槽 :
1 2 3 4 5 6 7 8 9 10 11 12 13 14 15 16 17 18 19 20 21 22 23 24 25 #ifndef MYWIDGET_H #define MYWIDGET_H #include <QWidget> namespace Ui { class MyWidget ; } class MyWidget : public QWidget { Q_OBJECT public : explicit MyWidget (QWidget *parent = 0 ) ~MyWidget (); private : Ui::MyWidget *ui; public slots: void showChildDialog () }; #endif
鼠标选中showChildDialog()槽,按下快捷键【Alt +
Enter】或者鼠标右键菜单里选择【Refactor】,在下面的弹出菜单上选择【在
mywidget.cpp 添加定义】项:
此时,编辑器会自动跳转至mywidget.cpp源文件,并且自动创建
1
个showChildDialog()槽,手动向其中添加对话框显示相关的代码,同时修改MyWidget类:
1 2 3 4 5 6 7 8 9 10 11 12 13 14 15 16 17 18 19 20 #include "mywidget.h" #include "ui_mywidget.h" #include <QDialog> MyWidget::MyWidget (QWidget *parent) : QWidget (parent), ui (new Ui::MyWidget) { ui->setupUi (this ); connect (ui->showChildButton, &QPushButton::clicked, this , &MyWidget::showChildDialog); } MyWidget::~MyWidget () { delete ui; } void MyWidget::showChildDialog () QDialog *dialog = new QDialog (this ); dialog->show (); }
上面代码使用了connect()函数将按钮单击信号clicked()与新建的showChildDialog()槽关联在一起。clicked信号定义在QPushButton类当中,而connect()函数定义在QObject类当中,由于MyWidget类继承了QObject,所以可以直接进行使用。connect()函数的
4
个参数分别是发射信号的对象、发射的信号、接收信号的对象、接收信号的槽。运行程序,然后MyWidget主界面上的按钮,就会弹出一个dialog对话框。
上述信号与槽的关联方法称为手动关联 ,此外还有一种更为方便的自动关联 ,即将相关函数整合到槽 命名当中,例如上面例子中的showChildDialog()槽可以重命名为on_showChildButton_clicked(),这样通过on_发射信号的部件名称_信号名称格式的命名风格,就能够省略connect()关联函数,实现信号与槽的自动关联。
首先,选中上面代码里的showChildDialog()函数名称,鼠标右键依次选择弹出菜单上的【Refactor
-> Rename Symbol Under Cursor】或者直接按下【Ctrl + Shift +
R】快捷键,在出现的替换栏中输入on_showChildButton_clicked(),再单击【Replace】按钮即可,此时mywidget.cpp源文件和mywidget.h头文件中的函数名称都进行批量修改。
1 2 3 4 5 6 7 8 9 10 11 12 13 14 15 16 17 18 19 20 21 22 23 24 25 #ifndef MYWIDGET_H #define MYWIDGET_H #include <QWidget> namespace Ui { class MyWidget ; } class MyWidget : public QWidget { Q_OBJECT public : explicit MyWidget (QWidget *parent = 0 ) ~MyWidget (); private : Ui::MyWidget *ui; public slots: void on_showChildButton_clicked () }; #endif
然后,删除mywidget.cpp当中MyWidget类构造函数里的connect方法:
1 2 3 4 5 6 7 8 9 10 11 12 13 14 15 16 17 18 #include "mywidget.h" #include "ui_mywidget.h" #include <QDialog> MyWidget::MyWidget (QWidget *parent) : QWidget (parent), ui (new Ui::MyWidget) { ui->setupUi (this ); } MyWidget::~MyWidget () { delete ui; } void MyWidget::on_showChildButton_clicked () QDialog *dialog = new QDialog (this ); dialog->show (); }
程序运行效果与之前一致,Qt
设计器生成的槽就采用自动方式生成,但是对于不在 Qt
设计器中添加的界面部件,就还额外要在调用setupUi()函数前定义该部件,而且还要手动调用setObjectName()函数指定部件的对象名称,这样才能完成自动关联。日常开发里,通常会选用显式声明connect()的手动方式 。
接下来,再来定义一个带按钮的对话框,并在 Qt
设计器中进行信号 与槽 的关联,最终实现主界面与对话框的切换导航。
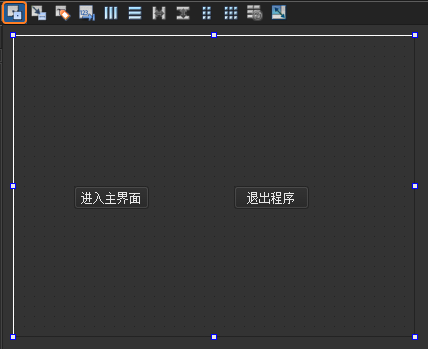
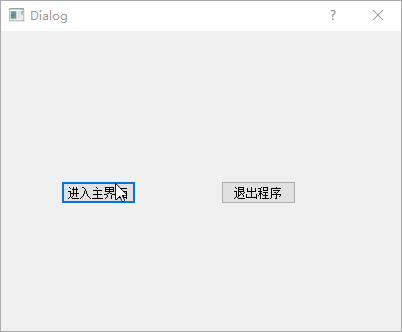
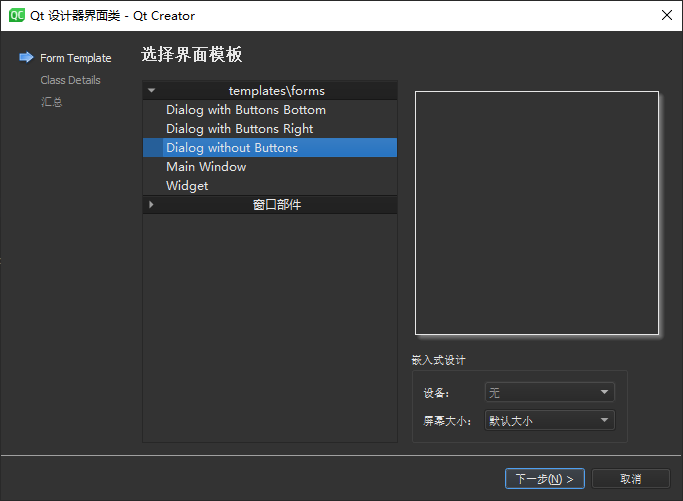
添加自定义对话框MyDialog ,基于前面的项目添加Qt
设计师界面类 ,界面模板选择Dialog without Buttons,类名称修改为MyDialog,然后向窗口拖入【进入主界面】和【退出程序】两个
Push Button 。
设计信号和槽 ,这里使用 Qt
设计器实现【退出程序】按钮的信号槽关联,单击 Qt Creator 顶部的【Edit
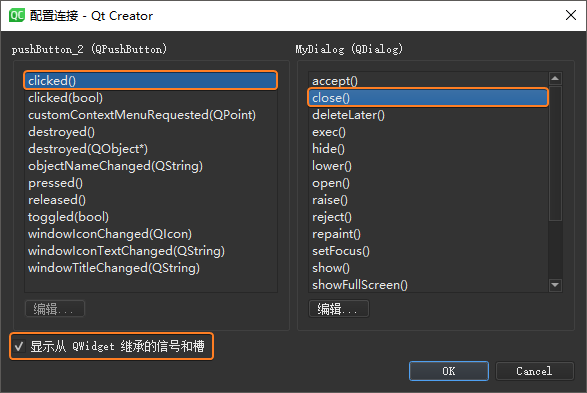
Signals/Slots】图标或是按下快捷键【F4】,进入了信号槽编辑模式,鼠标左键选中【退出程序】并且拖动到窗口界面,然后松开鼠标左键,此时会弹出【配置连接】对话框。
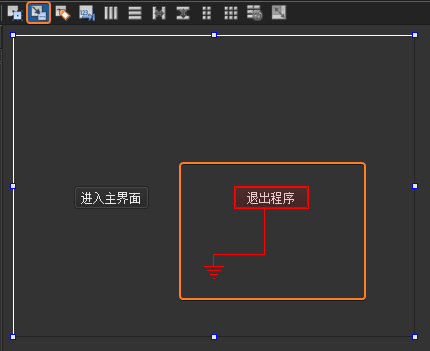
选中对话框底部的【显示从 QWidget
继承的信号和槽】,然后选中左侧QPushButton栏中的信号 clicked(),右侧QDialog栏中的槽 close(),完成后单击【OK】按钮(此处还可以单击【编辑】按钮添加自定义槽 ,但是这样还需要在MyDialog类中实现自定义槽)。这样【退出程序】按钮的单击信号 就与对话框内的关闭操作槽 关联起来,如果需要取消关联,只需在信号槽编辑模式下选中关联,按下【Delete】键,或者鼠标右键点击【删除】即可。
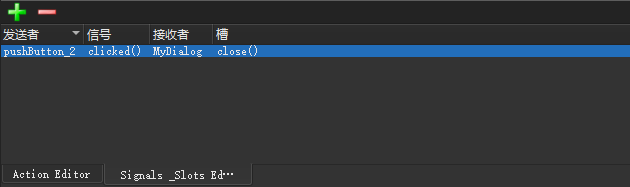
此时,Qt Creator
底部的【信号槽编辑器】就可以观察到当前设置好的关联。当然,也可以直接在【信号槽编辑器】当中去建立关联,这与上面通过鼠标选中部件进行关联的操作等效。
完成全部信号槽关联工作以后按下【F3】按键或者鼠标单击【Edit
Widgets】图标,回到部件编辑模式。紧接着关联【进入主界面】按钮的信号与槽,鼠标选择该按钮,选择右键菜单上的【转到槽...】,然后在弹出的对话框中选择clicked()信号,最后点击【OK】按钮。此时会自动切换到代码编辑模式,并且定位到自动生成的on_pushButton_clicked()槽:
1
2
3
void MyDialog::on_pushButton_clicked () accept (); }
上面代码中的accept()函数是QDialog类当中的 1
个槽,对于使用exec()函数实现的模态对话框,调用该槽 就会隐藏这个模态对话框,并返回QDialog::Accepted值用于判断当前按下的是哪个按钮;与之相对应,另一个reject()槽则可以返回QDialog::Rejected值,前面定义的【退出程序】按钮也可以关联到这个槽。接下来修改main.cpp源文件:
1 2 3 4 5 6 7 8 9 10 11 12 13 14 15 16 #include "mywidget.h" #include <QApplication> #include "mydialog.h" int main (int argc, char *argv[]) QApplication a (argc, argv) ; MyDialog dialog; if (dialog.exec () == QDialog::Accepted){ MyWidget w; w.show (); return a.exec (); } else return 0 ; }
上面代码在主函数当中建立了一个MyDialog对象,然后判断其exec()函数的返回值,如果当前按下【进入主界面】按钮,则返回值等于QDialog::Accepted,于是显示主界面并正常执行程序,如果不是则直接退出程序。进行到这里,代码已经可以从登录对话框进入主界面,再从主界面显示
1 个对话框。
接下来,实现从主界面重新进入登录界面的功能。双击mywidget.ui文件进入
Qt Creator 设计模式,向界面添加【重新登录】和【退出】两个 Push
button ,然后进入信号槽模式,将【退出】按钮的clicked()信号与MyWidget界面的close()槽关联。完成以后,再转到【重新登录】按钮的clicked()信号对应的槽,并进行如下修改:
1 2 3 4 5 6 7 8 9 10 11 12 13 14 15 16 17 18 19 20 21 22 23 24 #include "mywidget.h" #include "ui_mywidget.h" #include <QDialog> #include "mydialog.h" MyWidget::MyWidget (QWidget *parent) : QWidget (parent), ui (new Ui::MyWidget) { ui->setupUi (this ); } MyWidget::~MyWidget () { delete ui; } void MyWidget::on_showChildButton_clicked () QDialog *dialog = new QDialog (this ); dialog->show (); } void MyWidget::on_pushButton_clicked () close (); MyDialog dlg; if (dlg.exec () == QDialog::Accepted) show (); }
上述示例代码最终的运行效果如下面的动图所示:
标准对话框
Qt
为文件、字体、颜色的选择操作,提供了如下开箱即用的对话框小部件,它们全部继承自QDialog类:
对话框类
功能描述
QColorDialog用于指定颜色的对话框小部件;
QFileDialog允许用户选择文件或者目录的小部件;
QFontDialog用于选择字体的对话框小部件;
QInputDialog可供用户输入单个值的简单对话框;
QMessageBox通知用户或者询问用户并接收答案的模态对话框;
QProgressDialog用于对缓慢操作的进度进行反馈的对话框小部件;
通过将各种小部件组合到QDialog当中,就可以轻松的创建各种自定义对话框,下面这
2 个类可以用于构建自定义的对话框:
对话框类
功能描述
QDialog对话框窗口的基类;
QDialogButtonBox用于在一个适合当前小部件风格的布局里展现按钮小部件;
新建一个名为demo的 Qt Widgets
工程,基类选择QWidget,类名称修改为MyWidget,项目完整源代码如下所示:
demo.pro
1
2
3
4
5
6
7
8
9
10
11
12
13
14
QT += core gui greaterThan (QT_MAJOR_VERSION, 4 ): QT += widgetsTARGET = mydialog2 TEMPLATE = app SOURCES += main.cpp\ mywidget.cpp HEADERS += mywidget.h FORMS += mywidget.ui
main.cpp
1 2 3 4 5 6 7 8 9 10 11 #include "mywidget.h" #include <QApplication> int main (int argc, char *argv[]) QApplication a (argc, argv) ; MyWidget w; w.show (); return a.exec (); }
1 2 3 4 5 6 7 8 9 10 11 12 13 14 15 16 17 18 19 20 21 22 23 24 25 26 27 28 29 30 31 32 33 34 35 36 37 38 39 40 41 42 #ifndef MYWIDGET_H #define MYWIDGET_H #include <QWidget> #include <QWizard> class QErrorMessage ; namespace Ui { class MyWidget ; } class MyWidget : public QWidget { Q_OBJECT public : explicit MyWidget (QWidget *parent = 0 ) ~MyWidget (); private slots: void on_pushButton_1_clicked () void on_pushButton_2_clicked () void on_pushButton_3_clicked () void on_pushButton_4_clicked () void on_pushButton_5_clicked () void on_pushButton_6_clicked () void on_pushButton_7_clicked () void on_pushButton_8_clicked () private : Ui::MyWidget *ui; QErrorMessage *errordlg; QWizardPage *createPage1 () ; QWizardPage *createPage2 () ; QWizardPage *createPage3 () ; }; #endif
1 2 3 4 5 6 7 8 9 10 11 12 13 14 15 16 17 18 19 20 21 22 23 24 25 26 27 28 29 30 31 32 33 34 35 36 37 38 39 40 41 42 43 44 45 46 47 48 49 50 51 52 53 54 55 56 57 58 59 60 61 62 63 64 65 66 67 68 69 70 71 72 73 74 75 76 77 78 79 80 81 82 83 84 85 86 87 88 89 90 91 92 93 94 95 96 97 98 99 100 101 102 103 104 105 106 107 108 109 110 111 112 113 114 115 116 117 118 119 120 121 122 123 124 125 126 127 128 129 130 131 132 133 134 135 136 137 138 139 140 141 142 #include "mywidget.h" #include "ui_mywidget.h" #include <QDebug> #include <QColorDialog> #include <QFileDialog> #include <QFontDialog> #include <QInputDialog> #include <QMessageBox> #include <QProgressDialog> #include <QErrorMessage> MyWidget::MyWidget (QWidget *parent) : QWidget (parent), ui (new Ui::MyWidget) { ui->setupUi (this ); errordlg = new QErrorMessage (this ); } MyWidget::~MyWidget () { delete ui; } void MyWidget::on_pushButton_1_clicked () QColorDialog dialog (Qt::red, this ) ; dialog.setOption (QColorDialog::ShowAlphaChannel); dialog.exec (); QColor color = dialog.currentColor (); qDebug () << "color: " << color; } void MyWidget::on_pushButton_2_clicked () QStringList fileNames = QFileDialog::getOpenFileNames (this , tr ("文件对话框" ), "D:" , tr ("图片文件(*png *jpg)" )); qDebug ()<< "fileNames:" << fileNames; } void MyWidget::on_pushButton_3_clicked () bool ok; QFont font = QFontDialog::getFont (&ok, this ); if (ok) ui->pushButton_3->setFont (font); else qDebug () << tr ("没有选择字体!" ); } void MyWidget::on_pushButton_4_clicked () bool ok; QString string = QInputDialog::getText (this , tr ("输入字符串对话框" ), tr ("请输入用户名:" ), QLineEdit::Normal, tr ("admin" ), &ok); if (ok) qDebug () << "string:" << string; int value1 = QInputDialog::getInt (this , tr ("输入整数对话框" ), tr ("请输入-1000到1000之间的数值" ), 100 , -1000 , 1000 , 10 , &ok); if (ok) qDebug () << "value1:" << value1; double value2 = QInputDialog::getDouble (this , tr ("输入浮点数对话框" ), tr ("请输入-1000到1000之间的数值" ), 0.00 , -1000 , 1000 , 2 , &ok); if (ok) qDebug () << "value2:" << value2; QStringList items; items << tr ("条目1" ) << tr ("条目2" ); QString item = QInputDialog::getItem (this , tr ("输入条目对话框" ), tr ("请选择或输入一个条目" ), items, 0 , true , &ok); if (ok) qDebug () << "item:" << item; } void MyWidget::on_pushButton_5_clicked () int ret1 = QMessageBox::question (this , tr ("问题对话框" ), tr ("您访问过我的博客吗?" ), QMessageBox::Yes, QMessageBox::No); if (ret1 == QMessageBox::Yes) qDebug () << tr ("问题!" ); int ret2 = QMessageBox::information (this , tr ("提示对话框" ), tr ("这是我的博客地址:https://uinika.gitee.io/" ), QMessageBox::Ok); if (ret2 == QMessageBox::Ok) qDebug () << tr ("提示!" ); int ret3 = QMessageBox::warning (this , tr ("警告对话框" ), tr ("系统运行警告信息!" ), QMessageBox::Abort); if (ret3 == QMessageBox::Abort) qDebug () << tr ("警告!" ); int ret4 = QMessageBox::critical (this , tr ("危险错误对话框" ), tr ("系统运行出现危险错误!" ), QMessageBox::YesAll); if (ret4 == QMessageBox::YesAll) qDebug () << tr ("危险错误" ); QMessageBox::about (this , tr ("关于对话框" ), tr ("关于我的博客:https://uinika.github.io/" )); } void MyWidget::on_pushButton_6_clicked () QProgressDialog dialog (tr("文件复制进度" ), tr("取消" ), 0 , 50000 , this ) ; dialog.setWindowTitle (tr ("进度对话框" )); dialog.setWindowModality (Qt::WindowModal); dialog.show (); for (int i=0 ; i<50000 ; i++) { dialog.setValue (i); QCoreApplication::processEvents (); if (dialog.wasCanceled ()) break ; } dialog.setValue (50000 ); qDebug () << tr ("复制结束!" ); } void MyWidget::on_pushButton_7_clicked () errordlg->setWindowTitle (tr ("错误信息对话框" )); errordlg->showMessage (tr ("这里是出错信息!" )); } QWizardPage * MyWidget::createPage1 () { QWizardPage *page = new QWizardPage; page->setTitle (tr ("介绍" )); return page; } QWizardPage * MyWidget::createPage2 () { QWizardPage *page = new QWizardPage; page->setTitle (tr ("用户选择信息" )); return page; } QWizardPage * MyWidget::createPage3 () { QWizardPage *page = new QWizardPage; page->setTitle (tr ("结束" )); return page; } void MyWidget::on_pushButton_8_clicked () QWizard wizard (this ) ; wizard.setWindowTitle (tr ("向导对话框" )); wizard.addPage (createPage1 ()); wizard.addPage (createPage2 ()); wizard.addPage (createPage3 ()); wizard.exec (); }
1
2
3
4
5
6
7
8
9
10
11
12
13
14
15
16
17
18
19
20
21
22
23
24
25
26
27
28
29
30
31
32
33
34
35
36
37
38
39
40
41
42
43
44
45
46
47
48
49
50
51
52
53
54
55
56
57
58
59
60
61
62
63
64
65
66
67
68
69
70
71
72
73
74
75
76
77
78
79
80
81
82
83
84
85
86
87
88
89
90
91
92
93
94
95
96
97
98
99
100
101
102
103
104
105
106
107
108
109
110
111
112
113
114
115
116
117
118
119
120
121
122
123
124
<?xml version="1.0" encoding="UTF-8" ?> <ui version ="4.0" > <class > MyWidget</class > <widget class ="QWidget" name ="MyWidget" > <property name ="geometry" > <rect > <x > 0</x > <y > 0</y > <width > 400</width > <height > 300</height > </rect > </property > <property name ="windowTitle" > <string > MyWidget</string > </property > <widget class ="QPushButton" name ="pushButton_1" > <property name ="geometry" > <rect > <x > 60</x > <y > 40</y > <width > 75</width > <height > 23</height > </rect > </property > <property name ="text" > <string > 颜色对话框</string > </property > </widget > <widget class ="QPushButton" name ="pushButton_2" > <property name ="geometry" > <rect > <x > 240</x > <y > 40</y > <width > 75</width > <height > 23</height > </rect > </property > <property name ="text" > <string > 文件对话框</string > </property > </widget > <widget class ="QPushButton" name ="pushButton_3" > <property name ="geometry" > <rect > <x > 60</x > <y > 90</y > <width > 75</width > <height > 23</height > </rect > </property > <property name ="text" > <string > 字体对话框</string > </property > </widget > <widget class ="QPushButton" name ="pushButton_4" > <property name ="geometry" > <rect > <x > 240</x > <y > 90</y > <width > 75</width > <height > 23</height > </rect > </property > <property name ="text" > <string > 输入对话框</string > </property > </widget > <widget class ="QPushButton" name ="pushButton_5" > <property name ="geometry" > <rect > <x > 60</x > <y > 140</y > <width > 75</width > <height > 23</height > </rect > </property > <property name ="text" > <string > 消息对话框</string > </property > </widget > <widget class ="QPushButton" name ="pushButton_6" > <property name ="geometry" > <rect > <x > 240</x > <y > 140</y > <width > 75</width > <height > 23</height > </rect > </property > <property name ="text" > <string > 进度对话框</string > </property > </widget > <widget class ="QPushButton" name ="pushButton_7" > <property name ="geometry" > <rect > <x > 60</x > <y > 190</y > <width > 101</width > <height > 23</height > </rect > </property > <property name ="text" > <string > 错误信息对话框</string > </property > </widget > <widget class ="QPushButton" name ="pushButton_8" > <property name ="geometry" > <rect > <x > 240</x > <y > 190</y > <width > 91</width > <height > 23</height > </rect > </property > <property name ="text" > <string > 向导对话框</string > </property > </widget > </widget > <layoutdefault spacing ="6" margin ="11" /> <resources /> <connections /> </ui >
QFrame 边框
QFrame类是带边框小部件的基类,其子类包括常用的标签部件QLabel、QLCDNumber、QSplitter、QStackedWidget、QToolBox、QAbstractScrollArea类(所有带滚动区域部件的抽象基类)。注意
Qt
中凡是带有Abstract字样的类都是抽象类,抽象类不能直接使用,只能用于继承并实现自定义类,或是直接使用其子类。
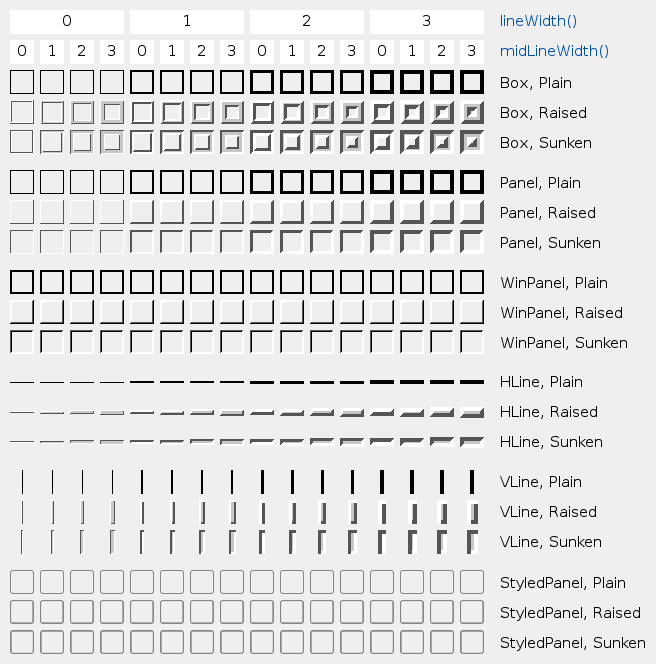
带边框小部件最明显的特征是拥有一个明显的边界框架,而QFrame类的主要功能就是用来实现不同的边框效果,这些边框主要由的形状 (QFrame::Shape)和阴影 (QFrame::Shadow)组合形成。
QFrame::Shape 枚举常量
值
功能描述
QFrame::NoFrame0QFrame不进行绘制;
QFrame::Box0x0001QFrame围绕其内容绘制一个边框;
QFrame::Panel0x0002QFrame绘制一个使内容显示为凸起或凹陷的面板;
QFrame::StyledPanel0x0006绘制一个矩形面板,其外观取决于当前的 GUI
样式,即可以是凸起也可以是凹陷;
QFrame::HLine0x0004绘制一条没有框架的水平线(可用作分隔符);
QFrame::VLine0x0005绘制一条没有框架的垂直线(可用作分隔符);
QFrame::WinPanel0x0003绘制类似于 Windows 2000 上的矩形面板,可以凸起或者凹陷;
QFrame::Shadow 枚举常量
值
功能描述
QFrame::Plain0x0010框架和内容与周围环境齐平,使用调色板QPalette::WindowText绘制颜色(没有任何
3D 效果);
QFrame::Raised0x0020框架和内容发生凸起(使用当前颜色组 的明暗色绘制 3D
凸起线);
QFrame::Sunken0x0030框架和内容发生凹陷(使用当前颜色组 的明暗色绘制 3D
凹下线);
上述QFrame枚举值合成的全部边框效果如下图所示:
注意 :lineWidth是边框边界线的宽度;而midLineWidth是在边框中额外插入一条线的宽度,从而形成
3D
效果,并且只在Box、HLine、VLine表现为凸起或者凹陷时有效。
接下来,编写程序演示具体效果。新建名称为myframe工程,选择QWidget为基类,类名设置为MyWidget。完成以后打开mywidget.ui文件。然后,打开
Qt Creator 设计器从左侧部件列表拖入 1
个Frame到工作区,然后在右下方属性栏将其frameShape更改为Box、frameshadow修改为Sunken、lineWidth设置为5,midLineWidth设置为10。这里设置的小部件属性,也可以在mywidget.cpp的构造函数MyWidget()里用代码进行实现:
1 2 3 4 5 6 7 8 9 10 11 12 13 #include "mywidget.h" #include "ui_mywidget.h" MyWidget::MyWidget (QWidget *parent) : QWidget (parent), ui (new Ui::MyWidget) { ui->setupUi (this ); ui->frame->setFrameShape (QFrame::Box); ui->frame->setFrameShadow (QFrame::Sunken); ui->frame->setLineWidth (5 ); ui->frame->setMidLineWidth (10 ); }
注意 :在 Qt Creator
设计器的属性栏当中设置的属性,在.cpp代码当中都会对应的方法进行相同的设置。
QLabel
小部件QLabel用于显示文本或者图片,打开 Qt Creator
设计器,向工作区拖入 1
个Label小部件,然后拉伸其长宽度,并在右侧属性栏中设置其alignment对齐属性,【水平的】栏目改为Align HCenter,【垂直的】栏目改为Align VCenter,从而让QLabel里的文本居中显示,然后通过修改mywidget.cpp的构造函数将font属性设置为18像素的加粗倾斜Consolas字体:
1 2 3 4 5 6 7 8 9 10 11 12 13 #include "mywidget.h" #include "ui_mywidget.h" MyWidget::MyWidget (QWidget *parent) : QWidget (parent), ui (new Ui::MyWidget) { ui->setupUi (this ); QFont font; font.setFamily ("Consolas" ); font.setPointSize (14 ); font.setBold (true ); font.setItalic (true ); ui->label->setFont (font); }
Qt Creator
设计器右下角的【QLabel】属性栏里的【wordWrap】可以实现文本的自动换行,如果不想换行而是让其自动省略,则可以选择用于计算给定字体字符串大小的QFontMetrics类,该类即可以通过创建对象的方式使用,也可以通过调用QWidget::fontMetrics()函数返回当前小部件字体的QFontMetrics对象。该对象下的elidedText()函数用于进行文本省略操作,其第
1 个参数用于指定待省略的文本、第 2
个参数指定省略号...出现的位置(Qt:ElideLeft文本开头、Qt::ElideMiddle文本中间、Qt::Elideright文本末尾)、第
3
个参数为以像素为单位的文本长度,超过该值即进行省略。继续在mywidget.cpp的构造函数当中添加如下代码:
1 2 3 4 5 6 7 8 9 10 #include "mywidget.h" #include "ui_mywidget.h" MyWidget::MyWidget (QWidget *parent) : QWidget (parent), ui (new Ui::MyWidget) { ui->setupUi (this ); QString string = tr ("标题太长,需要进行省略!" ); QString str = ui->label2->fontMetrics ().elidedText (string, Qt::ElideRight, 80 ); ui->label2->setText (str); }
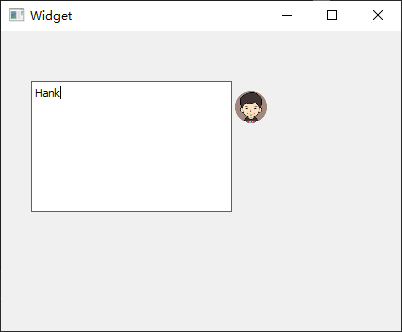
勾选 Qt Creator
设计器右下角【QLabel】属性栏里的【scaledContents】可以根据标签尺寸缩放其中的内容,然后向mywidget.cpp添加#include <QPixmap>头文件,并往构造函数添加如下代码:
1 2 3 4 5 6 7 8 9 #include "mywidget.h" #include "ui_mywidget.h" #include <QPixmap> MyWidget::MyWidget (QWidget *parent) : QWidget (parent), ui (new Ui::MyWidget) { ui->setupUi (this ); ui->label3->setPixmap (QPixmap ("../avatar.png" )); }
QLabel里还可以显示 GIF
动态图片,往mywidget.cpp中添加头文件#include <QMovie>,然后向其构造函数添加下面代码:
1 2 3 4 5 6 7 8 9 10 11 #include "mywidget.h" #include "ui_mywidget.h" #include <QMovie> MyWidget::MyWidget (QWidget *parent) : QWidget (parent), ui (new Ui::MyWidget) { ui->setupUi (this ); QMovie *movie = new QMovie ("../animation.gif" ); ui->label4->setMovie (movie); movie->start (); }
注意 :上述实验需要首先将图片avatar.png和animation.gi添加至当前工程的上一层目录。
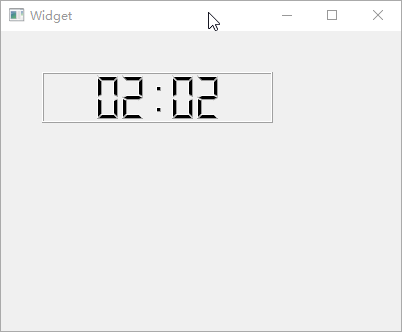
QLCDNumber
QLCDNumber小部件可用于实现类似 LED 数码管的显示效果,从
Qt Creator 设计器部件栏中拖入 1 个【LCD
Number】部件到工作区,然后更改其属性。选中【smallDecimalPoint】项以显示小数点;【digitCount】项的作用是设置显示的数字个数,这里设置为8以显示
8
个数字;【mode】选择Dec以显示十进制数值;【segmentStyle】用于将数值的显示样式设置为Filled;最后,用【value】将需要显示的数值设置为2020.51。
QStackedWidget类提供了一个拥有多张页面的部件栈,每个页面都可以拥有自己的小部件,但是每次只能显示
1
张页面。需要与QComboBox或者QListWidget搭配使用以选择指定页面。
从 Qt Creator 设计器部件栏中分别拖入 1 个【List Widget】和【Stacked
Widget】小部件,鼠标右键点击【List
Widget】,在弹出菜单中选择【编辑项目】,然后在弹出的【编辑列表窗口部件】对话框中点击左下角【+】添加
2
项,并且分别命名为第一页和第二页。接下来,向【Stacked
Widget】拖入 1
个Label,更改文本为第一页。再单击Stacked Widget小部件右上角的小箭头进入下一页,再拖入一个标签并更改文本为第二页。然后,再将【Stacked
Widget】部件的【frameShape】属性更改为StyledPanel。
最后,点击工作区顶部的【Edit
Signals/Slots】按钮进入信号槽设计模式 ,将listWidget部件的currentChanged()信号与stackedWidget的setCurrentIndex()槽进行关联,设置完成以后,就可以通过单击listWidget中的项目来选择stackedWidget里的页面。
QToolBox类提供了一列带有选项卡的部件,类似于 Skype
好友菜单的效果。从 Qt Creator 设计器部件栏中拖入 1 个【Tool
Box】至工作区,鼠标选中小部件并点击右键菜单上的【插入页 →
在当前页之后】插入一个新的页,然后修改其【frame Shape】属性为
Box,并分别将各页标签对应的【currentItemText】修改为好友、黑名单、陌生人。
本节完整示例
本节所有示例的运行效果以及源代码分别如下面所示:
myframe.pro
1
2
3
4
5
6
7
8
9
10
11
12
13
14
15
16
17
18
QT += core gui greaterThan(QT_MAJOR_VERSION, 4 ): QT += widgets TARGET = demo TEMPLATE = app SOURCES += main.cpp\ mywidget.cpp HEADERS += mywidget.h FORMS += mywidget.ui DISTFILES += \ animation.gif \ avatar.png
1 2 3 4 5 6 7 8 9 10 11 12 13 14 15 16 17 18 19 20 21 #ifndef MYWIDGET_H #define MYWIDGET_H #include <QWidget> namespace Ui { class MyWidget ; } class MyWidget : public QWidget { Q_OBJECT public : explicit MyWidget (QWidget *parent = 0 ) ~MyWidget (); private : Ui::MyWidget *ui; }; #endif
1 2 3 4 5 6 7 8 9 10 11 12 13 14 15 16 17 18 19 20 21 22 23 24 25 26 27 28 29 30 31 32 33 34 35 36 37 38 39 #include "mywidget.h" #include "ui_mywidget.h" #include <QPixmap> #include <QMovie> MyWidget::MyWidget (QWidget *parent) : QWidget (parent), ui (new Ui::MyWidget) { ui->setupUi (this ); ui->frame->setFrameShape (QFrame::Box); ui->frame->setFrameShadow (QFrame::Sunken); ui->frame->setLineWidth (5 ); ui->frame->setMidLineWidth (10 ); QFont font; font.setFamily ("Consolas" ); font.setPointSize (18 ); font.setBold (true ); font.setItalic (true ); ui->label1->setFont (font); QString string = tr ("标题太长,需要进行省略!" ); QString str = ui->label2->fontMetrics ().elidedText (string, Qt::ElideRight, 80 ); ui->label2->setText (str); ui->label3->setPixmap (QPixmap ("../avatar.png" )); QMovie *movie = new QMovie ("../animation.gif" ); ui->label4->setMovie (movie); movie->start (); } MyWidget::~MyWidget () { delete ui; }
1
2
3
4
5
6
7
8
9
10
11
12
13
14
15
16
17
18
19
20
21
22
23
24
25
26
27
28
29
30
31
32
33
34
35
36
37
38
39
40
41
42
43
44
45
46
47
48
49
50
51
52
53
54
55
56
57
58
59
60
61
62
63
64
65
66
67
68
69
70
71
72
73
74
75
76
77
78
79
80
81
82
83
84
85
86
87
88
89
90
91
92
93
94
95
96
97
98
99
100
101
102
103
104
105
106
107
108
109
110
111
112
113
114
115
116
117
118
119
120
121
122
123
124
125
126
127
128
129
130
131
132
133
134
135
136
137
138
139
140
141
142
143
144
145
146
147
148
149
150
151
152
153
154
155
156
157
158
159
160
161
162
163
164
165
166
167
168
169
170
171
172
173
174
175
176
177
178
179
180
181
182
183
184
185
186
187
188
189
190
191
192
193
194
195
196
197
198
199
200
201
202
203
204
205
206
207
208
209
210
211
212
213
214
215
216
217
218
219
220
221
222
223
224
225
226
227
228
229
230
231
232
233
234
235
236
237
238
239
240
241
242
243
244
245
246
247
248
249
250
251
252
253
254
255
256
257
258
259
260
261
262
263
264
265
266
267
268
269
<?xml version="1.0" encoding="UTF-8" ?> <ui version ="4.0" > <class > MyWidget</class > <widget class ="QWidget" name ="MyWidget" > <property name ="geometry" > <rect > <x > 0</x > <y > 0</y > <width > 927</width > <height > 334</height > </rect > </property > <property name ="windowTitle" > <string > MyWidget</string > </property > <widget class ="QFrame" name ="frame" > <property name ="geometry" > <rect > <x > 40</x > <y > 30</y > <width > 120</width > <height > 80</height > </rect > </property > <property name ="frameShape" > <enum > QFrame::StyledPanel</enum > </property > <property name ="frameShadow" > <enum > QFrame::Raised</enum > </property > </widget > <widget class ="QLCDNumber" name ="lcdNumber" > <property name ="geometry" > <rect > <x > 650</x > <y > 40</y > <width > 191</width > <height > 51</height > </rect > </property > <property name ="smallDecimalPoint" > <bool > true</bool > </property > <property name ="digitCount" > <number > 10</number > </property > <property name ="segmentStyle" > <enum > QLCDNumber::Filled</enum > </property > <property name ="value" stdset ="0" > <double > 2020.509999999999991</double > </property > </widget > <widget class ="QListWidget" name ="listWidget" > <property name ="geometry" > <rect > <x > 240</x > <y > 190</y > <width > 81</width > <height > 101</height > </rect > </property > <item > <property name ="text" > <string > 第一页</string > </property > </item > <item > <property name ="text" > <string > 第二页</string > </property > </item > </widget > <widget class ="QStackedWidget" name ="stackedWidget" > <property name ="geometry" > <rect > <x > 330</x > <y > 190</y > <width > 141</width > <height > 101</height > </rect > </property > <property name ="frameShape" > <enum > QFrame::StyledPanel</enum > </property > <property name ="currentIndex" > <number > 1</number > </property > <widget class ="QWidget" name ="page" > <widget class ="QLabel" name ="label_2" > <property name ="geometry" > <rect > <x > 40</x > <y > 50</y > <width > 54</width > <height > 12</height > </rect > </property > <property name ="text" > <string > 第一页</string > </property > </widget > </widget > <widget class ="QWidget" name ="page_2" > <widget class ="QLabel" name ="label_3" > <property name ="geometry" > <rect > <x > 40</x > <y > 50</y > <width > 54</width > <height > 12</height > </rect > </property > <property name ="text" > <string > 第二页</string > </property > </widget > </widget > </widget > <widget class ="QToolBox" name ="toolBox" > <property name ="geometry" > <rect > <x > 60</x > <y > 180</y > <width > 69</width > <height > 101</height > </rect > </property > <property name ="frameShape" > <enum > QFrame::Box</enum > </property > <property name ="currentIndex" > <number > 1</number > </property > <widget class ="QWidget" name ="page_3" > <property name ="geometry" > <rect > <x > 0</x > <y > 0</y > <width > 67</width > <height > 20</height > </rect > </property > <attribute name ="label" > <string > 好友</string > </attribute > </widget > <widget class ="QWidget" name ="page_5" > <property name ="geometry" > <rect > <x > 0</x > <y > 0</y > <width > 67</width > <height > 20</height > </rect > </property > <attribute name ="label" > <string > 黑名单</string > </attribute > </widget > <widget class ="QWidget" name ="page_4" > <property name ="geometry" > <rect > <x > 0</x > <y > 0</y > <width > 67</width > <height > 20</height > </rect > </property > <attribute name ="label" > <string > 陌生人</string > </attribute > </widget > </widget > <widget class ="QLabel" name ="label2" > <property name ="geometry" > <rect > <x > 280</x > <y > 60</y > <width > 71</width > <height > 31</height > </rect > </property > <property name ="text" > <string > 省略标题</string > </property > <property name ="alignment" > <set > Qt::AlignCenter</set > </property > </widget > <widget class ="QLabel" name ="label3" > <property name ="geometry" > <rect > <x > 420</x > <y > 20</y > <width > 118</width > <height > 122</height > </rect > </property > <property name ="text" > <string > Avatar</string > </property > <property name ="scaledContents" > <bool > true</bool > </property > <property name ="alignment" > <set > Qt::AlignCenter</set > </property > </widget > <widget class ="QLabel" name ="label4" > <property name ="geometry" > <rect > <x > 590</x > <y > 110</y > <width > 320</width > <height > 200</height > </rect > </property > <property name ="text" > <string > GIF</string > </property > <property name ="alignment" > <set > Qt::AlignCenter</set > </property > </widget > <widget class ="QLabel" name ="label1" > <property name ="geometry" > <rect > <x > 170</x > <y > 30</y > <width > 111</width > <height > 91</height > </rect > </property > <property name ="text" > <string > Hank</string > </property > <property name ="scaledContents" > <bool > true</bool > </property > <property name ="alignment" > <set > Qt::AlignCenter</set > </property > <property name ="wordWrap" > <bool > false</bool > </property > </widget > </widget > <layoutdefault spacing ="6" margin ="11" /> <resources /> <connections > <connection > <sender > listWidget</sender > <signal > currentRowChanged(int)</signal > <receiver > stackedWidget</receiver > <slot > setCurrentIndex(int)</slot > <hints > <hint type ="sourcelabel" > <x > 193</x > <y > 142</y > </hint > <hint type ="destinationlabel" > <x > 264</x > <y > 146</y > </hint > </hints > </connection > </connections > </ui >
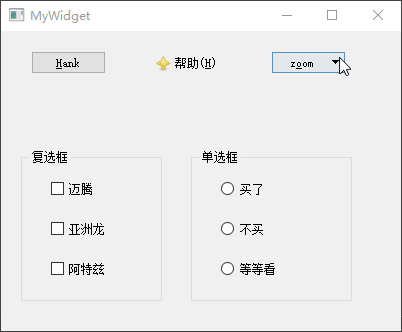
QAbstractButton是按钮小部件的抽象基类,提供了按钮的通用功能,其子类包括标准按钮QPushButton、单选框按钮QRadioButton、复选框QCheckBox、工具按钮QToolButton。新建mybutton工程,选择QWidget为基类,类名设置为MyWidget。然后在工程目录下新建images文件夹,并放入
2 张示例用的图标。
首先,放置QPushButton按钮,打开工程里的mywidget.ui文件,放置
3 个【Push
Button】到设计器工作区,然后将其【objectName】依次修改为pushBtn1、pushBtn2、pushBtn3。选中pushBtn1的checkable属性,使其拥有选中 和未选中
2
种状态;再选中pushBtn2的flat属性,使其不显示该按钮的边框;再鼠标选中pushBtn1右键点击【转到槽】进入其toggled(bool)信号的槽,添加qDebug()控制台打印信息。
然后,放置单选框按钮QRadioButton和复选框QCheckBox,将它们放置到
2 个【Group
Box】内进行管理,并将其标题分别修改为复选框和单选框。然后向复选框中拖入迈腾、亚洲龙、阿特兹3
个【Check
Box】;再向单选框拖入买了、不买、等等看
3 个【Radio Button】;这里还可以选中【Check
Box】的tristate属性,使其拥有不改变、选中、未选中
3 种状态。
最后,如果需要处理按钮选择以后的操作,则可以关联其stateChanged(int)信号到自定义槽;除此之外,还可以使用isChecked()函数查看按钮是否被选中;除了QGroupBox类之外,QButtonGroup类也可以用于管理多个按钮。
1
2
3
4
5
6
7
8
9
10
11
12
13
14
QT += core gui greaterThan(QT_MAJOR_VERSION, 4 ): QT += widgets TARGET = mybutton TEMPLATE = app SOURCES += main.cpp\ mywidget.cpp HEADERS += mywidget.h FORMS += mywidget.ui
main.cpp
1 2 3 4 5 6 7 8 9 10 #include "mywidget.h" #include <QApplication> int main (int argc, char *argv[]) QApplication a (argc, argv) ; MyWidget w; w.show (); return a.exec (); }
1 2 3 4 5 6 7 8 9 10 11 12 13 14 15 16 17 18 19 20 21 22 23 24 25 26 #ifndef MYWIDGET_H #define MYWIDGET_H #include <QWidget> namespace Ui { class MyWidget ; } class MyWidget : public QWidget { Q_OBJECT public : explicit MyWidget (QWidget *parent = 0 ) ~MyWidget (); private slots: void on_pushBtn1_toggled (bool checked) void on_checkBox_stateChanged (int arg1) private : Ui::MyWidget *ui; }; #endif
1 2 3 4 5 6 7 8 9 10 11 12 13 14 15 16 17 18 19 20 21 22 23 24 #include "mywidget.h" #include "ui_mywidget.h" #include <QDebug> #include <QMenu> MyWidget::MyWidget (QWidget *parent) : QWidget (parent), ui (new Ui::MyWidget) { ui->setupUi (this ); ui->pushBtn1->setText (tr ("&Hank" )); ui->pushBtn2->setText (tr ("帮助(&H)" )); ui->pushBtn2->setIcon (QIcon ("../mybutton/images/help.png" )); ui->pushBtn3->setText (tr ("z&oom" )); QMenu *menu = new QMenu (this ); menu->addAction (QIcon ("../mybutton/images/zoom-in.png" ), tr ("放大" )); ui->pushBtn3->setMenu (menu); } MyWidget::~MyWidget () { delete ui; } void MyWidget::on_pushBtn1_toggled (bool checked) qDebug () << tr ("按钮是否按下:" ) << checked; }
1
2
3
4
5
6
7
8
9
10
11
12
13
14
15
16
17
18
19
20
21
22
23
24
25
26
27
28
29
30
31
32
33
34
35
36
37
38
39
40
41
42
43
44
45
46
47
48
49
50
51
52
53
54
55
56
57
58
59
60
61
62
63
64
65
66
67
68
69
70
71
72
73
74
75
76
77
78
79
80
81
82
83
84
85
86
87
88
89
90
91
92
93
94
95
96
97
98
99
100
101
102
103
104
105
106
107
108
109
110
111
112
113
114
115
116
117
118
119
120
121
122
123
124
125
126
127
128
129
130
131
132
133
134
135
136
137
138
139
140
141
142
143
144
145
146
147
148
149
150
151
152
153
154
155
156
157
158
159
160
161
162
163
164
165
166
167
168
169
170
171
172
<?xml version="1.0" encoding="UTF-8" ?> <ui version ="4.0" > <class > MyWidget</class > <widget class ="QWidget" name ="MyWidget" > <property name ="geometry" > <rect > <x > 0</x > <y > 0</y > <width > 400</width > <height > 300</height > </rect > </property > <property name ="windowTitle" > <string > MyWidget</string > </property > <widget class ="QPushButton" name ="pushBtn1" > <property name ="geometry" > <rect > <x > 30</x > <y > 20</y > <width > 75</width > <height > 23</height > </rect > </property > <property name ="text" > <string > PushButton</string > </property > <property name ="checkable" > <bool > true</bool > </property > </widget > <widget class ="QPushButton" name ="pushBtn2" > <property name ="geometry" > <rect > <x > 150</x > <y > 20</y > <width > 75</width > <height > 23</height > </rect > </property > <property name ="text" > <string > PushButton</string > </property > <property name ="flat" > <bool > true</bool > </property > </widget > <widget class ="QPushButton" name ="pushBtn3" > <property name ="geometry" > <rect > <x > 270</x > <y > 20</y > <width > 75</width > <height > 23</height > </rect > </property > <property name ="text" > <string > PushButton</string > </property > </widget > <widget class ="QGroupBox" name ="groupBox" > <property name ="geometry" > <rect > <x > 20</x > <y > 120</y > <width > 141</width > <height > 151</height > </rect > </property > <property name ="title" > <string > 复选框</string > </property > <widget class ="QCheckBox" name ="checkBox" > <property name ="geometry" > <rect > <x > 30</x > <y > 30</y > <width > 71</width > <height > 16</height > </rect > </property > <property name ="text" > <string > 迈腾</string > </property > <property name ="tristate" > <bool > true</bool > </property > </widget > <widget class ="QCheckBox" name ="checkBox_2" > <property name ="geometry" > <rect > <x > 30</x > <y > 70</y > <width > 71</width > <height > 16</height > </rect > </property > <property name ="text" > <string > 亚洲龙</string > </property > </widget > <widget class ="QCheckBox" name ="checkBox_3" > <property name ="geometry" > <rect > <x > 30</x > <y > 110</y > <width > 71</width > <height > 16</height > </rect > </property > <property name ="text" > <string > 阿特兹</string > </property > </widget > </widget > <widget class ="QGroupBox" name ="groupBox_2" > <property name ="geometry" > <rect > <x > 190</x > <y > 120</y > <width > 161</width > <height > 151</height > </rect > </property > <property name ="title" > <string > 单选框</string > </property > <widget class ="QRadioButton" name ="radioButton" > <property name ="geometry" > <rect > <x > 30</x > <y > 30</y > <width > 89</width > <height > 16</height > </rect > </property > <property name ="text" > <string > 买了</string > </property > </widget > <widget class ="QRadioButton" name ="radioButton_2" > <property name ="geometry" > <rect > <x > 30</x > <y > 70</y > <width > 89</width > <height > 16</height > </rect > </property > <property name ="text" > <string > 不买</string > </property > </widget > <widget class ="QRadioButton" name ="radioButton_3" > <property name ="geometry" > <rect > <x > 30</x > <y > 110</y > <width > 89</width > <height > 16</height > </rect > </property > <property name ="text" > <string > 等等看</string > </property > </widget > </widget > </widget > <layoutdefault spacing ="6" margin ="11" /> <resources /> <connections /> </ui >
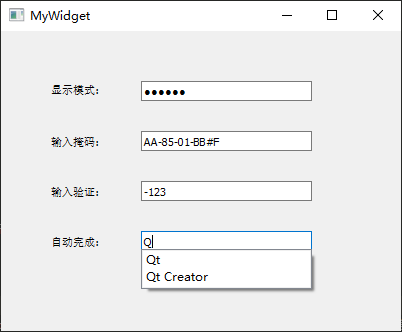
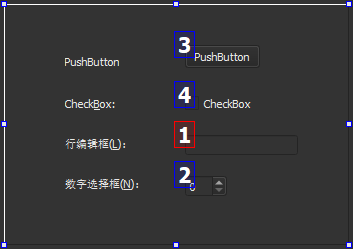
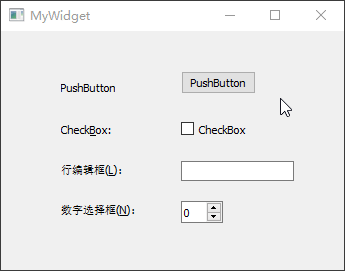
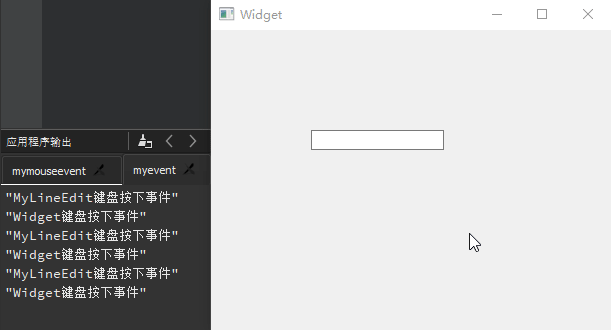
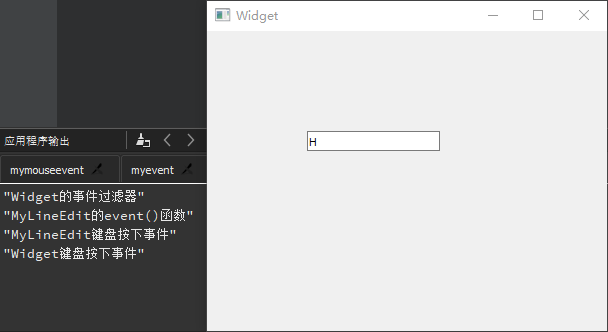
QLineEdit 行编辑器
QLineEdit小部件是一个单行的文本编辑器,用于接收用户输入和编辑单行的纯文本内容,而且提供了撤销、恢复、剪切、拖放等功能。Qt
Creator
新建一个mybutton工程,选择QWidget为基类,类名设置为MyWidget。然后进入设计模式,向工作区拖入
4 个【Line
Edit】,然后依次修改其objectName为lineEdit1、lineEdit2、lineEdit3、lineEdit4。
显示模式 :QLineEdit行编辑器拥有 4
种显示模式,可以在【echoMode】属性中进行修改,其属性值可以选择Normal正常显示输入的信息、NoEcho不显示任何输入以确保不会泄露输入的字符位数、Password显示为星号密码样式、PasswordEchoOnEdit在编辑时显示正常字符,其他情况下显示为密码样式。这里,将lineEdit1的【echoMode】设置为Password。输入掩码 :QLineEdit还提供了输入掩码(Input
Mask)限制输入内容,通过一些特殊字符对输入内容与格式进行设置。下面将lineedit2的【inputMask】属性设置为>AA-90-bb! a\#H;*”。除此之外,同样也可以采用setInputMask()函数在代码中进行输入掩码相关的设置。最后编辑lineEdit1行编辑框的默认信号returnPressed()所对应的槽函数on_lineEdit2_returnPressed(),添加相应的处理代码。输入验证 :QLineEdit还可以使用验证器QValidator对输入进行约束,需要包含#include <QValidator>头文件;自动补全 :QLineEdit利用QCompleter类实现,需要包含#include <QCompleter>头文件;
注意 :lineedit2的【inputMask】属性值>AA-90-bb-!aa\#H;*当中,符号>表示输入的字母自动转换为大写;AA表示开始必须输入
2
个字母;-号为分隔符,可以直接显示,但不可以输入;9表示必须输入
1 个数字;0表示输入一个数字;bb表示该 2
位可以留空或输入二进制字符0和1;!表示停止大小写转换,即让开头的>失效;aa表示可以留空或输入
2
个字母;#符号表示将#用作分隔符,由于#号具有特殊含义,所以前面加上\进行转义;H表明必须输入
1 个十六进制字符;;*表示用*号来填充空格。
mylineedit.pro
1
2
3
4
5
6
7
8
9
10
11
12
13
14
QT += core gui greaterThan(QT_MAJOR_VERSION, 4 ): QT += widgets TARGET = mylineedit TEMPLATE = app SOURCES += main.cpp\ mywidget.cpp HEADERS += mywidget.h FORMS += mywidget.ui
main.cpp
1 2 3 4 5 6 7 8 9 10 #include "mywidget.h" #include <QApplication> int main (int argc, char *argv[]) QApplication a (argc, argv) ; MyWidget w; w.show (); return a.exec (); }
1 2 3 4 5 6 7 8 9 10 11 12 13 14 15 16 17 18 19 20 21 22 23 24 25 26 #ifndef MYWIDGET_H #define MYWIDGET_H #include <QWidget> namespace Ui { class MyWidget ; } class MyWidget : public QWidget { Q_OBJECT public : explicit MyWidget (QWidget *parent = 0 ) ~MyWidget (); private slots: void on_lineEdit2_returnPressed () void on_lineEdit3_returnPressed () private : Ui::MyWidget *ui; }; #endif
1 2 3 4 5 6 7 8 9 10 11 12 13 14 15 16 17 18 19 20 21 22 23 24 25 26 27 28 29 30 31 32 33 34 35 36 37 38 39 40 #include "mywidget.h" #include "ui_mywidget.h" #include <QDebug> #include <QCompleter> #include <QValidator> MyWidget::MyWidget (QWidget *parent) : QWidget (parent), ui (new Ui::MyWidget) { ui->setupUi (this ); QValidator *validator = new QIntValidator (100 , 999 , this ); ui->lineEdit3->setValidator (validator); QStringList wordList; wordList << "Qt" << "Qt Creator" << tr ("你好" ); QCompleter *completer = new QCompleter (wordList, this ); completer->setCaseSensitivity (Qt::CaseInsensitive); ui->lineEdit4->setCompleter (completer); } MyWidget::~MyWidget () { delete ui; } void MyWidget::on_lineEdit2_returnPressed () ui->lineEdit3->setFocus (); qDebug () << ui->lineEdit2->text (); qDebug () << ui->lineEdit2->displayText (); } void MyWidget::on_lineEdit3_returnPressed () qDebug () << ui->lineEdit3->text (); }
1
2
3
4
5
6
7
8
9
10
11
12
13
14
15
16
17
18
19
20
21
22
23
24
25
26
27
28
29
30
31
32
33
34
35
36
37
38
39
40
41
42
43
44
45
46
47
48
49
50
51
52
53
54
55
56
57
58
59
60
61
62
63
64
65
66
67
68
69
70
71
72
73
74
75
76
77
78
79
80
81
82
83
84
85
86
87
88
89
90
91
92
93
94
95
96
97
98
99
100
101
102
103
104
105
106
107
108
109
110
111
112
113
114
115
116
117
118
<?xml version="1.0" encoding="UTF-8" ?> <ui version ="4.0" > <class > MyWidget</class > <widget class ="QWidget" name ="MyWidget" > <property name ="geometry" > <rect > <x > 0</x > <y > 0</y > <width > 400</width > <height > 300</height > </rect > </property > <property name ="windowTitle" > <string > MyWidget</string > </property > <widget class ="QLabel" name ="label" > <property name ="geometry" > <rect > <x > 50</x > <y > 50</y > <width > 61</width > <height > 16</height > </rect > </property > <property name ="text" > <string > 显示模式:</string > </property > </widget > <widget class ="QLineEdit" name ="lineEdit1" > <property name ="geometry" > <rect > <x > 140</x > <y > 50</y > <width > 171</width > <height > 20</height > </rect > </property > <property name ="echoMode" > <enum > QLineEdit::Password</enum > </property > </widget > <widget class ="QLabel" name ="label_2" > <property name ="geometry" > <rect > <x > 50</x > <y > 100</y > <width > 61</width > <height > 20</height > </rect > </property > <property name ="text" > <string > 输入掩码:</string > </property > </widget > <widget class ="QLineEdit" name ="lineEdit2" > <property name ="geometry" > <rect > <x > 140</x > <y > 100</y > <width > 171</width > <height > 20</height > </rect > </property > <property name ="inputMask" > <string > > AA-90-bb-!aa\#H;*</string > </property > </widget > <widget class ="QLabel" name ="label_3" > <property name ="geometry" > <rect > <x > 50</x > <y > 150</y > <width > 61</width > <height > 20</height > </rect > </property > <property name ="text" > <string > 输入验证:</string > </property > </widget > <widget class ="QLineEdit" name ="lineEdit3" > <property name ="geometry" > <rect > <x > 140</x > <y > 150</y > <width > 171</width > <height > 20</height > </rect > </property > </widget > <widget class ="QLabel" name ="label_4" > <property name ="geometry" > <rect > <x > 50</x > <y > 200</y > <width > 61</width > <height > 20</height > </rect > </property > <property name ="text" > <string > 自动完成:</string > </property > </widget > <widget class ="QLineEdit" name ="lineEdit4" > <property name ="geometry" > <rect > <x > 140</x > <y > 200</y > <width > 171</width > <height > 20</height > </rect > </property > </widget > </widget > <layoutdefault spacing ="6" margin ="11" /> <resources /> <connections /> </ui >
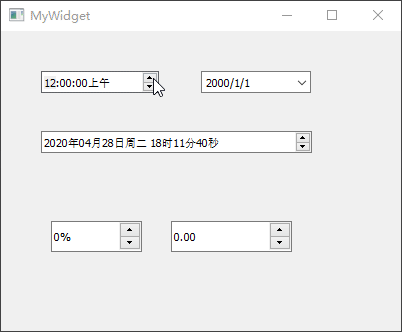
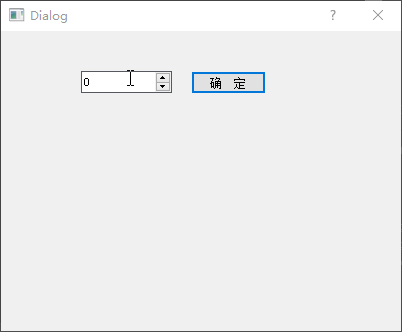
QAbstractSpinBox 微调框
QAbstractSpinBox是一个抽象基类,用于提供 1
个行编辑器和微调框来显示或设定值,其拥有QDateTimeEdit(用于设置日期时间)、QSpinBox(用于设置整数)、QDoubleSpinBox(用于设置浮点数)3
个子类。Qt Creator
新建一个myspinbox工程,选择QWidget为基类,类名设置为MyWidget。
QDateTimeEdit类提供了一个可以编辑时间和日期的小部件,分别向工作区拖入【Time
Edit】、【Date Edit】、【Date/Time Edit】小部件,首先设置【Time
Edit】的displayFormat为h:mm:ssA
以十二小时制进行显示;然后勾选【Date
Edit】的calendarPopup属性,以使用弹出的日历小部件设置日期;最后向MyWidget类的构造函数添加设置时间和显示格式的代码。QSpinBox用于设置整数,QDoubleSpinBox则用于设置浮点数,分别向工作区拖入【Spin
Box】和【Double Spin Box】,将【Spin
Box】的suffix后缀属性设置为%以显示百分数;
myspinbox.pro
1
2
3
4
5
6
7
8
9
10
11
12
13
14
QT += core gui greaterThan(QT_MAJOR_VERSION, 4 ): QT += widgets TARGET = myspinbox TEMPLATE = app SOURCES += main.cpp\ mywidget.cpp HEADERS += mywidget.h FORMS += mywidget.ui
main.cpp
1 2 3 4 5 6 7 8 9 #include "mywidget.h" #include <QApplication> int main (int argc, char *argv[]) QApplication a (argc, argv) ; MyWidget w; w.show (); return a.exec (); }
1 2 3 4 5 6 7 8 9 10 11 12 13 14 15 16 17 18 19 20 21 #ifndef MYWIDGET_H #define MYWIDGET_H #include <QWidget> namespace Ui { class MyWidget ; } class MyWidget : public QWidget { Q_OBJECT public : explicit MyWidget (QWidget *parent = 0 ) ~MyWidget (); private : Ui::MyWidget *ui; }; #endif
1 2 3 4 5 6 7 8 9 10 11 12 13 #include "mywidget.h" #include "ui_mywidget.h" MyWidget::MyWidget (QWidget *parent) : QWidget (parent), ui (new Ui::MyWidget) { ui->setupUi (this ); ui->dateTimeEdit->setDateTime (QDateTime::currentDateTime ()); ui->dateTimeEdit->setDisplayFormat (tr ("yyyy年MM月dd日ddd HH时mm分ss秒" )); } MyWidget::~MyWidget () { delete ui; }
1
2
3
4
5
6
7
8
9
10
11
12
13
14
15
16
17
18
19
20
21
22
23
24
25
26
27
28
29
30
31
32
33
34
35
36
37
38
39
40
41
42
43
44
45
46
47
48
49
50
51
52
53
54
55
56
57
58
59
60
61
62
63
64
65
66
67
68
69
70
71
72
73
74
75
76
77
78
79
<?xml version="1.0" encoding="UTF-8" ?> <ui version ="4.0" > <class > MyWidget</class > <widget class ="QWidget" name ="MyWidget" > <property name ="geometry" > <rect > <x > 0</x > <y > 0</y > <width > 400</width > <height > 300</height > </rect > </property > <property name ="windowTitle" > <string > MyWidget</string > </property > <widget class ="QTimeEdit" name ="timeEdit" > <property name ="geometry" > <rect > <x > 40</x > <y > 40</y > <width > 118</width > <height > 22</height > </rect > </property > <property name ="displayFormat" > <string > h:mm:ssA</string > </property > </widget > <widget class ="QDateEdit" name ="dateEdit" > <property name ="geometry" > <rect > <x > 200</x > <y > 40</y > <width > 110</width > <height > 22</height > </rect > </property > <property name ="calendarPopup" > <bool > true</bool > </property > </widget > <widget class ="QDateTimeEdit" name ="dateTimeEdit" > <property name ="geometry" > <rect > <x > 40</x > <y > 100</y > <width > 271</width > <height > 22</height > </rect > </property > </widget > <widget class ="QSpinBox" name ="spinBox" > <property name ="geometry" > <rect > <x > 50</x > <y > 190</y > <width > 91</width > <height > 31</height > </rect > </property > <property name ="suffix" > <string > %</string > </property > </widget > <widget class ="QDoubleSpinBox" name ="doubleSpinBox" > <property name ="geometry" > <rect > <x > 170</x > <y > 190</y > <width > 121</width > <height > 31</height > </rect > </property > </widget > </widget > <layoutdefault spacing ="6" margin ="11" /> <resources /> <connections /> </ui >
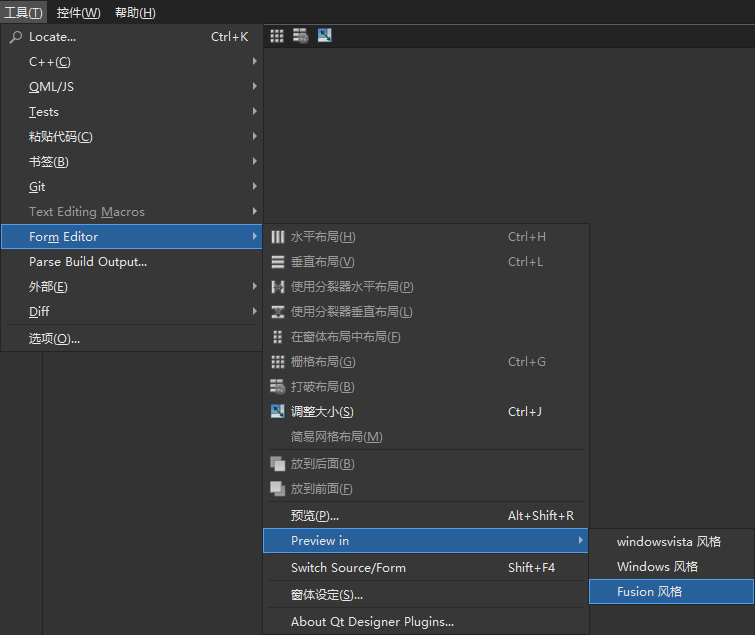
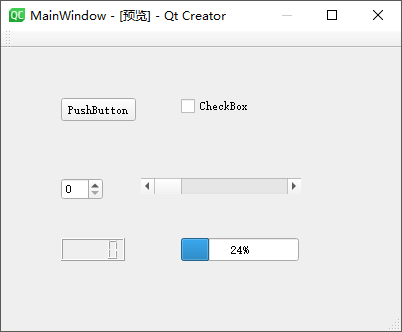
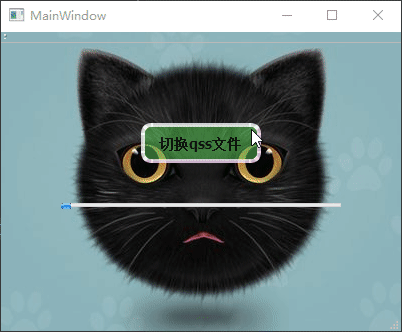
QAbstractSlider 滑动块
QAbstractSlider通过一个滑动块设置某个区间范围内的整数值,该类为一个抽象基类,拥有QScrollBar、QSlider、QDial
3
个子类。其中QScrollBar滚动条常用于QScrollArea类当中实现滚动区域;QSlider则是常见的音量控制或多媒体播放进度滑块小部件;QDial则是一个刻度表盘部件。
Qt Creator
新建一个myslider工程,选择QWidget为基类,类名设置为MyWidget。然后进入设计模式,向工作区拖入【Dial】、【Horizontal
Scroll Bar】、【Vertical Scroll Bar】、【Horizontal Slider】、【Vertical
Slider】、【Spin Box】共 6 个部件。
最后,单击 Qt Creator 顶部的【Edit
Signals/Slots】图标或是按下快捷键【F4】,进入了信号槽编辑模式。将刻度表盘部件dial的sliderMoved(int)信号分别与其它小部件的setValue(int)槽进行连接,从而让其它小部件跟随其一起变化。本小节示例主要依靠
Qt Creator 设计器进行实现,源代码则保持 Qt Creator
自动生成的模板即可。
myslider.pro
1
2
3
4
5
6
7
8
9
10
11
12
13
QT += core gui greaterThan(QT_MAJOR_VERSION, 4 ): QT += widgets TARGET = myslider TEMPLATE = app SOURCES += main.cpp\ mywidget.cpp HEADERS += mywidget.h FORMS += mywidget.ui
main.cpp
1 2 3 4 5 6 7 8 9 #include "mywidget.h" #include <QApplication> int main (int argc, char *argv[]) QApplication a (argc, argv) ; MyWidget w; w.show (); return a.exec (); }
1 2 3 4 5 6 7 8 9 10 11 12 13 14 15 16 17 18 19 20 21 #ifndef MYWIDGET_H #define MYWIDGET_H #include <QWidget> namespace Ui { class MyWidget ; } class MyWidget : public QWidget { Q_OBJECT public : explicit MyWidget (QWidget *parent = 0 ) ~MyWidget (); private : Ui::MyWidget *ui; }; #endif
1 2 3 4 5 6 7 8 9 10 #include "mywidget.h" #include "ui_mywidget.h" MyWidget::MyWidget (QWidget *parent) : QWidget (parent), ui (new Ui::MyWidget) { ui->setupUi (this ); } MyWidget::~MyWidget () { delete ui; }
1
2
3
4
5
6
7
8
9
10
11
12
13
14
15
16
17
18
19
20
21
22
23
24
25
26
27
28
29
30
31
32
33
34
35
36
37
38
39
40
41
42
43
44
45
46
47
48
49
50
51
52
53
54
55
56
57
58
59
60
61
62
63
64
65
66
67
68
69
70
71
72
73
74
75
76
77
78
79
80
81
82
83
84
85
86
87
88
89
90
91
92
93
94
95
96
97
98
99
100
101
102
103
104
105
106
107
108
109
110
111
112
113
114
115
116
117
118
119
120
121
122
123
124
125
126
127
128
129
130
131
132
133
134
135
136
137
138
139
140
141
142
143
144
145
146
147
148
149
150
151
152
153
154
155
156
157
158
159
160
161
162
163
164
165
166
167
168
169
170
171
172
173
174
175
176
177
178
179
180
181
182
183
184
185
186
187
188
<?xml version="1.0" encoding="UTF-8" ?> <ui version ="4.0" > <class > MyWidget</class > <widget class ="QWidget" name ="MyWidget" > <property name ="geometry" > <rect > <x > 0</x > <y > 0</y > <width > 400</width > <height > 300</height > </rect > </property > <property name ="windowTitle" > <string > MyWidget</string > </property > <widget class ="QDial" name ="dial" > <property name ="geometry" > <rect > <x > 30</x > <y > 30</y > <width > 50</width > <height > 64</height > </rect > </property > <property name ="notchesVisible" > <bool > true</bool > </property > </widget > <widget class ="QScrollBar" name ="horizontalScrollBar" > <property name ="geometry" > <rect > <x > 130</x > <y > 50</y > <width > 160</width > <height > 16</height > </rect > </property > <property name ="focusPolicy" > <enum > Qt::StrongFocus</enum > </property > <property name ="orientation" > <enum > Qt::Horizontal</enum > </property > <property name ="invertedControls" > <bool > false</bool > </property > </widget > <widget class ="QScrollBar" name ="verticalScrollBar" > <property name ="geometry" > <rect > <x > 360</x > <y > 10</y > <width > 16</width > <height > 160</height > </rect > </property > <property name ="focusPolicy" > <enum > Qt::StrongFocus</enum > </property > <property name ="orientation" > <enum > Qt::Vertical</enum > </property > <property name ="invertedControls" > <bool > true</bool > </property > </widget > <widget class ="QSlider" name ="horizontalSlider" > <property name ="geometry" > <rect > <x > 20</x > <y > 180</y > <width > 160</width > <height > 19</height > </rect > </property > <property name ="orientation" > <enum > Qt::Horizontal</enum > </property > </widget > <widget class ="QSlider" name ="verticalSlider" > <property name ="geometry" > <rect > <x > 240</x > <y > 110</y > <width > 19</width > <height > 160</height > </rect > </property > <property name ="orientation" > <enum > Qt::Vertical</enum > </property > </widget > <widget class ="QSpinBox" name ="spinBox" > <property name ="geometry" > <rect > <x > 30</x > <y > 250</y > <width > 101</width > <height > 22</height > </rect > </property > </widget > </widget > <layoutdefault spacing ="6" margin ="11" /> <resources /> <connections > <connection > <sender > dial</sender > <signal > sliderMoved(int)</signal > <receiver > horizontalScrollBar</receiver > <slot > setValue(int)</slot > <hints > <hint type ="sourcelabel" > <x > 57</x > <y > 65</y > </hint > <hint type ="destinationlabel" > <x > 154</x > <y > 61</y > </hint > </hints > </connection > <connection > <sender > dial</sender > <signal > sliderMoved(int)</signal > <receiver > verticalScrollBar</receiver > <slot > setValue(int)</slot > <hints > <hint type ="sourcelabel" > <x > 59</x > <y > 79</y > </hint > <hint type ="destinationlabel" > <x > 368</x > <y > 74</y > </hint > </hints > </connection > <connection > <sender > dial</sender > <signal > sliderMoved(int)</signal > <receiver > horizontalSlider</receiver > <slot > setValue(int)</slot > <hints > <hint type ="sourcelabel" > <x > 59</x > <y > 83</y > </hint > <hint type ="destinationlabel" > <x > 59</x > <y > 186</y > </hint > </hints > </connection > <connection > <sender > dial</sender > <signal > sliderMoved(int)</signal > <receiver > verticalSlider</receiver > <slot > setValue(int)</slot > <hints > <hint type ="sourcelabel" > <x > 75</x > <y > 72</y > </hint > <hint type ="destinationlabel" > <x > 242</x > <y > 160</y > </hint > </hints > </connection > <connection > <sender > dial</sender > <signal > sliderMoved(int)</signal > <receiver > spinBox</receiver > <slot > setValue(int)</slot > <hints > <hint type ="sourcelabel" > <x > 38</x > <y > 90</y > </hint > <hint type ="destinationlabel" > <x > 39</x > <y > 266</y > </hint > </hints > </connection > </connections > </ui >
布局管理
Qt
定义了一系列布局管理类,用于描述小部件在程序界面当中的布局方式。当可用的空间量发生变化时,这些布局会自动定位并调整小部件的大小尺寸,以确保其排列一致,用户界面保持整体可用。
所有QWidget子类都可以被布局管理类控制,使用QWidget::setLayout()函数即可将布局应用到小部件,被应用到指定布局的小部件拥有如下功能:
子部件的定位
感知默认与最小的窗口尺寸;
尺寸调整处理;
当内容发生变化时自动进行更新(当子部件的字体大小或者内容发生变化时,或者在删除或隐藏子部件的时候);
QLayout 布局类
QLayout类是布局管理器的抽象基类,继承自QObject和QLayoutItem类,其中QLayout和QLayoutItem类仅用于自定义布局管理器,一般情况下只需要使用到QLayout的子类:QHBoxLayout(基本布局管理器)、QVBoxLayout(垂直布局管理器)、QGridLayout(栅格布局管理器)、
QFormlayout(窗体布局管理器)和
QStackedLayout(栈布局管理器)。
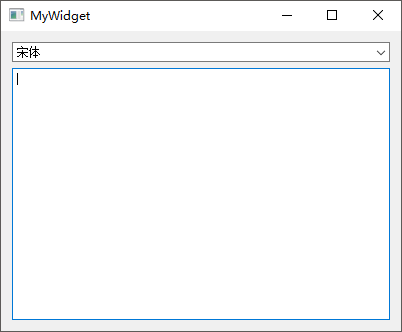
Qt Creator
新建一个mylayout工程,选择QWidget为基类,类名设置为MyWidget。然后进入设计模式,向工作区分别拖入
1 个【Text Edit】和【Font Combo
Box】小部件,然后选中最外层的MyWidget部件,并将其geometry属性宽度和高度分别设置为400 * 300;最后,按下快捷键【Ctrl
+ L】或者鼠标点击工作区顶部的【垂直布局】按钮即可让 2
个小部件实现垂直布局, 此时可以看到 2
个小部件会拉伸并且填满整个窗口。
QBoxLayout 盒子布局
QBoxLayout可以让子部件以水平或者垂直方式排成一列,即将所有空间分为多个盒子,然后分别将每个小部件放入一个盒子。实际开发当中,通常使用其QHBoxLayout水平盒子布局和QVBoxLayout垂直盒子布局
2
个子类。基于上面的mylayout示例工程,鼠标选中所有小部件后点击设计器顶部的【打破布局】按钮,然后清空设计器工作区的所有小部件,并且加入代码以呈现如下效果:
mylayout.pro
1
2
3
4
5
6
7
8
9
10
11
12
13
14
15
16
17
QT += core gui greaterThan (QT_MAJOR_VERSION, 4 ): QT += widgetsCONFIG += c++11 DEFINES += QT_DEPRECATED_WARNINGS SOURCES += \ main.cpp \ mywidget.cpp HEADERS += \ mywidget.h FORMS += \ mywidget.ui
main.cpp
1 2 3 4 5 6 7 8 9 10 #include "mywidget.h" #include <QApplication> int main (int argc, char *argv[]) QApplication a (argc, argv) ; MyWidget w; w.show (); return a.exec (); }
1 2 3 4 5 6 7 8 9 10 11 12 13 14 15 16 17 18 19 #ifndef MYWIDGET_H #define MYWIDGET_H #include <QWidget> QT_BEGIN_NAMESPACE namespace Ui { class MyWidget ; }QT_END_NAMESPACE class MyWidget : public QWidget { Q_OBJECT public : MyWidget (QWidget *parent = nullptr ); ~MyWidget (); private : Ui::MyWidget *ui; }; #endif
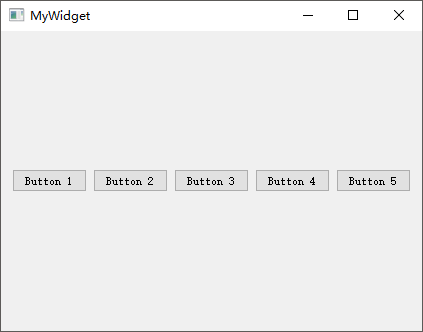
1 2 3 4 5 6 7 8 9 10 11 12 13 14 15 16 17 18 19 20 21 22 23 24 25 26 27 28 29 30 #include "mywidget.h" #include "ui_mywidget.h" #include <QHBoxLayout> #include <QPushButton> MyWidget::MyWidget (QWidget *parent): QWidget (parent), ui (new Ui::MyWidget) { ui->setupUi (this ); QPushButton *button1 = new QPushButton ("Button 1" ); QPushButton *button2 = new QPushButton ("Button 2" ); QPushButton *button3 = new QPushButton ("Button 3" ); QPushButton *button4 = new QPushButton ("Button 4" ); QPushButton *button5 = new QPushButton ("Button 5" ); QHBoxLayout *layout = new QHBoxLayout; layout->addWidget (button1); layout->addWidget (button2); layout->addWidget (button3); layout->addWidget (button4); layout->addWidget (button5); setLayout (layout); } MyWidget::~MyWidget () { delete ui; }
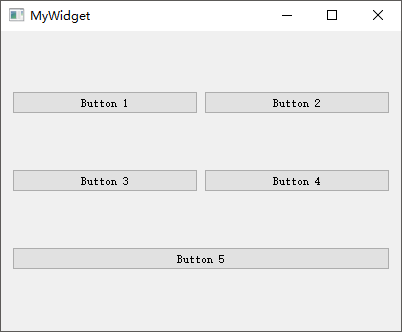
如果将上述工程中的QHBoxLayout修改为QVBoxLayout,即采用垂直盒子布局,所有按钮即可呈现成为如下效果:
1 2 3 4 5 6 7 8 9 10 11 12 13 14 15 16 17 18 19 20 21 22 23 24 25 26 27 28 29 30 #include "mywidget.h" #include "ui_mywidget.h" #include <QVBoxLayout> #include <QPushButton> MyWidget::MyWidget (QWidget *parent): QWidget (parent), ui (new Ui::MyWidget) { ui->setupUi (this ); QPushButton *button1 = new QPushButton ("Button 1" ); QPushButton *button2 = new QPushButton ("Button 2" ); QPushButton *button3 = new QPushButton ("Button 3" ); QPushButton *button4 = new QPushButton ("Button 4" ); QPushButton *button5 = new QPushButton ("Button 5" ); QVBoxLayout *layout = new QVBoxLayout; layout->addWidget (button1); layout->addWidget (button2); layout->addWidget (button3); layout->addWidget (button4); layout->addWidget (button5); setLayout (layout); } MyWidget::~MyWidget () { delete ui; }
QGridLayout 栅格布局
QGridLayout栅格布局用于在一个二维网格当中放置小部件,每个小部件可以占用多个单元格。
1 2 3 4 5 6 7 8 9 10 11 12 13 14 15 16 17 18 19 20 21 22 23 24 25 26 27 28 29 30 #include "mywidget.h" #include "ui_mywidget.h" #include <QGridLayout> #include <QPushButton> MyWidget::MyWidget (QWidget *parent): QWidget (parent), ui (new Ui::MyWidget) { ui->setupUi (this ); QPushButton *button1 = new QPushButton ("Button 1" ); QPushButton *button2 = new QPushButton ("Button 2" ); QPushButton *button3 = new QPushButton ("Button 3" ); QPushButton *button4 = new QPushButton ("Button 4" ); QPushButton *button5 = new QPushButton ("Button 5" ); QGridLayout *layout = new QGridLayout; layout->addWidget (button1, 0 , 0 , 1 , 1 ); layout->addWidget (button2, 0 , 1 , 1 , 1 ); layout->addWidget (button3, 1 , 0 , 1 , 1 ); layout->addWidget (button4, 1 , 1 , 1 , 1 ); layout->addWidget (button5, 2 , 0 , 1 , 2 ); setLayout (layout); } MyWidget::~MyWidget () { delete ui; }
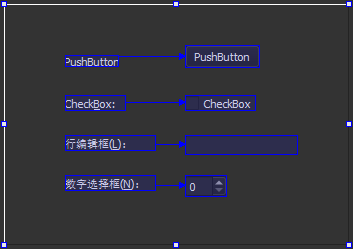
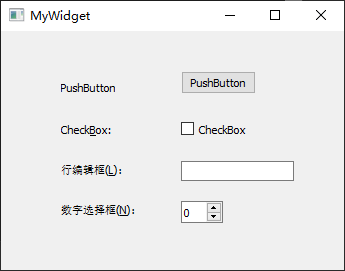
QFormLayout表单布局类用于管理输入小部件以及其相关的小部件形成的表单。
1 2 3 4 5 6 7 8 9 10 11 12 13 14 15 16 17 18 19 20 21 22 23 24 25 26 27 28 29 30 31 32 33 34 35 36 37 38 39 #include "mywidget.h" #include "ui_mywidget.h" #include <QFormLayout> #include <QLineEdit> #include <QPushButton> MyWidget::MyWidget (QWidget *parent): QWidget (parent), ui (new Ui::MyWidget) { ui->setupUi (this ); QPushButton *button1 = new QPushButton ("Button 1" ); QLineEdit *lineEdit1 = new QLineEdit ("LineEdit 1" ); QPushButton *button2 = new QPushButton ("Button 2" ); QLineEdit *lineEdit2 = new QLineEdit ("LineEdit 2" ); QPushButton *button3 = new QPushButton ("Button 3" ); QLineEdit *lineEdit3 = new QLineEdit ("LineEdit 3" ); QPushButton *button4 = new QPushButton ("Button 4" ); QLineEdit *lineEdit4 = new QLineEdit ("LineEdit 4" ); QPushButton *button5 = new QPushButton ("Button 5" ); QLineEdit *lineEdit5 = new QLineEdit ("LineEdit 5" ); QFormLayout *layout = new QFormLayout; layout->addRow (button1, lineEdit1); layout->addRow (button2, lineEdit2); layout->addRow (button3, lineEdit3); layout->addRow (button4, lineEdit4); layout->addRow (button5, lineEdit5); setLayout (layout); } MyWidget::~MyWidget () { delete ui; }
布局对小部件的处理流程
向一个布局中添加小部件时,该布局的处理流程如下:
最初,所有小部件根据其QWidget::sizePolicy()和QWidget::sizeHint()分配空间;
如果小部件设置了伸缩因子,且其值大于0,则按照伸缩因子指定的比例分配空间;
如果小部件伸缩因子设置为0,那么只会在其它小部件不需要空间时,其才会获得更多空间,且空间会优先分配给具备Expanding大小策略的小部件;
如果小部件分配到的空间小于其最小 尺寸(如果没有指定最小尺寸minimumSize,则基于其最小尺寸提示minimumSizeHint进行判断),则其会分配到所需的最小空间(小部件不必具有最小尺寸minimumSize或者最小尺寸提示minimumSizeHint,这样其伸缩因子将会成为决定性因素);
如果小部件分配到的空间大于其最大 尺寸,则其会分配到所需的最大空间;
伸缩因子
创建小部件通常并不需要设置任何伸缩因子(Stretch
Factors),但是当将小部件放置到布局里时,就会根据其QWidget::sizePolicy()或者它们的minimumSizeHint分配空间,此时伸缩因子用于控制每个小部件占用的空间比例。
例如:下面是 3
个小部件被放置到没有伸缩因子的QHBoxLayout布局中所呈现的效果。
此时,如果将伸缩因子应用于每个小部件,则它们将会按照比例进行排列(但是绝对不会小于其minimumSizeHint)。
sizeHint/minimumSizeHint/QSizePolicy
属性
终上所述,对布局内小部件空间占用产生影响的方法或属性主要有如下几个:
QWidget::sizeHint():获得小部件的推荐尺寸 属性sizeHint,返回值为QSize类型;QWidget::minimumSizeHint():获得小部件的最小推荐尺寸 属性minimumSizeHint,返回值为QSize类型;QWidget::setSizePolicy(QSizePolicy):设置小部件的空间策略;
#include <QSize>中定义的QSize类专门用于保存小部件的大小尺寸(不包括窗口框架)。而QWidget类提供的QSizePolicy类型(用于描述水平和垂直方向的缩放规则)则用于描述小部件的布局策略,可选的枚举值如下所示:
枚举常量
取值
功能描述
QSizePolicy::Fixed0只能使用sizeHint()提供的值,无法进行伸缩;
QSizePolicy::MinimumGrowFlagsizeHint()提供的尺寸是最小的,小部件可以进行拉伸;
QSizePolicy::MaximumShrinkFlagsizeHint()提供的尺寸是最大的,小部件可以进行压缩;
QSizePolicy::PreferredGrowFlag / ShrinkFlag默认规则,sizeHint()提供的尺寸是最佳的,小部件依然可以进行伸缩,但是效果不如sizeHint()的尺寸;
QSizePolicy::ExpandingGrowFlag / ShrinkFlag /
ExpandFlagsizeHint()提供的尺寸合理,小部件虽然可以压缩,但会更加倾向通过拉伸来获取更多的空间;
QSizePolicy::MinimumExpandingGrowFlag / ExpandFlagsizeHint()提供的尺寸最小,小部件会尽可能通过拉伸来获取更多空间;
QSizePolicy::IgnoredShrinkFlag / GrowFlag /
IgnoreFlagsizeHint()的尺寸将会被忽略,小部件将获得尽可能多的空间;
综合使用布局
各种类型的布局管理,通常在实际项目当中是综合运用的,例如:如下界面的布局就混合使用了QBoxLayout盒子布局、QGridLayout栅格布局、QFormLayout表单布局。
上述界面布局的最终运行效果如下图所示:
QSplitter 分裂器类
QSplitter类提供了一个分裂器部件,可以实现与QBoxLayout类似的布局管理器功能,但是其中包含的部件会随着分裂器大小尺寸的变化而变化。例如:布局管理器当中的按钮,其垂直方向默认不会进行拉伸,但是放入分裂器当中就会。除此之外,布局管理器继承自QObject类,而分裂器则继承自QFrame类,而QFrame又继承自QWidget类,也就是说QSplitter可以像QFrame一样设置边框。
Qt Creator
新建mysplitter工程,选择QWidget作为基类,类名同样设置为MyWidget。进入设计模式,向工作区分别拖入
4 个【Push Button】,然后鼠标选中这 4 个按钮,右键选择【布局 >
使用分裂器水平部局】,即可将 4 个小部件放入 1 个水平分裂器当中
然后适当调整最外层QWidget的几何尺寸,同时用鼠标拖拽放大分裂器,并设置其【frameShape】属性为Box,【frameShadow】属性为Raised,【lineWidth】属性为5。
Edit Buddies
Qt 的基本特性之一是提供了伙伴小部件 (Buddy
Widget)支持,QLabel标签通常会用作交互式小部件的功能说明,为了方便对这些交互式小部件定位,QLabel提供了伙伴小部件 机制,使用快捷键就可以将键盘焦点放置到对应的小部件,而这个小部件就称为QLabel的伙伴 。当QLabel中的文本为英文时,在文本首字母前面添加&符号,即可指定快捷键为【Alt
+
字母】;如果QLabel中的文本为中文,则需要在小括号中指定加速键字母。
Qt Creator
新建mybuddy工程,选择QWidget作为基类,类名同样设置为MyWidget。进入设计模式,向工作区分别拖入
4 个【Label】标签以及对应的【Push Button】、【Check Box】、【Line
Edit】、【Spin Box】交互式小部件,然后分别将 4
个【Label】标签的text属性修改为:&PushButton、Check&Box、行编辑框(&L)、数字选择框(&N)。
单击 Qt Creator 设计器工作区顶部的【Edit
Buddies】图标,进入伙伴编辑模式 ,鼠标左键拖动箭头,将标签【Label】与交互式小部件【Push
Button】、【Check Box】、【Line Edit】、【Spin
Box】逐一关联起来。然后点击工作区顶部的【Edit
Widgets】或是按下快捷键【F3】返回小部件编辑模式 ,运行程序后呈现的界面效果如下:
最后,通过键盘分别按下【Alt + P】、【Alt + B】、【Alt + L】、【Alt +
N】快捷键即可呈现与鼠标点击交互式控件时相同的效果。
Edit Tab Order
如果需要使用【Tab】按键在小部件之间移动输入焦点,基于上一步的代码,点击
Qt Creator 设计器工作区顶部的【Edit Tab Order】图标进入 Tab
顺序编辑模式 :
设置完成之后运行工程,输入焦点会自动落在【Tab】键顺序为1的小部件上,具体效果如下图所示:
上述的设置等价于向mywidget.cpp源文件中的MyWidget类构造函数添加如下代码:
1 2 3 4 5 6 7 8 9 10 11 12 13 14 #include "mywidget.h" #include "ui_mywidget.h" MyWidget::MyWidget (QWidget *parent) : QWidget (parent), ui (new Ui::MyWidget) { ui->setupUi (this ); setTabOrder (ui->lineEdit, ui->spinBox); setTabOrder (ui->spinBox, ui->pushButton); setTabOrder (ui->pushButton, ui->checkBox); } MyWidget::~MyWidget () { delete ui; }
主窗口
主窗口 为构建程序用户界面提供了框架,Qt
提供了QMainWindow以及一系列相关的类共同来完成主窗口的管理,其中QMainWindow类拥有着自己的布局,可以向其中添加QToolBars、QDockWidgets、QMenuBar、QStatusBar等小部件:
QMenuBar:菜单栏 ,位于主窗口的顶部,包含一个下拉菜单项的列表,这些菜单项由QAction动作类实现,1
个主窗口只能有 1 个菜单栏;QToolBar:工具栏 ,用于显示一些常用的菜单项,也可以插入其他窗口部件,并且是可以移动的,1
个主窗口可以拥有多个工具栏;QDockWidget:Dock
停靠窗口 ,可以停靠在中心部件的四周,并且放入一些小部件,1
个主窗口可以拥有多个 Dock 部件;QStatusBar:状态栏 ,用于显示程序的一些状态信息,在主窗口的最底部。1
个主窗口只能拥有 1 个状态栏;Central
Widget :中心部件 ,主窗口中心区域可以放入QTextEdit或者QGraphicsView等标准
Qt 小部件,是应用程序主要业务功能的体现区域,1 个主窗口只能拥有 1
个中心部件;
示例:多窗口编辑器
Qt Creator
新建一个mymainwindow工程,选择QMainWindow为基类,类名设置为MainWindow。然后进入设计模式添加主窗口菜单,鼠标双击左上角的【在这里输入】,将其修改为文件(&F),然后鼠标点击该菜单,继续将弹出的菜单项修改为新建文件(&N),此时工作区下方的【Action
Editor】会显示出对应的Action ,最后按下回车键即可完成菜单项的添加。
myimages.qrc
新建 Qt 资源文件,选中项目然后鼠标右键点击【Add
New...】添加新文件,选择【Qt Resource
File】,文件名称填写为myimages,其他选项默认即可。
接下来添加资源,先在工程目录下新建一个名为images的文件夹,并放入new.png和open.png两张图片(图片资源必须放在.qrc资源文件同级或者子级目录下),然后用【资源编辑器】打开myimages.qrc源文件,点击工作区下方的【Add
Prefix】按钮,并命名为/image,然后鼠标再点击【Add
Files】按钮将工程目录下的 2 个图片文件加载进来。
最后着手使用图片,回到mainwindow.ui对应的设计模式,鼠标点击【Action
Editor】上的【新建】按钮,此时会弹出【新建动作】对话框:
按照上面截图当中的格式填写对话框,然后点击图标后面的【...】按钮,进入【选择资源】对话框选择new.png作为图标:
上述步骤添加的myimages.qrc资源文件本质是一个 XML
文件,用【普通文本编辑器】打开该文件后可以查看到如下内容:
1
2
3
4
5
6
<RCC> <qresource prefix="/image" > <file>images/new .png</file> <file>images/open.png</file> </qresource> </RCC>
按照上面的myimages.qrc资源文件格式,如果编写代码时需要使用new.png图片,则可以将其路径指定为:/image/images/new.png;其中,前缀/image可以修改为其它名字或者省略。
mymainwindow.pro
1
2
3
4
5
6
7
8
9
10
11
12
13
14
15
16
17
18
QT += core gui greaterThan(QT_MAJOR_VERSION, 4 ): QT += widgets CONFIG += c++11 TARGET = mymainwindow TEMPLATE = app SOURCES += \ main.cpp \ mainwindow.cpp HEADERS += mainwindow.h FORMS += mainwindow.ui RESOURCES += myimages.qrc
main.cpp
1 2 3 4 5 6 7 8 9 #include "mainwindow.h" #include <QApplication> int main (int argc, char *argv[]) QApplication a (argc, argv) ; MainWindow w; w.show (); return a.exec (); }
mainwindow.h
1 2 3 4 5 6 7 8 9 10 11 12 13 14 15 16 17 18 19 20 21 22 23 24 25 #ifndef MAINWINDOW_H #define MAINWINDOW_H #include <QMainWindow> namespace Ui { class MainWindow ; } class MainWindow : public QMainWindow { Q_OBJECT public : explicit MainWindow (QWidget *parent = 0 ) ~MainWindow (); private slots: void on_action_New_triggered () void on_action_Dock_triggered () private : Ui::MainWindow *ui; }; #endif
mainwindow.cpp
1 2 3 4 5 6 7 8 9 10 11 12 13 14 15 16 17 18 19 20 21 22 23 24 25 26 27 28 29 30 31 32 33 34 35 36 37 38 39 40 41 42 43 44 45 46 47 48 49 50 51 52 53 54 55 56 57 58 59 60 61 62 63 64 65 66 67 68 69 70 71 72 73 74 #include "mainwindow.h" #include "ui_mainwindow.h" #include <QToolButton> #include <QSpinBox> #include <QTextEdit> #include <QMdiSubWindow> #include <QLabel> MainWindow::MainWindow (QWidget *parent) : QMainWindow (parent), ui (new Ui::MainWindow) { ui->setupUi (this ); QMenu *editMenu = ui->menuBar->addMenu (tr ("编辑(&E)" )); QAction *action_Open = editMenu->addAction (QIcon (":/image/images/open.png" ),tr ("打开文件(&O)" )); action_Open->setShortcut (QKeySequence ("Ctrl+O" )); ui->mainToolBar->addAction (action_Open); QActionGroup *group = new QActionGroup (this ); QAction *action_L = group->addAction (tr ("左对齐(&L)" )); action_L->setCheckable (true ); QAction *action_R = group->addAction (tr ("右对齐(&R)" )); action_R->setCheckable (true ); QAction *action_C = group->addAction (tr ("居中(&C)" )); action_C->setCheckable (true ); action_L->setChecked (true ); editMenu->addSeparator (); editMenu->addAction (action_L); editMenu->addAction (action_R); editMenu->addAction (action_C); QToolButton *toolBtn = new QToolButton (this ); toolBtn->setText (tr ("颜色" )); QMenu *colorMenu = new QMenu (this ); colorMenu->addAction (tr ("红色" )); colorMenu->addAction (tr ("绿色" )); toolBtn->setMenu (colorMenu); toolBtn->setPopupMode (QToolButton::MenuButtonPopup); ui->mainToolBar->addWidget (toolBtn); QSpinBox *spinBox = new QSpinBox (this ); ui->mainToolBar->addWidget (spinBox); ui->statusBar->showMessage (tr ("欢迎使用多文档编辑器" ), 2000 ); QLabel *permanent = new QLabel (this ); permanent->setFrameStyle (QFrame::Box | QFrame::Sunken); permanent->setText ("https://uinika.github.io/" ); ui->statusBar->addPermanentWidget (permanent); } MainWindow::~MainWindow () { delete ui; } void MainWindow::on_action_New_triggered () QTextEdit *edit = new QTextEdit (this ); QMdiSubWindow *child = ui->mdiArea->addSubWindow (edit); child->setWindowTitle (tr ("多文档编辑器子窗口" )); child->show (); } void MainWindow::on_action_Dock_triggered () ui->dockWidget->show (); }
mainwindow.ui
1
2
3
4
5
6
7
8
9
10
11
12
13
14
15
16
17
18
19
20
21
22
23
24
25
26
27
28
29
30
31
32
33
34
35
36
37
38
39
40
41
42
43
44
45
46
47
48
49
50
51
52
53
54
55
56
57
58
59
60
61
62
63
64
65
66
67
68
69
70
71
72
73
74
75
76
77
78
79
80
81
82
83
84
85
86
87
88
89
90
91
92
93
94
95
96
97
98
99
100
101
102
103
104
105
106
<?xml version="1.0" encoding="UTF-8" ?> <ui version="4.0" > <class >MainWindow</class > <widget class ="QMainWindow" name="MainWindow" > <property name="geometry" > <rect> <x>0 </x> <y>0 </y> <width>400 </width> <height>300 </height> </rect> </property> <property name="windowTitle" > <string>MainWindow</string> </property> <widget class ="QWidget" name="centralWidget" > <layout class ="QGridLayout" name="gridLayout" > <item row="0" column="0" > <widget class ="QMdiArea" name="mdiArea" /> </item> </layout> </widget> <widget class ="QMenuBar" name="menuBar" > <property name="geometry" > <rect> <x>0 </x> <y>0 </y> <width>400 </width> <height>22 </height> </rect> </property> <widget class ="QMenu" name="menu_F" > <property name="title" > <string>文件(&F)</string> </property> <addaction name="action_New" /> </widget> <addaction name="menu_F" /> </widget> <widget class ="QToolBar" name="mainToolBar" > <property name="toolButtonStyle" > <enum >Qt::ToolButtonIconOnly</enum > </property> <attribute name="toolBarArea" > <enum >TopToolBarArea</enum > </attribute> <attribute name="toolBarBreak" > <bool >false </bool > </attribute> </widget> <widget class ="QStatusBar" name="statusBar" /> <widget class ="QDockWidget" name="dockWidget" > <property name="windowTitle" > <string>工具箱</string> </property> <attribute name="dockWidgetArea" > <number>1 </number> </attribute> <widget class ="QWidget" name="dockWidgetContents" > <widget class ="QPushButton" name="pushButton" > <property name="geometry" > <rect> <x>0 </x> <y>20 </y> <width>75 </width> <height>23 </height> </rect> </property> <property name="text" > <string>PushButton</string> </property> </widget> <widget class ="QFontComboBox" name="fontComboBox" > <property name="geometry" > <rect> <x>0 </x> <y>100 </y> <width>81 </width> <height>22 </height> </rect> </property> </widget> </widget> </widget> <action name="action_New" > <property name="icon" > <iconset resource="myimages.qrc" > <normaloff>:/image/images/new .png</normaloff>:/image/images/new .png</iconset> </property> <property name="text" > <string>新建文件(&N)</string> </property> <property name="toolTip" > <string>新建文件</string> </property> <property name="shortcut" > <string>Ctrl+N</string> </property> </action> </widget> <layoutdefault spacing="6" margin="11" /> <resources> <include location="myimages.qrc" /> </resources> <connections/> </ui>
示例:自定义菜单
实现自定义菜单需要通过继承QWidgetAction类,并且重写其createWidget()函数。本示例实现的菜单项包含有
1 个标签和 1
个行编辑框,行编辑框中输入的字符串,按下回车键即可自动输出至作为中心小部件的文本编辑器。首先,Qt
Creator
新建一个myaction工程,基类默认为QMainWindow,类名依然设置为MainWindow;然后,向工程添加
C++ Class
文件,类名设置为MyAction,基类指定为QWidgetAction。
当在本示例的行编辑框中输入文本以后,按下回车键,行编辑框就会发射returnPressed()信号,此时就会调用了相应的sendText()槽函数,而sendText()槽函数当中又发射了getText()信号,该信号当中包含了行编辑框里的文本内容,接着又会调用setText()槽函数,由其将getText()信号发送来的文本输入至文本编辑器里,从而实现按下回车键即可将行编辑框中的文本,发送至作为中心部件的文本编辑器。
如果所有小部件都放置在同一个类当中,则可以直接关联行编辑框的returnPressed()信号到槽函数进行操作。由于现实情况是需要在MyAction和MainWindow两个类之间进行数据传输,所以使用了自定义的信号与槽。
myaction.pro
1
2
3
4
5
6
7
8
9
10
11
12
13
14
15
QT += core gui greaterThan(QT_MAJOR_VERSION, 4 ): QT += widgets TARGET = myaction TEMPLATE = app SOURCES += main.cpp\ mainwindow.cpp \ myaction.cpp HEADERS += mainwindow.h \ myaction.h FORMS += mainwindow.ui
main.cpp
1 2 3 4 5 6 7 8 9 #include "mainwindow.h" #include <QApplication> int main (int argc, char *argv[]) QApplication a (argc, argv) ; MainWindow w; w.show (); return a.exec (); }
myaction.h
1 2 3 4 5 6 7 8 9 10 11 12 13 14 15 16 17 18 19 20 21 22 23 #ifndef MYACTION_H #define MYACTION_H #include <QWidgetAction> class QLineEdit ; class MyAction : public QWidgetAction { Q_OBJECT public : explicit MyAction (QObject *parent = 0 ) protected : QWidget* createWidget (QWidget *parent) ; signals: void getText (const QString &string) private slots: void sendText () private : QLineEdit *lineEdit; }; #endif
myaction.cpp
1 2 3 4 5 6 7 8 9 10 11 12 13 14 15 16 17 18 19 20 21 22 23 24 25 26 27 28 29 30 31 #include "myaction.h" #include <QLineEdit> #include <QSplitter> #include <QLabel> MyAction::MyAction (QObject *parent) : QWidgetAction (parent) { lineEdit = new QLineEdit; connect (lineEdit, &QLineEdit::returnPressed, this , &MyAction::sendText); } QWidget * MyAction::createWidget (QWidget *parent) { if (parent->inherits ("QMenu" ) || parent->inherits ("QToolBar" )){ QSplitter *splitter = new QSplitter (parent); QLabel *label = new QLabel; label->setText (tr ("插入文本:" )); splitter->addWidget (label); splitter->addWidget (lineEdit); return splitter; } return 0 ; } void MyAction::sendText () emit getText (lineEdit->text()) ; lineEdit->clear (); }
mainwindow.h
1 2 3 4 5 6 7 8 9 10 11 12 13 14 15 16 17 18 19 20 21 22 23 24 #ifndef MAINWINDOW_H #define MAINWINDOW_H #include <QMainWindow> namespace Ui { class MainWindow ; } class MainWindow : public QMainWindow { Q_OBJECT public : explicit MainWindow (QWidget *parent = 0 ) ~MainWindow (); private : Ui::MainWindow *ui; private slots: void setText (const QString &string) }; #endif
mainwindow.cpp
1 2 3 4 5 6 7 8 9 10 11 12 13 14 15 16 17 18 19 20 21 #include "mainwindow.h" #include "ui_mainwindow.h" #include "myaction.h" MainWindow::MainWindow (QWidget *parent) : QMainWindow (parent), ui (new Ui::MainWindow) { ui->setupUi (this ); MyAction *action = new MyAction; QMenu *editMenu = ui->menuBar->addMenu (tr ("编辑(&E)" )); editMenu->addAction (action); connect (action, SIGNAL (getText (QString)), this , SLOT (setText (QString))); } MainWindow::~MainWindow () { delete ui; } void MainWindow::setText (const QString &string) ui->textEdit->setText (string); }
mainwindow.ui
1
2
3
4
5
6
7
8
9
10
11
12
13
14
15
16
17
18
19
20
21
22
23
24
25
26
27
28
29
30
31
32
33
34
35
36
37
38
39
40
41
42
43
44
45
46
<?xml version="1.0" encoding="UTF-8" ?> <ui version ="4.0" > <class > MainWindow</class > <widget class ="QMainWindow" name ="MainWindow" > <property name ="geometry" > <rect > <x > 0</x > <y > 0</y > <width > 400</width > <height > 300</height > </rect > </property > <property name ="windowTitle" > <string > MainWindow</string > </property > <widget class ="QWidget" name ="centralWidget" > <layout class ="QGridLayout" name ="gridLayout" > <item row ="0" column ="0" > <widget class ="QTextEdit" name ="textEdit" /> </item > </layout > </widget > <widget class ="QMenuBar" name ="menuBar" > <property name ="geometry" > <rect > <x > 0</x > <y > 0</y > <width > 400</width > <height > 22</height > </rect > </property > </widget > <widget class ="QToolBar" name ="mainToolBar" > <attribute name ="toolBarArea" > <enum > TopToolBarArea</enum > </attribute > <attribute name ="toolBarBreak" > <bool > false</bool > </attribute > </widget > <widget class ="QStatusBar" name ="statusBar" /> </widget > <layoutdefault spacing ="6" margin ="11" /> <resources /> <connections /> </ui >
事件系统
Qt
中的事件都继承自QEvent类,事件与信号并不相同,例如鼠标点击按钮,就会产生鼠标事件QMouseEvent(并非按钮产生),被按下的按钮则会发射clicked()信号(由按钮产生)。通常情况下,只需要关心按钮的单击信号,而不需要考虑鼠标事件。但是如果需要在鼠标单击按钮时产生其它效果,则需要关心鼠标事件。由此可见,事件 与信号 属于两个不同层面的概念,其发出者和作用者都各不相同,任意QObject的子类实例都可以接收和处理事件。
一个事件可以包含多种事件类型,例如上面提到的鼠标事件QMouseEvent可以进一步分为鼠标按下、双击、移动等操作,这些事件类型都由QEvent类提供的枚举类型QEvent::Type进行表示,其中包含有上百种事件类型。虽然QEvent的子类可以用于定义事件,但是却不能处理事件,事件的处理需要借助于QCoreApplication类notify()函数提供的
5 种事件处理方法:
重新实现小部件的paintEvent()、mousePressEvent()等事件处理函数;
重新实现notify()函数,该函数功能强大,可以先于事件过滤器获取事件,从而提供了对事件的完全控制,但是其每次只能处理
1 个事件;
在QCoreApplication::instance()对象上安装事件过滤器,这样事件过滤器就能够处理小部件的所有事件,其功能与重写notify()同样强大;应用程序可拥有多个全局事件过滤器,因而可以同时处理多个事件;
重新实现QObject::event()函数,该函数可以在事件到达默认事件处理函数之前获得该事件;
在对象上安装事件过滤器,此时事件过滤器可以在 1
个界面类当中,同时处理不同子部件的不同事件;
由于第 2 种方法需要继承QApplication类,第 3
种方法需要使用全局事件过滤器,从而减缓事件的传递,虽然这 2
种方法功能强大,但是极少被使用到。实际开发环境下,第 1
种方法最为常用,其次是第 5 种方法。
事件的传递
每个 Qt
应用程序的main()函数最后都会调用QApplication类的exec()方法,该函数会使
Qt 应用程序进入主事件循环 (Main Event
Loop),从而允许应用程序在运行时接收各种事件。一旦事件发生,Qt
就会自动构建一个相应的QEvent子类对象来表示,然后将其传递给相应的QObject对象或者子对象,本小节将通过两个典型的示例来展示
Qt 事件的传递过程。
示例:嵌套小部件之间的事件传递
Qt Creator
新建一个myevent工程,基类默认为QWidget,类名保持为Widget;然后,向工程添加类名为MyLineEdit的
C++ Class
文件,基类指定为QLineEdit。最后,将MyLineEdit添加至Widget里面,并且两者都同时实现了键盘按下事件 处理函数。从上面示例的运行结果可以看到,事件首先传递给获得焦点的窗口小部件,但是如果其忽略该事件,那么该事件就会继续传递给其父部件。重新实现事件处理函数时,通常需要调用父类的相应事件处理函数来实现默认操作。
myevent.pro
1
2
3
4
5
6
7
8
9
10
11
12
13
14
15
QT += core gui greaterThan(QT_MAJOR_VERSION, 4 ): QT += widgets TARGET = myevent TEMPLATE = app SOURCES += main.cpp\ widget.cpp \ mylineedit.cpp HEADERS += widget.h \ mylineedit.h FORMS += widget.ui
main.cpp
1 2 3 4 5 6 7 8 9 #include "widget.h" #include <QApplication> int main (int argc, char *argv[]) QApplication a (argc, argv) ; Widget w; w.show (); return a.exec (); }
mylineedit.h
1 2 3 4 5 6 7 8 9 10 11 12 13 14 #ifndef MYLINEEDIT_H #define MYLINEEDIT_H #include <QLineEdit> class MyLineEdit : public QLineEdit { Q_OBJECT public : explicit MyLineEdit (QWidget *parent = 0 ) protected : void keyPressEvent (QKeyEvent *event) }; #endif
mylineedit.cpp
1 2 3 4 5 6 7 8 9 10 11 12 #include "mylineedit.h" #include <QKeyEvent> #include <QDebug> MyLineEdit::MyLineEdit (QWidget *parent) : QLineEdit (parent){} void MyLineEdit::keyPressEvent (QKeyEvent *event) qDebug () << tr ("MyLineEdit键盘按下事件" ); QLineEdit::keyPressEvent (event); event->ignore (); }
1 2 3 4 5 6 7 8 9 10 11 12 13 14 15 16 17 18 19 20 21 22 23 24 25 26 #ifndef WIDGET_H #define WIDGET_H #include <QWidget> class MyLineEdit ;namespace Ui { class Widget ; } class Widget : public QWidget { Q_OBJECT public : explicit Widget (QWidget *parent = 0 ) ~Widget (); private : Ui::Widget *ui; MyLineEdit *lineEdit; protected : void keyPressEvent (QKeyEvent *event) }; #endif
1 2 3 4 5 6 7 8 9 10 11 12 13 14 15 16 17 18 19 20 #include "widget.h" #include "ui_widget.h" #include "mylineedit.h" #include <QKeyEvent> #include <QDebug> Widget::Widget (QWidget *parent) : QWidget (parent), ui (new Ui::Widget) { ui->setupUi (this ); lineEdit = new MyLineEdit (this ); lineEdit->move (100 , 100 ); } Widget::~Widget () { delete ui; } void Widget::keyPressEvent (QKeyEvent *event) qDebug () << tr ("Widget键盘按下事件" ); }
1 2 3 4 5 6 7 8 9 10 11 12 13 14 15 16 17 18 19 20 <?xml version="1.0" encoding="UTF-8" ?> <ui version ="4.0" > <class > Widget</class > <widget class ="QWidget" name ="Widget" > <property name ="geometry" > <rect > <x > 0</x > <y > 0</y > <width > 400</width > <height > 300</height > </rect > </property > <property name ="windowTitle" > <string > Widget</string > </property > </widget > <layoutdefault spacing ="6" margin ="11" /> <resources /> <connections /> </ui >
示例:带有过滤器的嵌套小部件事件传递
改进上面的例子,添加事件过滤器后观察事件的捕获顺序。首先,事件经过事件过滤器;然后到达焦点小部件 的event()函数,最后进入焦点小部件 的事件处理函数;如果焦点小部件 忽略了该事件,那么就会执行其父部件 的事件处理函数。
值得注意的是,这里的event()函数、事件处理函数都是在焦点小部件 内部重新定义的,而事件过滤器却是定义在焦点小部件的父部件 里面。
mylineedit.h
1 2 3 4 5 6 7 8 9 10 11 12 13 14 15 16 #ifndef MYLINEEDIT_H #define MYLINEEDIT_H #include <QLineEdit> class MyLineEdit : public QLineEdit { Q_OBJECT public : explicit MyLineEdit (QWidget *parent = 0 ) bool event (QEvent *event) protected : void keyPressEvent (QKeyEvent *event) }; #endif
mylineedit.cpp
1 2 3 4 5 6 7 8 9 10 11 12 13 14 15 16 17 18 19 20 21 #include "mylineedit.h" #include <QKeyEvent> #include <QDebug> MyLineEdit::MyLineEdit (QWidget *parent) : QLineEdit (parent){} void MyLineEdit::keyPressEvent (QKeyEvent *event) qDebug () << tr ("MyLineEdit键盘按下事件" ); QLineEdit::keyPressEvent (event); event->ignore (); } bool MyLineEdit::event (QEvent *event) if (event->type () == QEvent::KeyPress) { qDebug () << tr ("MyLineEdit的event()函数" ); } return QLineEdit::event (event); }
1 2 3 4 5 6 7 8 9 10 11 12 13 14 15 16 17 18 19 20 21 22 23 24 25 26 #ifndef WIDGET_H #define WIDGET_H #include <QWidget> class MyLineEdit ;namespace Ui { class Widget ; } class Widget : public QWidget { Q_OBJECT public : explicit Widget (QWidget *parent = 0 ) ~Widget (); bool eventFilter (QObject *obj, QEvent *event) private : Ui::Widget *ui; MyLineEdit *lineEdit; protected : void keyPressEvent (QKeyEvent *event) }; #endif
1 2 3 4 5 6 7 8 9 10 11 12 13 14 15 16 17 18 19 20 21 22 23 24 25 26 27 28 29 30 31 32 33 #include "widget.h" #include "ui_widget.h" #include "mylineedit.h" #include <QKeyEvent> #include <QDebug> Widget::Widget (QWidget *parent) : QWidget (parent), ui (new Ui::Widget) { ui->setupUi (this ); lineEdit = new MyLineEdit (this ); lineEdit->move (100 , 100 ); lineEdit->installEventFilter (this ); } Widget::~Widget () { delete ui; } void Widget::keyPressEvent (QKeyEvent *event) qDebug () << tr ("Widget键盘按下事件" ); } bool Widget::eventFilter (QObject *obj, QEvent *event) if (obj == lineEdit){ if (event->type () == QEvent::KeyPress) { qDebug () << tr ("Widget的事件过滤器" ); } } return QWidget::eventFilter (obj, event); }
鼠标与滚轮事件
QMouseEvent类用于表示鼠标事件,窗口小部件当中按下鼠标键或者移动鼠标指针时,都会产生鼠标事件。通过QMouseEvent类可以知道哪个鼠标键被按下,当前鼠标指针的位置等。日常开发工作当中,通常会重新定义小部件的鼠标事件处理函数来实现一些自定义操作。
另一个与鼠标操作相关的QWheelEvent类,则用于表示鼠标滚轮事件,可以获取鼠标滚轮的移动方向和距离。下面的示例,在主界面上按住鼠标左键 可以拖动窗口,双击鼠标左键 则可以使其全屏,按住鼠标右键 则会使指针变为自定义图片,使用鼠标滚轮 还可以放大或缩小编辑框内文本内容的尺寸。
Qt Creator
新建一个mymouseevent工程,基类默认为QWidget,类名保持为Widget不变,然后进入设计模式向界面拖入一个【Text
Edit】小部件。
注意 :默认情况下,按下鼠标键时移动鼠标,Qt
才会产生鼠标移动事件;如果希望不按鼠标键,也可以获取鼠标移动事件,则需要在小部件构造函数内添加如下代码,开启窗口小部件的鼠标跟踪功能:
mymouseevent.pro
1 2 3 4 5 6 7 8 9 10 11 12 13 QT += core gui greaterThan(QT_MAJOR_VERSION, 4 ): QT += widgets TARGET = mymouseevent TEMPLATE = app SOURCES += main.cpp\ widget.cpp HEADERS += widget.h FORMS += widget.ui
main.cpp
1 2 3 4 5 6 7 8 9 #include "widget.h" #include <QApplication> int main (int argc, char *argv[]) QApplication a (argc, argv) ; Widget w; w.show (); return a.exec (); }
1 2 3 4 5 6 7 8 9 10 11 12 13 14 15 16 17 18 19 20 21 22 23 24 25 26 27 #ifndef WIDGET_H #define WIDGET_H #include <QWidget> namespace Ui { class Widget ; } class Widget : public QWidget { Q_OBJECT public : explicit Widget (QWidget *parent = 0 ) ~Widget (); private : Ui::Widget *ui; QPoint offset; protected : void mousePressEvent (QMouseEvent *event) void mouseReleaseEvent (QMouseEvent *event) void mouseDoubleClickEvent (QMouseEvent *event) void mouseMoveEvent (QMouseEvent *event) void wheelEvent (QWheelEvent *event) }; #endif
1 2 3 4 5 6 7 8 9 10 11 12 13 14 15 16 17 18 19 20 21 22 23 24 25 26 27 28 29 30 31 32 33 34 35 36 37 38 39 40 41 42 43 44 45 46 47 48 49 50 51 52 53 54 55 56 57 58 59 60 61 62 63 64 65 66 67 68 69 70 71 72 73 #include "widget.h" #include "ui_widget.h" #include <QMouseEvent> Widget::Widget (QWidget *parent) : QWidget (parent), ui (new Ui::Widget) { ui->setupUi (this ); QCursor cursor; cursor.setShape (Qt::OpenHandCursor); setCursor (cursor); } Widget::~Widget () { delete ui; } void Widget::mousePressEvent (QMouseEvent *event) if (event->button () == Qt::LeftButton){ QCursor cursor; cursor.setShape (Qt::ClosedHandCursor); QApplication::setOverrideCursor (cursor); offset = event->globalPos () - pos (); } else if (event->button () == Qt::RightButton){ QCursor cursor (QPixmap ("../mymouseevent/logo.png" )); QApplication::setOverrideCursor (cursor); } } void Widget::mouseMoveEvent (QMouseEvent *event) if (event->buttons () & Qt::LeftButton){ QPoint temp; temp = event->globalPos () - offset; move (temp); } } void Widget::mouseReleaseEvent (QMouseEvent *event) Q_UNUSED (event); QApplication::restoreOverrideCursor (); } void Widget::mouseDoubleClickEvent (QMouseEvent *event) if (event->button () == Qt::LeftButton){ if (windowState () != Qt::WindowFullScreen) { setWindowState (Qt::WindowFullScreen); } else { setWindowState (Qt::WindowNoState); } } } void Widget::wheelEvent (QWheelEvent *event) if (event->delta () > 0 ) { ui->textEdit->zoomIn (); } else { ui->textEdit->zoomOut (); } }
1 2 3 4 5 6 7 8 9 10 11 12 13 14 15 16 17 18 19 20 21 22 23 24 25 26 27 28 29 30 <?xml version="1.0" encoding="UTF-8" ?> <ui version ="4.0" > <class > Widget</class > <widget class ="QWidget" name ="Widget" > <property name ="geometry" > <rect > <x > 0</x > <y > 0</y > <width > 400</width > <height > 300</height > </rect > </property > <property name ="windowTitle" > <string > Widget</string > </property > <widget class ="QTextEdit" name ="textEdit" > <property name ="geometry" > <rect > <x > 30</x > <y > 50</y > <width > 201</width > <height > 131</height > </rect > </property > </widget > </widget > <layoutdefault spacing ="6" margin ="11" /> <resources /> <connections /> </ui >
键盘事件
QKeyEvent类用于描述一个键盘事件,当键盘按键被按下或者释放时,处于键盘输入焦点的小部件就会产生键盘事件。QKeyEvent类的key()函数可以获取具体按键(键名存放在Qt::KeyQKeyEvent类的modifiers()函数获取(键名存放在Qt::KeyboardModifiermykeyevent工程,基类默认为QWidget,类名保持Widget不变。
示例:Ctrl+M 窗口最大化
本示例不需要对widget.ui进行更改,保持默认界面即可。主要通过【Ctrl
+
M】快捷键最大化当前窗口。键盘按下事件处理函数中,首先会检测【Ctrl】键是否按下,如果是,则再检测【M】键是否按下。
mykeyevent.pro
1 2 3 4 5 6 7 8 9 10 11 12 13 QT += core gui greaterThan(QT_MAJOR_VERSION, 4 ): QT += widgets TARGET = mykeyevent TEMPLATE = app SOURCES += main.cpp \ widget.cpp HEADERS += widget.h FORMS += widget.ui
main.cpp
1 2 3 4 5 6 7 8 9 #include "widget.h" #include <QApplication> int main (int argc, char *argv[]) QApplication a (argc, argv) ; Widget w; w.show (); return a.exec (); }
1 2 3 4 5 6 7 8 9 10 11 12 13 14 15 16 17 18 19 20 21 22 23 #ifndef WIDGET_H #define WIDGET_H #include <QWidget> namespace Ui { class Widget ; } class Widget : public QWidget { Q_OBJECT public : explicit Widget (QWidget *parent = 0 ) ~Widget (); private : Ui::Widget *ui; protected : void keyPressEvent (QKeyEvent *event) void keyReleaseEvent (QKeyEvent *event) }; #endif
1 2 3 4 5 6 7 8 9 10 11 12 13 14 15 16 17 18 19 20 21 22 23 24 25 26 27 28 #include "widget.h" #include "ui_widget.h" #include <QKeyEvent> Widget::Widget (QWidget *parent) : QWidget (parent), ui (new Ui::Widget) { ui->setupUi (this ); } Widget::~Widget () { delete ui; } void Widget::keyPressEvent (QKeyEvent *event) if (event->modifiers () == Qt::ControlModifier){ if (event->key () == Qt::Key_M){ setWindowState (Qt::WindowMaximized); } } else QWidget::keyPressEvent (event); } void Widget::keyReleaseEvent (QKeyEvent *event) }
示例:方向键组合移动按钮
上面的例子通过同时按下【Ctrl】键和【M】键来实现一定操作,本小节将尝试同时按下两个不同的普通按键来移动一个按钮的位置。基于前一小节的代码,进入
Qt Creator 设计模式向界面放置 1 个【Horizontal
Line】小部件,分别设置其【X】、【Y】坐标属性为50、100;再拖入
1 个【Vertical
Line】小部件,将其【X】、【Y】坐标属性设置为100、20;最后,拖入
1 个【Push
Button】,设置其【X】、【Y】坐标属性为120、120,并修改其内容为请按方向键。
下面代码,首先在键盘按下事件处理函数 keyPressEvent()中对方向键【↑】和【←】是否按下进行标记,并且在发生自动重复时不进行任何处理。然后在按键释放事件处理函数 keyReleaseEvent()中,分别对【↑】和【←】按键的释放进行了处理。当按下方向键【←】时,keyPressEvent()中便会标记keyLeft = true,此时如果同时按下方向键【↑】,那么keyUp = true。松开方向键【↑】,keyReleaseEvent()会标记keyUp = false,由于此时keyLeft = true,所以按钮进行斜向移动,并且让移动标志move = true。此时再释放方向键【←】,keyReleaseEvent()会标记keyLeft = false,由于已经进行过斜向移动,所以move = true不再进行操作。
1 2 3 4 5 6 7 8 9 10 11 12 13 14 15 16 17 18 19 20 21 22 23 24 25 26 27 28 #ifndef WIDGET_H #define WIDGET_H #include <QWidget> namespace Ui { class Widget ; } class Widget : public QWidget { Q_OBJECT public : explicit Widget (QWidget *parent = 0 ) ~Widget (); private : Ui::Widget *ui; bool keyUp; bool keyLeft; bool move; protected : void keyPressEvent (QKeyEvent *event) void keyReleaseEvent (QKeyEvent *event) }; #endif
1 2 3 4 5 6 7 8 9 10 11 12 13 14 15 16 17 18 19 20 21 22 23 24 25 26 27 28 29 30 31 32 33 34 35 36 37 38 39 40 41 42 43 44 45 46 47 48 49 50 51 52 53 54 55 56 57 58 59 60 61 62 63 64 65 66 67 68 69 70 71 72 73 74 75 76 77 78 79 80 81 82 83 84 85 86 87 #include "widget.h" #include "ui_widget.h" #include <QKeyEvent> #include <QDebug> Widget::Widget (QWidget *parent) : QWidget (parent), ui (new Ui::Widget) { ui->setupUi (this ); setFocus (); keyUp = false ; keyLeft = false ; move = false ; } Widget::~Widget () { delete ui; } void Widget::keyPressEvent (QKeyEvent *event) if (event->key () == Qt::Key_Up) { if (event->isAutoRepeat ()) return ; keyUp = true ; } else if (event->key () == Qt::Key_Left) { if (event->isAutoRepeat ()) return ; keyLeft = true ; } } void Widget::keyReleaseEvent (QKeyEvent *event) if (event->key () == Qt::Key_Up) { if (event->isAutoRepeat ()) return ; keyUp = false ; if (move) { move = false ; return ; } if (keyLeft) { ui->pushButton->move (30 , 80 ); move = true ; } else { ui->pushButton->move (120 , 80 ); } } else if (event->key () == Qt::Key_Left) { if (event->isAutoRepeat ()) return ; keyLeft = false ; if (move) { move = false ; return ; } if (keyUp) { ui->pushButton->move (30 , 80 ); move = true ; } else { ui->pushButton->move (30 , 120 ); } } else if (event->key () == Qt::Key_Down) { ui->pushButton->move (120 , 120 ); } }
1 2 3 4 5 6 7 8 9 10 11 12 13 14 15 16 17 18 19 20 21 22 23 24 25 26 27 28 29 30 31 32 33 34 35 36 37 38 39 40 41 42 43 44 45 46 47 48 49 50 51 52 53 54 55 56 57 58 59 <?xml version="1.0" encoding="UTF-8" ?> <ui version ="4.0" > <class > Widget</class > <widget class ="QWidget" name ="Widget" > <property name ="geometry" > <rect > <x > 0</x > <y > 0</y > <width > 400</width > <height > 300</height > </rect > </property > <property name ="windowTitle" > <string > Widget</string > </property > <widget class ="Line" name ="line" > <property name ="geometry" > <rect > <x > 50</x > <y > 100</y > <width > 291</width > <height > 16</height > </rect > </property > <property name ="orientation" > <enum > Qt::Horizontal</enum > </property > </widget > <widget class ="Line" name ="line_2" > <property name ="geometry" > <rect > <x > 100</x > <y > 20</y > <width > 20</width > <height > 231</height > </rect > </property > <property name ="orientation" > <enum > Qt::Vertical</enum > </property > </widget > <widget class ="QPushButton" name ="pushButton" > <property name ="geometry" > <rect > <x > 120</x > <y > 120</y > <width > 75</width > <height > 23</height > </rect > </property > <property name ="text" > <string > 请按方向键</string > </property > </widget > </widget > <layoutdefault spacing ="6" margin ="11" /> <resources /> <connections /> </ui >
定时器事件
通过QTimer类可以实例化一个定时器,而QTimerEvent类用于描述定时器事件,对于QObject的子类,只需要调用int QObject:startTimer(int interval)函数即可开启一个定时器,其中参数interval以毫秒为单位,返回值为当前定时器的整型编号 。如果定时器发生溢出,则可以在timerEvent()函数进行相应操作。此外,通过qrand()和qsrand()函数可以生成随机数。打开
Qt Creator
新建mytimerevent工程,基类默认为QWidget,类名同样保持Widget不变。
示例:打印定时器溢出信息
mytimerevent.pro
1 2 3 4 5 6 7 8 9 10 11 12 13 QT += core gui greaterThan(QT_MAJOR_VERSION, 4 ): QT += widgets TARGET = mytimerevent TEMPLATE = app SOURCES += main.cpp \ widget.cpp HEADERS += widget.h FORMS += widget.ui
main.cpp
1 2 3 4 5 6 7 8 9 #include "widget.h" #include <QApplication> int main (int argc, char *argv[]) QApplication a (argc, argv) ; Widget w; w.show (); return a.exec (); }
1 2 3 4 5 6 7 8 9 10 11 12 13 14 15 16 17 18 19 20 21 22 23 #ifndef WIDGET_H #define WIDGET_H #include <QWidget> namespace Ui { class Widget ; } class Widget : public QWidget { Q_OBJECT public : explicit Widget (QWidget *parent = 0 ) ~Widget (); private : Ui::Widget *ui; int id1, id2, id3; protected : void timerEvent (QTimerEvent *event) }; #endif
1 2 3 4 5 6 7 8 9 10 11 12 13 14 15 16 17 18 19 20 21 22 23 24 25 26 27 28 29 #include "widget.h" #include "ui_widget.h" #include <QDebug> Widget::Widget (QWidget *parent) : QWidget (parent), ui (new Ui::Widget) { ui->setupUi (this ); id1 = startTimer (1000 ); id2 = startTimer (1500 ); id3 = startTimer (2000 ); } Widget::~Widget () { delete ui; } void Widget::timerEvent (QTimerEvent *event) if (event->timerId () == id1) { qDebug () << "timer1" ; } else if (event->timerId () == id2) { qDebug () << "timer2" ; } else { qDebug () << "timer3" ; } }
示例:数码管动态时间显示
基于上一小节的工程,进入 Qt Creator
的设计模式,向widget.ui界面上添加【LCD
Number】小部件,并修改相应代码,运行以后可观察到如下效果:
1 2 3 4 5 6 7 8 9 10 11 12 13 14 15 16 17 18 19 20 21 22 23 #ifndef WIDGET_H #define WIDGET_H #include <QWidget> namespace Ui { class Widget ; } class Widget : public QWidget { Q_OBJECT public : explicit Widget (QWidget *parent = 0 ) ~Widget (); private : Ui::Widget *ui; int id1, id2, id3; private slots: void timerUpdate () }; #endif
1 2 3 4 5 6 7 8 9 10 11 12 13 14 15 16 17 18 19 20 21 22 23 24 25 26 27 28 29 30 31 32 33 34 35 36 37 38 39 40 #include "widget.h" #include "ui_widget.h" #include <QDebug> #include <QTimer> #include <QTime> Widget::Widget (QWidget *parent) : QWidget (parent), ui (new Ui::Widget) { ui->setupUi (this ); QTimer *timer = new QTimer (this ); connect (timer, &QTimer::timeout, this , &Widget::timerUpdate); timer->start (1000 ); qsrand (QTime (0 , 0 , 0 ).secsTo (QTime::currentTime ())); QTimer::singleShot (10000 , this , &Widget::close); } void Widget::timerUpdate () QTime time = QTime::currentTime (); QString text = time.toString ("hh:mm" ); if ((time.second () % 2 ) == 0 ){ text[2 ]=' ' ; } ui->lcdNumber->display (text); int rand = qrand () % 300 ; ui->lcdNumber->move (rand, rand); } Widget::~Widget () { delete ui; }
1 2 3 4 5 6 7 8 9 10 11 12 13 14 15 16 17 18 19 20 21 22 23 24 25 26 27 28 29 30 <?xml version="1.0" encoding="UTF-8" ?> <ui version ="4.0" > <class > Widget</class > <widget class ="QWidget" name ="Widget" > <property name ="geometry" > <rect > <x > 0</x > <y > 0</y > <width > 400</width > <height > 300</height > </rect > </property > <property name ="windowTitle" > <string > Widget</string > </property > <widget class ="QLCDNumber" name ="lcdNumber" > <property name ="geometry" > <rect > <x > 90</x > <y > 100</y > <width > 231</width > <height > 51</height > </rect > </property > </widget > </widget > <layoutdefault spacing ="6" margin ="11" /> <resources /> <connections /> </ui >
事件过滤器
事件过滤器 用于完成一个部件对其它多个部件的事件监视,是由QObject类中的installEventFilter()和eventFilter()两个函数组成的一种操作。借助事件过滤器可以方便的处理多个小部件的事件,否则就需要子类化各个小部件,然后重新实现其对应的各个事件处理函数,从而导致代码极为繁琐。
除此之外,如果需要发送事件到某个小部件,则可以考虑采用QCoreApplication类的如下
2 个函数来完成:
bool sendEvent(QObject *receiver, QEvent *event):立即处理指定事件,QEvent对象参数在事件发送完成后无法自动删除,因此需要在栈 上创建该对象;void postEvent(QObject *receiver, QEvent *event, int priority = Qt::NormalEventPriority):将事件放入等待调度队列,下次
Qt
主事件循环运行时再行处理,参数对象QEvent必须使用new关键字创建在堆 上,事件发送完毕后事件队列会自动删除该对象;
下面通过一个完整的示例来演示事件过滤器的具体使用方法,这里继续新建一个myeventfilter工程,基类选择QWidget,类名保持Widget不变。完成以后进入
Qt Creator 设计模式,并向界面拖入 1 个【Text Edit】 和 1 个【Spin
Box】小部件。
myeventfilter.pro
1 2 3 4 5 6 7 8 9 10 11 12 13 QT += core gui greaterThan(QT_MAJOR_VERSION, 4 ): QT += widgets TARGET = myeventfilter TEMPLATE = app SOURCES += main.cpp \ widget.cpp HEADERS += widget.h FORMS += widget.ui
main.cpp
1 2 3 4 5 6 7 8 9 10 #include "widget.h" #include <QApplication> int main (int argc, char *argv[]) QApplication a (argc, argv) ; Widget w; w.show (); return a.exec (); }
1 2 3 4 5 6 7 8 9 10 11 12 13 14 15 16 17 18 19 20 21 #ifndef WIDGET_H #define WIDGET_H #include <QWidget> namespace Ui { class Widget ; } class Widget : public QWidget { Q_OBJECT public : explicit Widget (QWidget *parent = 0 ) ~Widget (); bool eventFilter (QObject *obj, QEvent *event) private : Ui::Widget *ui; }; #endif
1 2 3 4 5 6 7 8 9 10 11 12 13 14 15 16 17 18 19 20 21 22 23 24 25 26 27 28 29 30 31 32 33 34 35 36 37 38 39 40 41 42 43 44 45 46 47 48 49 50 51 52 53 54 55 56 57 58 59 60 61 #include "widget.h" #include "ui_widget.h" #include <QKeyEvent> #include <QWheelEvent> Widget::Widget (QWidget *parent) : QWidget (parent), ui (new Ui::Widget) { ui->setupUi (this ); ui->textEdit->installEventFilter (this ); ui->spinBox->installEventFilter (this ); QKeyEvent myEvent (QEvent::KeyPress, Qt::Key_Up, Qt::NoModifier) ; qApp->sendEvent (ui->spinBox, &myEvent); } Widget::~Widget () { delete ui; } bool Widget::eventFilter (QObject *obj, QEvent *event) if (obj == ui->textEdit) { if (event->type () == QEvent::Wheel) { QWheelEvent *wheelEvent = static_cast <QWheelEvent*>(event); if (wheelEvent->delta () > 0 ){ ui->textEdit->zoomIn (); } else { ui->textEdit->zoomOut (); } return true ; } else { return false ; } } else if (obj == ui->spinBox) { if (event->type () == QEvent::KeyPress) { QKeyEvent *keyEvent = static_cast <QKeyEvent*>(event); if (keyEvent->key () == Qt::Key_Space) { ui->spinBox->setValue (0 ); return true ; } else { return false ; } } else { return false ; } } else { return QWidget::eventFilter (obj, event); } }
1 2 3 4 5 6 7 8 9 10 11 12 13 14 15 16 17 18 19 20 21 22 23 24 25 26 27 28 29 30 31 32 33 34 35 36 37 38 39 40 <?xml version="1.0" encoding="UTF-8" ?> <ui version ="4.0" > <class > Widget</class > <widget class ="QWidget" name ="Widget" > <property name ="geometry" > <rect > <x > 0</x > <y > 0</y > <width > 400</width > <height > 300</height > </rect > </property > <property name ="windowTitle" > <string > Widget</string > </property > <widget class ="QTextEdit" name ="textEdit" > <property name ="geometry" > <rect > <x > 20</x > <y > 20</y > <width > 171</width > <height > 171</height > </rect > </property > </widget > <widget class ="QSpinBox" name ="spinBox" > <property name ="geometry" > <rect > <x > 250</x > <y > 80</y > <width > 91</width > <height > 41</height > </rect > </property > </widget > </widget > <layoutdefault spacing ="6" margin ="11" /> <resources /> <connections /> </ui >
对象模型
标准 C++ 对象模型(Object
Model )在处理图形界面编程的一些问题时不够灵活,因此 Qt 在标准 C++
对象模型的基础上增加了一些新的特性,从而形成了自己的对象模型,这些特性如下所示:
上述 Qt 对象模型特性都是基于标准 C++
规范实现的,使用这些特性必须继承QObject类。其中,对象通信机制 和动态属性系统 还需要获取元对象系统 的支持。元对象系统(Meta-Object
System )由 Qt 自己的元对象编译器(Meta-Object
Compiler )提供,用于使 C++ 语言更加适用于图形界面编程。
信号与槽
信号与槽机制是 Qt 的核心特征,主要用于对象之间的通信,是 Qt
不同于其它开发框架的显著特征。之前小节所使用的信号与槽都是 1 个信号对应
1 个槽,事实上 1
个信号可以关联至多个槽,多个信号也可以关联到同一个槽,甚至 1
个信号还可以关联至另 1 个信号上。
注意 :如果存在多个槽与某个信号相关联,那么该信号被发射时,这些槽将会逐个进行执行,其执行顺序与关联的顺序保持一致。
示例:手动关联信号与槽
本小节示例将会在主界面创建一个对话框,在该对话框中输入数值,鼠标单击【确定】按钮后关闭对话框并且将输入的数值通过信号发射出去,最后在主界面中接收该信号并且显示出来。新建
Qt Widgets
工程mysignalslot,基类选择QWidget,类名保持Widget不变。然后向工程中添加【Qt
设计师界面类】,界面模板选择【Dialog without
Buttons】类名设置为【MyDialog】。
信号函数与槽函数的使用总结起来有如下 4 个注意事项:
继承自QObject或者子类;
类声明开始处添加Q_OBJECT宏;
槽函数的参数类型需要与信号参数的类型对应,不能多于信号函数的参数;
信号只需要声明不需要实现,且返回值为void类型;
mysignalslot.pro
1 2 3 4 5 6 7 8 9 10 11 12 13 14 15 16 QT += core gui greaterThan(QT_MAJOR_VERSION, 4 ): QT += widgets TARGET = mysignalslot TEMPLATE = app SOURCES += main.cpp \ widget.cpp \ mydialog.cpp HEADERS += widget.h \ mydialog.h FORMS += widget.ui \ mydialog.ui
main.cpp
1 2 3 4 5 6 7 8 9 #include "widget.h" #include <QApplication> int main (int argc, char *argv[]) QApplication a (argc, argv) ; Widget w; w.show (); return a.exec (); }
mydialog.h
使用signals关键字声明一个信号,但是前面不能使用public、private、rotected等限定符。由于信号默认为public的函数,可以从任意位置发射,但是仅建议在定义该信号的类或子类中进行发射。信号只需要声明即可,不能也不需要对其进行实现。信号函数无返回值,所以只能使用void类型。
由于只有QObject类及其子类才能使用信号槽机制,示例中的MyDialog类继承自QDialog类,QDialog又是QWidget的子类,最后QWidget继承了QObject类,所以能够正常使用信号槽机制,但是必须在类声明的开始位置添加Q_OBJECT宏。
1 2 3 4 5 6 7 8 9 10 11 12 13 14 15 16 17 18 19 20 21 22 23 24 #ifndef MYDIALOG_H #define MYDIALOG_H #include <QDialog> namespace Ui { class MyDialog ; } class MyDialog : public QDialog { Q_OBJECT public : explicit MyDialog (QWidget *parent = 0 ) ~MyDialog (); private : Ui::MyDialog *ui; signals: void dlgReturn (int ) private slots: void on_pushButton_clicked () }; #endif
mydialog.cpp
双击下面的mydialog.ui文件进入 Qt Creator
设计模式,向界面添加 1 个【Spin Box】部件和 1 个【Push
Button】部件,然后转到pushButton的clicked()单击信号对应的槽。
1 2 3 4 5 6 7 8 9 10 11 12 13 14 15 16 17 18 #include "mydialog.h" #include "ui_mydialog.h" #include <QDebug> MyDialog::MyDialog (QWidget *parent) : QDialog (parent), ui (new Ui::MyDialog) { ui->setupUi (this ); } MyDialog::~MyDialog () { delete ui; } void MyDialog::on_pushButton_clicked () int value = ui->spinBox->value (); emit dlgReturn (value) ; close (); }
mydialog.ui
1 2 3 4 5 6 7 8 9 10 11 12 13 14 15 16 17 18 19 20 21 22 23 24 25 26 27 28 29 30 31 32 33 34 35 36 37 38 39 40 41 42 <?xml version="1.0" encoding="UTF-8" ?> <ui version ="4.0" > <class > MyDialog</class > <widget class ="QDialog" name ="MyDialog" > <property name ="geometry" > <rect > <x > 0</x > <y > 0</y > <width > 400</width > <height > 300</height > </rect > </property > <property name ="windowTitle" > <string > Dialog</string > </property > <widget class ="QSpinBox" name ="spinBox" > <property name ="geometry" > <rect > <x > 80</x > <y > 40</y > <width > 91</width > <height > 22</height > </rect > </property > </widget > <widget class ="QPushButton" name ="pushButton" > <property name ="geometry" > <rect > <x > 190</x > <y > 40</y > <width > 75</width > <height > 23</height > </rect > </property > <property name ="text" > <string > 确 定</string > </property > </widget > </widget > <resources /> <connections /> </ui >
槽只是一个普通的 C++
函数,声明时需要使用slots关键字,可以是private、public、protected类型,其最大特点是可以与信号关联。打开widget.ui并拖入
1 个【Label】部件。
1 2 3 4 5 6 7 8 9 10 11 12 13 14 15 16 17 18 19 20 21 22 #ifndef WIDGET_H #define WIDGET_H #include <QWidget> namespace Ui { class Widget ; } class Widget : public QWidget { Q_OBJECT public : explicit Widget (QWidget *parent = 0 ) ~Widget (); private : Ui::Widget *ui; private slots: void showValue (int value) }; #endif
信号与槽的关联使用的是QObject类当中的connect()静态成员函数:
1 2 3 4 5 connect (const QObject *sender, const QMetaMethod &signal, const QObject *receiver, const QMetaMethod &method, Qt::ConnectionType type = Qt::AutoConnection)
第 1
个参数*sender为发射信号的对象,本示例中为dlg;第
2 个参数是待发射的信号,本示例中是dlgReturn(value);第 3
个参数是接收信号的对象,这里用this表示Widget部件本身(由于connect()函数拥有省略该参数的重载形式,因此该参数可以省略),第
4
个参数是信号对应的槽函数showValue(int value)(该参数也可以指定为
1 个信号,从而实现信号与信号的关联)。第 5
个参数参数type用于描述信号与槽的关联方式,由Qt::ConnectionType枚举类型指定,日常开发通常使用其默认值Qt:AutoConnection,其它枚举值以及用途如下表所示:
枚举常量
值
描述
Qt::AutoConnection0自动关联 (默认),在信号被发射时决定使用哪种关联类型,如果receiver存在于发射信号的线程,则使用
Qt::DirectConnection,否则使用Qt::QueuedConnection;
Qt::DirectConnection1直接关联 ,信号发射后立即调用槽函数,仅当槽函数执行完成返回以后,发射信号后面的代码才会继续执行;
Qt::QueuedConnection2队列关联 ,当流程返回receiver所在线程的事件循环之后,再执行槽函数,而且无论槽函数是否执行,发射信号后续的代码都将立刻执行;
Qt::BlockingQueuedConnection3阻塞队列关联 ,作用类似于Qt::QueuedConnection,但是信号线程会一直阻塞,直至槽函数返回。如果receiver位于发出信号的线程中,则不能使用该连接方式,否则会造成应用程序死锁;
Qt::UniqueConnection0x80唯一关联 标志,可以结合其它几种连接类型,使用按位或操作;此时,两个对象之间的相同信号与槽只能拥有唯一的关联,使用该标志主要是为了防止出现重复关联;
例如:本小节中的MyDialog类使用emit关键字发射信号之后,就会立刻执行槽函数,只有等待该槽函数执行完成以后,才会继续执行emit语句后面的代码。此时,如果将参数修改为Qt::QueuedConnection,那么在执行完成emit语句之后,无论槽函数是否已经被执行,都会立刻执行后续的代码。
注意 :对于信号与槽函数的参数,基本原则是信号函数的参数类型要与槽函数的参数类型对应,但是信号函数中的参数可以多于槽函数的参数,这些多余的参数将会被忽略。
本小节示例中的connect()函数使用的是下面的重载形式,信号与槽参数可以使用SIGNAI()和SLOT()宏将其转换为const char类型:
1 2 3 4 5 6 7 connect (dlg, SIGNAL (dlgReturn (int )), this , SLOT (showValue (int )));connect (const QObject *sender, const char *signal, const QObject *receiver, const char *method, Qt::ConnectionType type = Qt::AutoConnection)
Qt5
加入了另一种基于函数指针的connect()重载形式,与之前介绍的重载形式最大不同在于,槽函数不再是必须使用slots关键字声明的函数,而是任意能与信号相关联的成员函数;要使成员函数与信号相关联,那么该成员函数的参数个数不能超过信号函数的参数个数,但是并不会要求参数类型上的完全一致,只需能够进行隐式转换即可:
1 2 3 4 5 6 7 connect (dlg, &MyDialog::dlgReturn, this , &Widget::showValue);connect (const QObject *sender, PointerToMemberFunction signal, const QObject *receiver, PointerToMemberFunction method, Qt::ConnectionType type = Qt::AutoConnection)
上面这种方式的另一个好处在于可以在编译时进行检查,信号与槽的拼写错误、槽函数参数数量多于信号函数的参数个数等错误都能够在编译时被发现,因此推荐在
Qt5 当中使用这种关联形式。除此之外,这种形式还支持 C++11 里的
Lambda
表达式,可以在信号与槽进行关联的时候,直接编写信号发射后将要执行的槽函数代码,例如:
1 2 3 connect (dlg, &MyDialog::dlgReturn, [=](int value){ ui->label->setText (tr ("获取的值是:%1" ).arg (value)); });
最后,connect()函数的返回值 为QMetaObject:Connection类型,该返回值可用于断开信号槽关联的QObject:disconnect(const Q MetaObject:Connection connection)函数。
1 2 3 4 5 6 7 8 9 10 11 12 13 14 15 16 17 18 19 20 21 22 23 #include "widget.h" #include "ui_widget.h" #include "mydialog.h" #include <QDebug> Widget::Widget (QWidget *parent) : QWidget (parent), ui (new Ui::Widget) { ui->setupUi (this ); MyDialog *dlg = new MyDialog (this ); connect (dlg, SIGNAL (dlgReturn (int )), this , SLOT (showValue (int ))); dlg->show (); } Widget::~Widget () { delete ui; } void Widget::showValue (int value) ui->label->setText (tr ("获取的值是:%1" ).arg (value)); }
1 2 3 4 5 6 7 8 9 10 11 12 13 14 15 16 17 18 19 20 21 22 23 24 25 26 27 28 29 30 31 32 33 <?xml version="1.0" encoding="UTF-8" ?> <ui version="4.0" > <class >Widget</class > <widget class ="QWidget" name="Widget" > <property name="geometry" > <rect> <x>0 </x> <y>0 </y> <width>400 </width> <height>300 </height> </rect> </property> <property name="windowTitle" > <string>Widget</string> </property> <widget class ="QLabel" name="label" > <property name="geometry" > <rect> <x>90 </x> <y>30 </y> <width>111 </width> <height>16 </height> </rect> </property> <property name="text" > <string>获取的值是:</string> </property> </widget> </widget> <layoutdefault spacing="6" margin="11" /> <resources/> <connections/> </ui>
示例:自动关联信号与槽
前一小节的示例代码,Qt Creator
在设计模式下自动生成【确定】按钮单击信号的槽函数on_pushButto_clicked(),就是采用了信号与槽的自动关联方式,即on_ + 小部件objectName + _信号名称这种命名格式的槽可以直接与信号名称对应的信号自动完成关联,无需再手动调用connect()函数。这种方式之所以能够直接使用,是因为
Qt Creator
在由xxx.ui生成ui_xxx.h的过程中,自动加入了QMetaObject::connectSlotsByName(objectName)来完成信号与槽的关联。
本小节再来完成一个信号与槽自动关联的示例,重新建立一个 Qt Widgets
工程,项目名称依然为mysignalslot,基类选择QWidget,类名保持默认的Widget不变。
mysignalslot.pro
1 2 3 4 5 6 7 8 9 10 11 12 13 QT += core gui greaterThan(QT_MAJOR_VERSION, 4 ): QT += widgets TARGET = mysignalslot TEMPLATE = app SOURCES += main.cpp \ widget.cpp HEADERS += widget.h FORMS += widget.ui
main.cpp
1 2 3 4 5 6 7 8 9 #include "widget.h" #include <QApplication> int main (int argc, char *argv[]) QApplication a (argc, argv) ; Widget w; w.show (); return a.exec (); }
1 2 3 4 5 6 7 8 9 10 11 12 13 14 15 16 17 18 19 20 21 22 #ifndef WIDGET_H #define WIDGET_H #include <QWidget> namespace Ui { class Widget ; } class Widget : public QWidget { Q_OBJECT public : explicit Widget (QWidget *parent = 0 ) ~Widget (); private : Ui::Widget *ui; private slots: void on_myButton_clicked () }; #endif
1 2 3 4 5 6 7 8 9 10 11 12 13 14 15 16 17 18 #include "widget.h" #include "ui_widget.h" #include <QPushButton> Widget::Widget (QWidget *parent) : QWidget (parent), ui (new Ui::Widget) { QPushButton *button = new QPushButton (this ); button->setObjectName ("myButton" ); ui->setupUi (this ); } Widget::~Widget () { delete ui; } void Widget::on_myButton_clicked () close (); }
1 2 3 4 5 6 7 8 9 10 11 12 13 14 15 16 17 18 19 20 <?xml version="1.0" encoding="UTF-8" ?> <ui version ="4.0" > <class > Widget</class > <widget class ="QWidget" name ="Widget" > <property name ="geometry" > <rect > <x > 0</x > <y > 0</y > <width > 400</width > <height > 300</height > </rect > </property > <property name ="windowTitle" > <string > Widget</string > </property > </widget > <layoutdefault spacing ="6" margin ="11" /> <resources /> <connections /> </ui >
disconnect() 静态函数
通过QObject上提供的静态函数disconnect(),可以断开信号与槽的关联,其函数原型如下:
1 2 3 4 5 6 7 8 9 bool QObject::disconnect (const QObject *sender, const char *signal, const QObject *receiver, const char *method) bool QObject::disconnect (const QObject *sender, const QMetaMethod &signal, const QObject *receiver, const QMetaMethod &method)
一般情况下,该函数拥有如下使用方法:
断开与一个对象所有信号的全部关联: 1 2 3 disconnect (myObject, 0 , 0 , 0 );myObject->disconnect ();
断开与一个指定信号的全部关联: 1 2 3 disconnect (myObject, SIGNAL (mySignal ()), 0 , 0 );myObject->disconnect (SIGNAL (mySignal ()));
断开一个指定信号与槽的关联: 1 2 3 disconnect (myObject, 0 , myReceiver, 0 );myObject->disconnect (myReceiver);
断开一个指定信号和槽的关联: 1 2 3 4 5 disconnect (myObject, SIGNAL (mySignal ()), myReceiver, SLOT (mySlot ()));myObject->disconnect (myObject, SIGNAL (mySignal ()), myReceiver, SLOT (mySlot ())); myObject->disconnect (myConnection);
与disconnect()类似,disconnect()也提供了基于函数指针的重载形式:
1 2 3 4 bool QObject::disconnect (const QObject *sender, PointerToMemberFunction signal, const QObject *receiver, PointerToMemberFunction method)
该函数并不能断开信号与普通函数或者 Lambda
表达式之间的关联,遇到此类情况通常需要借助于connect()函数的返回值来执行断开操作。
QSignalMapper 类
如果需要获取信号发送者的信息,Qt
提供了QObject::sender()函数返回发送该信号对象的指针,如果多个信号关联到了同一个槽,而该槽需要对每个信号进行不同的处理,使用这种方式就会较为麻烦。应对这种情况,推荐使用QSignalMapper信号映射器类
该类通过调用setMapping()将指定的字符串或整数 与特定对象进行映射,然后再将对象的信号连接至map()插槽,该插槽将会使用与原始信号对象关联的字符串或整数 发出被映射的信号,该映射可以在稍后使用removeMappings()删除。
例如:创建包含一组按钮的自定义小部件(工具面板),传统方式是将每个按钮的clicked()信号连接至单独的自定义槽;如果希望将所有按钮的信号都连接至同一个槽,然后对当前单击的按钮在槽中进行参数化判断,可以阅读接下来的代码。这里先定义
1
个ButtonWidget小部件,该小部件拥有一个单独的clicked()信号,它将伴随与所单击按钮的文本一同被发射:
1 2 3 4 5 6 7 8 9 10 class ButtonWidget : public QWidget { Q_OBJECT public : ButtonWidget (const QStringList &texts, QWidget *parent = 0 ); signals: void clicked (const QString &text) private : QSignalMapper *signalMapper; };
接下来,唯一需要在源文件中实现的函数是ButtonWidget类的构造函数:
1 2 3 4 5 6 7 8 9 10 11 12 13 14 ButtonWidget::ButtonWidget (const QStringList &texts, QWidget *parent) : QWidget (parent) { signalMapper = new QSignalMapper (this ); QGridLayout *gridLayout = new QGridLayout; for (int i = 0 ; i < texts.size (); ++i) { QPushButton *button = new QPushButton (texts[i]); connect (button, SIGNAL (clicked ()), signalMapper, SLOT (map ())); signalMapper->setMapping (button, texts[i]); gridLayout->addWidget (button, i / 3 , i % 3 ); } connect (signalMapper, SIGNAL (mapped (QString)), this , SIGNAL (clicked (QString))); setLayout (gridLayout); }
1
个文本列表参数texts将会传递给ButtonWidget类的构造函数,构造
1 个信号映射器,并为列表中的每个文本创建 1
个QPushButton。然后,将每个按钮的clicked()信号连接到信号映射器的map()槽,并在信号映射器中创建从每个按钮到按钮文本的映射。最后,将信号映射器的mapped()信号连接至ButtonWidget小部件的clicked()信号。这样当用户单击按钮时,自定义小部件就会发出单个的clicked()信号,该信号的参数是用户单击按钮的文本。
在 Lambda
表达式可用于编写槽函数之前,QSignalMapper是非常有用的一个类,但是现在还可以通过一个
Lambda 表达式来简化上面的示例:
1 2 3 4 5 6 7 8 9 10 11 12 ButtonWidget::ButtonWidget (const QStringList &texts, QWidget *parent) : QWidget (parent) { QGridLayout *gridLayout = new QGridLayout; for (int i = 0 ; i < texts.size (); ++i) { QString text = texts[i]; QPushButton *button = new QPushButton (text); connect (button, &QPushButton::clicked, [=] { clicked (text); }); gridLayout->addWidget (button, i / 3 , i % 3 ); } setLayout (gridLayout); }
属性系统
Qt 提供了一个复杂的属性系统 (Property
System ),类似于某些编译器供应商提供的属性系统。但作为一个独立于编译器与操作系统的
C++ 库,Qt 并不依赖于非标准的编译器特性,而是可以在每个 Qt
支持的平台上与任意标准 C++ 编译器一同工作。Qt
提供的这套属性系统基于元对象系统 (Meta-Object
System )实现,并且通过信号与槽完成对象之间的通信。如果要声明属性,需要继承QObject类的同时在声明前使用Q_PROPERTY()宏。
1 2 3 4 5 6 7 8 9 10 11 12 Q_PROPERTY (type name (READ getFunction [WRITE setFunction] | MEMBER memberName [(READ getFunction | WRITE setFunction)]) [RESET resetFunction] [NOTIFY notifySignal] [REVISION int ] [DESIGNABLE bool ] [SCRIPTABLE bool ] [STORED bool ] [USER bool ] [CONSTANT] [FINAL])
type属性可以是QVariant支持的任何类型,也可以是用户的自定义类型。下面是一些出自QWidget类的典型属性声明示例:
1 2 3 Q_PROPERTY (bool focus READ hasFocus)Q_PROPERTY (bool enabled READ isEnabled WRITE setEnabled)Q_PROPERTY (QCursor cursor READ cursor WRITE setCursor RESET unsetCursor)
下面的示例演示了如何使用member关键字将成员变量导出为 Qt
属性,代码中必须指定NOTIFY信号来允许 QML 属性绑定。
1 2 3 4 5 6 7 8 9 10 11 12 13 Q_PROPERTY (QColor color MEMBER m_color NOTIFY colorChanged) Q_PROPERTY (qreal spacing MEMBER m_spacing NOTIFY spacingChanged) Q_PROPERTY (QString text MEMBER m_text NOTIFY textChanged) signals: void colorChanged () void spacingChanged () void textChanged (const QString &newText) private : QColor m_color; qreal m_spacing; QString m_text;
虽然属性 的行为类似于类数据成员,但是除此之外,它还会拥有一些可以通过元对象系统访问的附加特性。
READ操作函数:用于读取属性值,该函数一般声明为const类型,其返回值类型必须与该属性的类型一致,或者是该属性类型的指针或者引用。如果未指定MEMBER变量,那么该函数必须存在。WRITE操作函数:(可选)用于设置属性值。该函数只能拥有 1
个参数,且其返回值必须为空void。MEMBER变量:如果未指定READ操作函数,那么必须指定一个MEMBER变量关联,这样会让指定的成员变量变为可读可写,而不需要创建READ和WRITE操作函数;RESET函数:(可选)用于将属性恢复到默认值。该函数不能拥有参数,且返回值必须为空void;NOTIFY信号:(可选)使用该选项,必须指定类当中 1
个已经存在的信号,每当该属性的值改变时都会发射该信号;如果使用MEMBER变量时指定了NOTIFY信号,则该信号最多只能拥有
1 个参数,并且参数类型必须与属性类型相同。REVISION版本号:(可选)可用于指定属性以及NOTIFY信号仅用于指定版本的
API,默认为0;DESIGNABLE标注:(可选)标注该属性在 Qt Designer
的属性编辑器中是否可见。大多数属性会设置为true,即可见;SCRIPTABLE标注:(可选)标注该属性是否可以被脚本引擎访问,其默认值为true。STORED标注:(可选)标注是否在对象状态被存储时,也必须存储该属性的值,大部分属性会设置为true;USER:(可选)标注该属性是否被指定为面向用户的属性,或者该类的用户可编辑属性,每个类通常只拥有
1 个USER属性,其默认值为false;CONSTANT:(可选)表明该属性的值为常量,对于一个给定的对象实例,每次使用常量属性的READ方法都必须返回相同的值,但对于类的不同的实例,该常量可以不同。常量属性不能拥有WRITE方法和NOTIFY信号;FINAL:(可选)用于表示该属性不能被派生类进行重写;
其中,READ、WRITE、RESET函数可以被继承,也可以作为虚拟的;进行多继承时,它们必须继承自第
1
个父类。接下来看一个具体的示例:新建一个名称为myproperty的工程,基类选择QWidget,类名保持Widget不变。接着向工程添加名为MyClass的
C++ 类文件,并且选择其基类为QObject。
myproperty.pro
1 2 3 4 5 6 7 8 9 10 11 12 13 14 15 QT += core gui greaterThan(QT_MAJOR_VERSION, 4 ): QT += widgets TARGET = myproperty TEMPLATE = app SOURCES += main.cpp \ widget.cpp \ myclass.cpp HEADERS += widget.h \ myclass.h FORMS += widget.ui
main.cpp
1 2 3 4 5 6 7 8 9 #include "widget.h" #include <QApplication> int main (int argc, char *argv[]) QApplication a (argc, argv) ; Widget w; w.show (); return a.exec (); }
myclass.h
这里使用Q_PROPERTY宏向元对象系统注册了一个userName属性,然后声明了几个相应的操作函数。
1 2 3 4 5 6 7 8 9 10 11 12 13 14 15 16 17 18 19 20 21 22 23 24 25 26 27 28 29 30 31 32 33 34 #ifndef MYCLASS_H #define MYCLASS_H #include <QObject> class MyClass : public QObject { Q_OBJECT Q_PROPERTY (QString userName READ getUserName WRITE setUserName NOTIFY userNameChanged) public : explicit MyClass (QObject *parent = 0 ) QString getUserName () const { return m_userName; } void setUserName (QString userName) m_userName = userName; emit userNameChanged (userName) ; } signals: void userNameChanged (QString) private : QString m_userName; }; #endif
myclass.cpp
1 2 3 4 5 #include "myclass.h" MyClass::MyClass (QObject *parent) : QObject (parent) { }
1 2 3 4 5 6 7 8 9 10 11 12 13 14 15 16 17 18 19 20 21 22 23 #ifndef WIDGET_H #define WIDGET_H #include <QWidget> namespace Ui { class Widget ; } class Widget : public QWidget { Q_OBJECT public : explicit Widget (QWidget *parent = 0 ) ~Widget (); private : Ui::Widget *ui; private slots: void userChanged (QString) }; #endif
这里创建了 1
个MyClass类实例,然后进行userName属性的读写操作,这里有两种方法:一种是直接调用该属性的相关函数;另一种是使用QObject类的setProperty()和property()函数,使用这
2 个函数需要指定属性名。Property()函数的返回值类型为
QVariant,可以使用该类的toString()函数转换为QString类型数据。
除此之外,通过QObject类的setProperty()函数还可以设置动态属性 (仅对于当前类的实例有效),此时只需将属性名称设置为
1 个类中没有的属性即可。
1 2 3 4 5 6 7 8 9 10 11 12 13 14 15 16 17 18 19 20 21 22 23 24 25 26 27 28 29 30 31 32 #include "widget.h" #include "ui_widget.h" #include "myclass.h" #include <QDebug> Widget::Widget (QWidget *parent) : QWidget (parent), ui (new Ui::Widget) { ui->setupUi (this ); MyClass *my = new MyClass (this ); connect (my, &MyClass::userNameChanged, this , &Widget::userChanged); my->setUserName ("Hank" ); qDebug () << "userName1:" << my->getUserName (); my->setProperty ("userName" , "Uinika" ); qDebug () << "userName2:" << my->property ("userName" ).toString (); my->setProperty ("myValue" , 2020 ); qDebug () << "myValue:" << my->property ("myValue" ).toInt (); } Widget::~Widget () { delete ui; } void Widget::userChanged (QString userName) qDebug () << "user changed:" << userName; }
1 2 3 4 5 6 7 8 9 10 11 12 13 14 15 16 17 18 19 20 <?xml version="1.0" encoding="UTF-8" ?> <ui version ="4.0" > <class > Widget</class > <widget class ="QWidget" name ="Widget" > <property name ="geometry" > <rect > <x > 0</x > <y > 0</y > <width > 400</width > <height > 300</height > </rect > </property > <property name ="windowTitle" > <string > Widget</string > </property > </widget > <layoutdefault spacing ="6" margin ="11" /> <resources /> <connections /> </ui >
对象树与所有权
Qt 使用对象树 ((Object
Tree)[https://doc.qt.io/qt-5/objecttrees.html])来组织管理所有QObject及其子类对象,当创建
1
个QObject时,如果使用其它对象作为其父对象 ,那么该QObject就会被添加至这个父对象的children()列表;销毁父对象时,QObject也会自动销毁,这样的机制非常适合于管理
GUI
对象。例如:QShortcut键盘快捷键对象是某个窗口的子对象,当用户关闭该窗口时,快捷键对象也会被销毁。
QWidget作为 Qt Widgets
模块的基础类,扩展了对象之间的继承关系。由于该子对象需要显示在父部件的坐标系统当中,所以一个子对象同时也是一个子部件。例如:当一个消息对话框关闭后需要进行销毁时,其中的按钮与标签也会被一同销毁。这也正是开发人员所希望的,因为按钮和标签是消息对话框的子部件。当然,也可以手动销毁一个子对象,此时会将该子对象从对应的父对象当中被移除。
新建名称为myownership的 Qt Widgets
工程,基类选择QWidget,类名保持Widget不变;然后向工程添加
C++
类文件MyButton,其基类指定为QPushButton。
myownership.pro
1 2 3 4 5 6 7 8 9 10 11 12 13 14 15 QT += core gui greaterThan(QT_MAJOR_VERSION, 4 ): QT += widgets TARGET = myownership TEMPLATE = app SOURCES += main.cpp \ widget.cpp \ mybutton.cpp HEADERS += widget.h \ mybutton.h FORMS += widget.ui
main.cpp
规范的 Qt
程序,需要在main()函数中将主窗口部件 创建在栈上(例如下面代码里的Widget w;),而非创建在堆上(使用new操作符)。而其它窗口小部件则可以通过new操作符创建在堆上,不过一定要指定其父部件 ,这样就无需再使用delete操作符手动销毁该对象。
1 2 3 4 5 6 7 8 9 #include "widget.h" #include <QApplication> int main (int argc, char *argv[]) QApplication a (argc, argv) ; Widget w; w.show (); return a.exec (); }
1 2 3 4 5 6 7 8 9 10 11 12 13 14 #ifndef MYBUTTON_H #define MYBUTTON_H #include <QPushButton> class MyButton : public QPushButton { Q_OBJECT public : explicit MyButton (QWidget *parent = 0 ) ~MyButton (); }; #endif
1 2 3 4 5 6 7 8 9 #include "mybutton.h" #include <QDebug> MyButton::MyButton (QWidget *parent) : QPushButton (parent) { } MyButton::~MyButton () { qDebug () << "delete button" ; }
1 2 3 4 5 6 7 8 9 10 11 12 13 14 15 16 17 18 19 20 #ifndef WIDGET_H #define WIDGET_H #include <QWidget> namespace Ui { class Widget ; } class Widget : public QWidget { Q_OBJECT public : explicit Widget (QWidget *parent = 0 ) ~Widget (); private : Ui::Widget *ui; }; #endif
除此之外,还存在一种重定义父部件的情况,例如将包含有其它小部件的布局管理器添加至一个窗口部件上,那么该布局管理器和其中所有小部件都会自动将它们的父部件切换为该窗口部件。
1 2 3 4 5 6 7 8 9 10 11 12 13 14 15 16 17 18 19 20 21 22 23 24 25 26 27 28 29 #include "widget.h" #include "ui_widget.h" #include "mybutton.h" #include <QDebug> #include <QHBoxLayout> Widget::Widget (QWidget *parent) : QWidget (parent), ui (new Ui::Widget) { ui->setupUi (this ); MyButton *button = new MyButton (this ); button->setText (tr ("button" )); MyButton *button2 = new MyButton; MyButton *button3 = new MyButton; QHBoxLayout *layout = new QHBoxLayout; layout->addWidget (button2); layout->addWidget (button3); setLayout (layout); qDebug () << children (); } Widget::~Widget () { delete ui; qDebug () << "delete widget" ; }
1 2 3 4 5 6 7 8 9 10 11 12 13 14 15 16 17 18 19 20 <?xml version="1.0" encoding="UTF-8" ?> <ui version ="4.0" > <class > Widget</class > <widget class ="QWidget" name ="Widget" > <property name ="geometry" > <rect > <x > 0</x > <y > 0</y > <width > 400</width > <height > 300</height > </rect > </property > <property name ="windowTitle" > <string > Widget</string > </property > </widget > <layoutdefault spacing ="6" margin ="11" /> <resources /> <connections /> </ui >
元对象系统
Qt 的元对象系统(Meta-Object
System )为对象间通信、运行时类型信息、动态属性系统提供了信号与槽机制,元对象系统的运行需要基于下面
3 个条件:
该类必须继承自QObject类;
类声明的私有部分中的Q_OBJECT宏用于启用元对象特性,例如:动态属性、信号与槽;
元对象编译器(MOC,Meta-Object
Compiler)为每个QObject子类实现元对象特性提供必需的代码;
其中,元对象编译器读取一个 C++
源文件,如果发现类声明中包含Q_OBJECT宏,则会另外再创建一个
C++ 源文件(即工程里【debug】目录下以moc_xxx.cpp格式命名的
C++
源文件,其中包含了为每个类自动插入的元对象代码。元对象系统主要是为了实现信号与槽机制而引入。除此之外,元对象系统还提供了一些其它的特性:
QObject::metaObject():返回类的关联元对象;QMetaObject::className():运行时将类名以字符串格式返回,而无需通过
C++ 编译器获取原生运行时类型信息 (RTTI)的支持;QObject::inherits():判断并返回某个对象是否为QObject继承树上
1 个的类实例;QObject::tr()和QObject::trUtf8():为国际化翻译字符串;QObject::setProperty()和QObject::property():根据名称动态设置和获取属性;QMetaObject::newInstance():构造一个类的新实例;
除此之外,还可以使用qobject_cast()对QObject类上进行强制动态类型转换,qobject_cast()函数的行为类似于标准
C++ 当中的dynamic_cast()方法,但是并不需要 RTTI
支持,该函数尝试将参数转换为在尖括号中指定类型的指针,如果对象的类型正确,则返回一个非零指针;如果对象的类型不兼容,则返回nullptr。
例如,假设MyWidget继承了QWidget,并且使用了Q_OBJECT宏声明:
1 QObject *obj = new MyWidget;
类型为QObject *的obj变量实质引用了一个MyWidget对象,因而可以对其进行适当转换:
1 QWidget *widget = qobject_cast <QWidget *>(obj);
由于MyWidget本质上是QWidget的子类,所以QObject可以成功将其强制类型转换为QWidget;同理,由于obj是MyWidget类型的实例,所以还能将其转换为MyWidget *:
1 MyWidget *myWidget = qobject_cast <MyWidget *>(obj);
因为qobject_cast()并不区分内置 Qt
类型与自定义类型,所以这样的转换操作也是成功的。
1 QLabel *label = qobject_cast <QLabel *>(obj);
不过,上面代码对QLabel的强制类型转换失败了,所以这里将label指针设置为0,这使得在运行时根据不同类型处理相应的对象成为可能,正如下面代码所展示的这样:
1 2 3 4 5 if (QLabel *label = qobject_cast <QLabel *>(obj)) { label->setText (tr ("Ping" )); } else if (QPushButton *button = qobject_cast <QPushButton *>(obj)) { button->setText (tr ("Pong!" )); }
虽然可以在不使用Q_OBJECT宏和元对象代码 的情况下使用QObject作为基类,但是这样会导致信号与槽以及本小节描述的其它特性不可使用。从元对象系统的角度来看,没有插入元代码 (Meta
Code)的QObject子类相当于其最近的祖先拥有元对象代码。这意味着诸如QMetaObject::className()这样的方法,并不会返回类的实际名称,而是返回其祖先类的名称。
界面风格
Qt
中的各种风格都继承自一个封装有图形界面外观的抽象基类QStyle,Qt
的内建小部件通过其完成了几乎所有的绘制工作,以确保在各个操作系统上运行效果与原生部件一致。例如,下图展示了QComboBox小部件的
9 种不同风格:
QStyleFactory类可以创建一个QStyle对象,通过该类提供的keys()函数获取当前可用的风格,然后再调用create()函数创建QStyle对象。通常windows和fusion风格默认可用,其它风格则只在特定操作系统中才会有效,例如windowsvista和macintosh。
Qt Creator
设计模式里可以预览当前.ui文件对应的界面风格,这里通过具体的示例来进行说明。新建一个名为mystyle的
Qt Widgets
工程,类名为MainWindow,基类QMainWindow仍然保持不变。单击mainwindow.ui文件进入设计模式,分别向工作区拖入【Push
Button】、【Check Box】、【Spin Box】、【Horizontal Scroll Bar】、【LCD
Number】、【Progress Bar】。然后,鼠标依次选择 Qt Creator
工具栏上的【工具 → Form Editor → Preview in → Fusion
风格】菜单项即可进行相应风格的预览。
mystyle.pro
1 2 3 4 5 6 7 8 9 10 11 12 13 QT += core gui greaterThan(QT_MAJOR_VERSION, 4 ): QT += widgets TARGET = mystyle TEMPLATE = app SOURCES += main.cpp \ mainwindow.cpp HEADERS += mainwindow.h FORMS += mainwindow.ui
main.cpp
下面代码显式指定使用 Fusion
风格,当然也可以选择命令行运行程序时通过-style fusion参数进行指定。如果不希望整个应用都使用相同风格,则可以调用小部件的setStyle()函数来指定风格。
除了 Qt
提供的这些风格,还可以使用通过继承QCommonStyle类实现的自定义风格。
1 2 3 4 5 6 7 8 9 10 11 #include "mainwindow.h" #include <QApplication> #include <QStyleFactory> int main (int argc, char *argv[]) QApplication a (argc, argv) ; a.setStyle (QStyleFactory::create ("fusion" )); MainWindow w; w.show (); return a.exec (); }
mainwindow.h
1 2 3 4 5 6 7 8 9 10 11 12 13 14 15 16 17 18 19 20 #ifndef MAINWINDOW_H #define MAINWINDOW_H #include <QMainWindow> namespace Ui { class MainWindow ; } class MainWindow : public QMainWindow { Q_OBJECT public : explicit MainWindow (QWidget *parent = 0 ) ~MainWindow (); private : Ui::MainWindow *ui; }; #endif
mainwindow.cpp
QPalette调色板类包含了小部件各种状态下的颜色组,该类通常包含激活 (Active)、失效 (Disabled)、非激活 (Inactive)三种颜色组。所有
Qt 小部件都拥有 1
个调色板来绘制自身,每个调色板包含的颜色组如下所示:
创建一个新的小部件时,我们强烈建议您使用调色板中的颜色,而不是硬编码特定的颜色
QPalette::Active:激活颜色组,用于获得键盘焦点的窗口;QPalette::Inactive:非激活颜色组,用于其它未获得键盘焦点的窗口;QPalette::Disabled:失效颜色组,用于因某些原因禁用的小部件(非窗口);
要改变一个应用程序的调色板,可以先使用QApplication:palette()函数来获取调色板,完成修改后再调用QApplication:setPalette()函数使用该调色板。更改应用程序调色板会影响到该程序的所有小部件,如果仅需改变某个小部件的调色板,则可以调用其palette()以及setPalette()函数,这样仅会影响该小部件本身及其子部件。
设置调色板颜色可以使用QPalette::setColor(QPalette::ColorRole role, const QColor &color)函数,该函数的ColorRole参数表示颜色角色,例如背景颜色、文本颜色等,主要的颜色角色如下表所示:
常量
值
描述
QPalette::Window10通用的背景颜色;
QPalette::BackgroundWindow(已废弃)使用QPalette::Window代替;
QPalette::WindowText0通用的前景颜色;
QPalette::ForegroundWindowText(已废弃)使用WindowText代替;
QPalette::Base9主要作为文本输入部件的背景颜色,也可以用于;
QPalette::AlternateBase16在交替行颜色的视图里面,作为交替的背景颜色;
QPalette::ToolTipBase18作为QToolTip和QWhatsThis的背景色;
QPalette::ToolTipText19作为QToolTip和QWhatsThis的前景色;
QPalette::PlaceholderText20用作各种文本输入小部件的占位符颜色;
QPalette::Text6与QPalette::Base一起使用时作为前景色;
QPalette::Button1按钮小部件的背景色;
QPalette::ButtonText8按钮小部件的前景色;
QPalette::BrightText7高亮文本,用于与深色形成良好的对比度;通常用于需要提高对比度的位置;
1 2 3 4 5 6 7 8 9 10 11 12 13 14 15 16 17 18 19 20 21 22 23 24 25 #include "mainwindow.h" #include "ui_mainwindow.h" #include <QStyleFactory> #include <QPalette> MainWindow::MainWindow (QWidget *parent) : QMainWindow (parent), ui (new Ui::MainWindow) { ui->setupUi (this ); ui->progressBar->setStyle (QStyleFactory::create ("windows" )); QPalette palette1 = ui->pushButton->palette (); palette1. setColor (QPalette::ButtonText, Qt::red); palette1. setColor (QPalette::Button, Qt::green); ui->pushButton->setPalette (palette1); ui->spinBox->setDisabled (true ); QPalette palette2 = ui->spinBox->palette (); palette2. setColor (QPalette::Disabled,QPalette::Base,Qt::blue); ui->spinBox->setPalette (palette2); } MainWindow::~MainWindow () { delete ui; }
mainwindow.ui
Qt Creator
设计模式中添加到界面上的小部件,可以通过修改属性编辑器中的palette属性来设置其调色板,这样还可以方便的预览修改以后的效果。
1 2 3 4 5 6 7 8 9 10 11 12 13 14 15 16 17 18 19 20 21 22 23 24 25 26 27 28 29 30 31 32 33 34 35 36 37 38 39 40 41 42 43 44 45 46 47 48 49 50 51 52 53 54 55 56 57 58 59 60 61 62 63 64 65 66 67 68 69 70 71 72 73 74 75 76 77 78 79 80 81 82 83 84 85 86 87 88 89 90 91 92 93 94 95 96 97 98 99 100 101 102 103 104 105 106 107 108 109 110 111 112 113 <?xml version="1.0" encoding="UTF-8" ?> <ui version ="4.0" > <class > MainWindow</class > <widget class ="QMainWindow" name ="MainWindow" > <property name ="geometry" > <rect > <x > 0</x > <y > 0</y > <width > 400</width > <height > 300</height > </rect > </property > <property name ="windowTitle" > <string > MainWindow</string > </property > <widget class ="QWidget" name ="centralWidget" > <widget class ="QPushButton" name ="pushButton" > <property name ="geometry" > <rect > <x > 60</x > <y > 50</y > <width > 75</width > <height > 23</height > </rect > </property > <property name ="text" > <string > PushButton</string > </property > </widget > <widget class ="QCheckBox" name ="checkBox" > <property name ="geometry" > <rect > <x > 180</x > <y > 50</y > <width > 71</width > <height > 16</height > </rect > </property > <property name ="text" > <string > CheckBox</string > </property > </widget > <widget class ="QSpinBox" name ="spinBox" > <property name ="geometry" > <rect > <x > 60</x > <y > 130</y > <width > 42</width > <height > 22</height > </rect > </property > </widget > <widget class ="QScrollBar" name ="horizontalScrollBar" > <property name ="geometry" > <rect > <x > 140</x > <y > 130</y > <width > 160</width > <height > 16</height > </rect > </property > <property name ="orientation" > <enum > Qt::Horizontal</enum > </property > </widget > <widget class ="QLCDNumber" name ="lcdNumber" > <property name ="geometry" > <rect > <x > 60</x > <y > 190</y > <width > 64</width > <height > 23</height > </rect > </property > </widget > <widget class ="QProgressBar" name ="progressBar" > <property name ="geometry" > <rect > <x > 180</x > <y > 190</y > <width > 118</width > <height > 23</height > </rect > </property > <property name ="value" > <number > 24</number > </property > </widget > </widget > <widget class ="QMenuBar" name ="menuBar" > <property name ="geometry" > <rect > <x > 0</x > <y > 0</y > <width > 400</width > <height > 22</height > </rect > </property > </widget > <widget class ="QToolBar" name ="mainToolBar" > <attribute name ="toolBarArea" > <enum > TopToolBarArea</enum > </attribute > <attribute name ="toolBarBreak" > <bool > false</bool > </attribute > </widget > <widget class ="QStatusBar" name ="statusBar" /> </widget > <layoutdefault spacing ="6" margin ="11" /> <resources /> <connections /> </ui >
样式表
Qt
样式表可以用于自定义小部件的外观,除了可以通过继承QStyle进行修改的外观特性,其它都可以通过
Qt 样式表进行美化。Qt
样式表即可以通过调用QApplication:setStyleSheet()函数将其设置到整个应用程序,也可以使用QWidget::setStyleSheet()函数将其设置到一个具体的小部件或者其子部件,如果在不同的继承级别都设置有样式表,则
Qt 会层叠使用全部的有效样式。
新建 Qt Widgets
工程mystylesheets,类名为MainWindow,基类为QMainWindow。
代码添加样式
进入 Qt Creator 设计模式,向工作区拖入【Push Button】和【Horizontal
Slider】,然后向mainwindow.cpp的构造函数添加如下代码:
mainwindow.cpp
1 2 3 4 5 6 7 8 9 10 11 12 13 14 15 16 17 18 19 #include "mainwindow.h" #include "ui_mainwindow.h" #include <QFile> MainWindow::MainWindow (QWidget *parent) : QMainWindow (parent), ui (new Ui::MainWindow) { ui->setupUi (this ); ui->pushButton->setStyleSheet ("background:yellow" ); ui->horizontalSlider->setStyleSheet ("background:blue" ); } MainWindow::~MainWindow () { delete ui; }
mainwindow.ui
1 2 3 4 5 6 7 8 9 10 11 12 13 14 15 16 17 18 19 20 21 22 23 24 25 26 27 28 29 30 31 32 33 34 35 36 37 38 39 40 41 42 43 44 45 46 47 48 49 50 51 52 53 54 55 56 57 58 59 60 61 62 63 64 65 66 67 68 69 70 <?xml version="1.0" encoding="UTF-8" ?> <ui version ="4.0" > <class > MainWindow</class > <widget class ="QMainWindow" name ="MainWindow" > <property name ="geometry" > <rect > <x > 0</x > <y > 0</y > <width > 400</width > <height > 300</height > </rect > </property > <property name ="windowTitle" > <string > MainWindow</string > </property > <property name ="styleSheet" > <string notr ="true" /> </property > <widget class ="QWidget" name ="centralWidget" > <widget class ="QPushButton" name ="pushButton" > <property name ="geometry" > <rect > <x > 110</x > <y > 70</y > <width > 120</width > <height > 40</height > </rect > </property > <property name ="text" > <string /> </property > </widget > <widget class ="QSlider" name ="horizontalSlider" > <property name ="geometry" > <rect > <x > 60</x > <y > 160</y > <width > 280</width > <height > 6</height > </rect > </property > <property name ="orientation" > <enum > Qt::Horizontal</enum > </property > </widget > </widget > <widget class ="QMenuBar" name ="menuBar" > <property name ="geometry" > <rect > <x > 0</x > <y > 0</y > <width > 400</width > <height > 22</height > </rect > </property > </widget > <widget class ="QToolBar" name ="mainToolBar" > <attribute name ="toolBarArea" > <enum > TopToolBarArea</enum > </attribute > <attribute name ="toolBarBreak" > <bool > false</bool > </attribute > </widget > <widget class ="QStatusBar" name ="statusBar" /> </widget > <layoutdefault spacing ="6" margin ="11" /> <resources /> <connections /> </ui >
设计模式添加样式
释掉上面添加的代码,进入 Qt Creator
设计模式,点击工作区右键弹出菜单中的【改变样式表】选项:
此时将会弹出【编辑样式表】对话框,然后向其中输入如下代码,就可以得到与上面通过代码添加样式相同的效果:
样式表功能比调色板更为强大,并且能够不受操作平台和主题引擎的影响。
Qt 样式表语法
Qt 样式表(Qt Style
Sheet)包含了一系列样式规则,每个样式规则由选择器(selector)和声明(declaration)两部分组成。
1 2 3 QPushButton { color : red; }
上面样式定义当中,QPushButton是选择器,{color:red}是声明。该样式规则指定QPushButton及其子类使用红色作为前景色。Qt
样式表声明部分不用区分大小写 ,所以color、Color、COLOR、COloR都表示相同属性。而选择器部分则需要区分大小写 。可以对多个选择器指定相同声明,每个选择器都采用逗号,进行分隔。
1 2 3 4 5 QPushButton, QLineEdit, QComboBox { color : red; }
样式的声明部分是由一系列键值对组成的列表,每个键值对之间通过分号;进行分隔。
1 2 3 4 QPushButton { color : red; background-color : white; }
选择器类型
Qt 样式表支持 CSS2
里定义的所有选择器,下面的表格列出了较为常用的选择器类型:
选择器
示例
说明
通用选择器 *匹配所有小部件;
类型选择器 QPushButton匹配所有QPushButton及其所有子类的实例;
属性选择器 QPushButton[flat="false"]匹配QPushButton的属性flat为false的实例;
类选择器 .QPushButton匹配所有QPushButton实例,其作用等效于*[class~="QPushButton"];
ID 选择器 QPushButton#okButton匹配所有QPushButton当中以okButton作为对象名称的实例;
后代选择器 QDialog QPushButton匹配所有作为Dialog后代小部件的QPushButton实例;
子选择器 QDialog > QPushButton匹配所有作为Dialog直接子部件的QPushButton实例;
子控件选择器
当需要实现较为复杂的小部件样式时,可能需要访问其子部件,例如:QComboBox的下拉按钮或者QSpinBox的向上向下箭头等。选择器可以包含子控件来对部件的待定子控件应用规则,例如:
特定的小部件子控件
1 2 3 QComboBox::drop-down { image : url (dropdown.png ); }
上述的样式规则会改变所有QComboBox小部件的下拉按钮样式,虽然双冒号::语法与
CSS3 伪类选择器相似,但是显然 Qt
的子控件选择器拥有着不同的级联语义。
子控件 总是相对于引用元素 来进行定位,例如:QComboBox小部件的::drop-down默认放置在QComboBox填充矩形的右上角,而::drop-down默认放置在子控件内容矩形的中心。
可以使用subcontrol-origin属性更改当前需要使用的原点矩形。例如:如果想在QComboBox的空白矩形中放置下拉菜单,而非默认的填充矩形,则可以编写如下代码:
1 2 3 4 5 6 QComboBox { margin-right : 20px ; } QComboBox::drop-down { subcontrol-origin: margin; // 修改边框内下拉列表的对齐方式。 }
此外,还可以通过width和height来控制子控件的尺寸,注意使用image属性会隐式设置子控件尺寸。
相对定位方案(position: relative)允许子控件位置从其初始位置 偏移,例如:QComboBox下拉按钮被按下时,如果希望里面的箭头发生偏移从而展示按下效果:
1 2 3 4 5 6 7 QComboBox::down-arrow { image: url (down_arrow.png); } QComboBox::down-arrow:pressed { position: relative; top: 1 px; left: 1 px; }
绝对定位方案(position: absolute)则允许子控件的位置和尺寸相对于引用元素 进行偏移。一旦完成定位,子控件即被视为小部件,从而可以使用盒子模型 进一步样式化。
伪状态选择器
伪状态选择器用于设置小部件在各种状态下的样式,其中伪状态 出现在选择器末尾,中间通过冒号:进行分隔。例如:当鼠标悬停在QPushButton上时,应用如下规则:
1 2 3 QPushButton:hover { color : white; }
感叹号!运算符用于否定伪状态,例如:当希望鼠标不悬停在QRadioButton上时,可以应用如下样式规则:
1 2 3 qradiobutton: !hover { color : red; }
伪状态可以链接调用,作用类似于隐式的逻辑与,例如:当鼠标悬停在选中的QCheckBox上时,可以应用如下规则:
1 2 3 QCheckBox:hover :checked { color : white; }
否定的伪状态也可以出现在伪状态的链式调用当中。例如,当鼠标悬停但是并未按下QPushButton时,可以采用以下规则:
1 2 3 QPushButton:hover :!pressed { color : blue; }
逗号运算符,能够让选择器起到逻辑或 的作用:
1 2 3 4 QCheckBox:hover , QCheckBox:checked { color : white; }
伪状态 可以与子控件 组合起来使用:
1 2 3 QComboBox::drop-down:hover { image : url (dropdown_bright.png ); }
样式冲突
当具有不同值的多条样式规则指定到相同的属性时,就会发生样式冲突,例如下面的代码:
1 2 3 4 5 6 QPushButton#okButton { color : gray; } QPushButton { color : red; }
上述 2 个规则都匹配 1
个名称为okButton的QPushButton实例,并且颜色属性存在冲突。解决冲突必须考虑到选择器的特殊性,上面例子中,QPushButton#okButton的描述比QPushButton更为具体。
类似地,拥有伪状态的选择器比没有伪状态的选择器更加具体。因此,下面样式表指定当鼠标悬停在QPushButton上时,会出现白色文本,否则就显示红色文本:
1 2 3 4 5 6 QPushButton:hover { color : white; } QPushButton { color : red; }
接下来的代码相对更为棘手,这里 2
个选择器特殊性相同。这种情况下,会认为最后出现的选择器优先级更高:
1 2 3 4 5 6 QPushButton:enabled { color : red; } QPushButton:hover { color : white; }
如果需要让第 1 条规则获得更高的优先级,那么可以让第 1
条选择器的描述变得更加具体:
1 2 3 4 5 6 QPushButton:hover :enabled { color : white; } QPushButton:enabled { color : red; }
使用类型选择器的时候,也会出现类似的问题。考虑下面的例子:
1 2 3 4 5 6 QPushButton { color : red; } QAbstractButton { color : gray; }
上面代码中,由于QPushButton继承了QAbstractButton,因此这
2
条样式规则都会作用于QPushButton实例,此时颜色属性会存在冲突。由于QPushButton继承自QAbstractButton,所以很容易知道QPushButton要比QAbstractButton更为具体。但是,对于样式表优先级的计算而言,如果所有选择器都具有相同的特殊性,那么最后出现的规则优先 。换而言之,上面代码中包括qpushbutton在内的所有QAbstractButtons小部件颜色都会被设置为灰色。
Qt 当中样式规则的特异性同样遵循 CSS2 规范:
计算选择器中 ID 属性的数量(=a);
计算选择器中其他属性和伪类的数量(=b);
计算选择器中有名称的元素数量(=c);
被忽略的伪元素,例如subcontrols;
将上面列表中的a、b、c三个数字连接起来就可以计算出选择器的优先级特性,参考如下示例:
1 2 3 4 5 6 7 8 * {} /* a=0 b=0 c=0 ➞ 特异性 = 0 */ LI {} /* a=0 b=0 c=1 ➞ 特异性 = 1 */ UL LI {} /* a=0 b=0 c=2 ➞ 特异性 = 2 */ UL OL+LI {} /* a=0 b=0 c=3 ➞ 特异性 = 3 */ H1 + *[REL=up]{} /* a=0 b=1 c=1 ➞ 特异性 = 11 */ UL OL LI.red {} /* a=0 b=1 c=3 ➞ 特异性 = 13 */ LI.red.level {} /* a=0 b=2 c=1 ➞ 特异性 = 21 */ #x34y {} /* a=1 b=0 c=0 ➞ 特异性 = 100 */
级联
QApplication和其它父子小部件上都可以设置样式表,但是如果发生冲突时,小部件自身的样式表总是优先于任何继承的样式表 ,而不用考虑冲突规则的特殊性。考虑下面的例子,首先在QApplication上设置一个样式表:
1 qApp->setStyleSheet("QPushButton { color : white }");
然后,在QPushButton对象上设置样式表:
1 myPushButton->setStyleSheet("* { color : blue }");
上面代码中,尽管应用程序范围的样式表提供了更为具体的选择器规则,但是QPushButton最终仍然会展示蓝色的文本。
注意 :样式表的级联是一个较为复杂的话题,更多详细信息可以参考CSS2
官方规范 ,注意 Qt 目前还没有实现!important;
继承
经典 CSS
当中,如果元素没有显式设置字体与颜色,则该元素会自动从父级继承这些样式,但是
Qt
中的小部件并不会自动从其父部件继承字体与颜色样式。例如,一个QGroupBox当中的QPushButton:
1 qApp->setStyleSheet("QGroupBox { color : red; } ");
由于QPushButton没有显式的指定颜色,因此会保持系统颜色不变,并不会继承QGroupBox的颜色设置。如果需要设置QGroupBox及其子元素的颜色,则可以这样编写代码:
1 qApp->setStyleSheet("QGroupBox, QGroupBox * { color : red; }");
但是,如果使用QWidget::setFont()和QWidget::setPalette()设置字体到调色板,则效果将会传播至子窗口小部件。如果需要将字体和调色板像这样传播至子部件,则可以设置Qt::AA_UseStyleSheetPropagationInWidgetStyles标志:
1 QCoreApplication::setAttribute (Qt::AA_UseStyleSheetPropagationInWidgetStyles, true );
开启 Qt 小部件字体、调色板样式传播以后,通过 Qt
样式表修改字体与调色板,将会与手动调用QWidget::setPalette()和QWidget::setFont()效果一致,都将会导致
Qt 样式表传播到子部件。
C++ 命名空间中的小部件
类型选择器可以用于指定特定类型的小部件样式,例如:
1 2 3 4 5 6 class MyPushButton : public QPushButton { // ... } // ... qApp->setStyleSheet("MyPushButton { background : yellow; }");
Qt
样式表通过小部件的QObject::className()来决定何时使用类型选择器,当自定义小部件位于命名空间当中时,QObject::className()将会返回<namespace>::<className>,这样就会与子控件语法发生冲突,因此在命名空间内使用小部件类型选择器时,必须将::替换为--,正如下面这样:
1 2 3 4 5 6 7 8 namespace ns { class MyPushButton : public QPushButton { // ... } } // ... qApp->setStyleSheet("ns--MyPushButton { background : yellow; }");
设置 QObject 属性
任何可设计的Q_PROPERTY,都可以使用qproperty-<property name>语法来设置样式表。
1 2 3 4 5 6 7 8 9 MyLabel { qproperty-pixmap: url (pixmap.png ); } MyGroupBox { qproperty-titlecolor: rgb (100 , 200 , 100 ); } QPushButton { qproperty-iconsize: 20px 20px ; }
注意 :qproperty语法只会被计算一次,因此在QPushButton:hover等伪状态下无法使用qproperty。
盒子模型
Qt
样式表将每个小部件视为一个包含margin、border、padding、content四个同心矩形的框 。
margin、border-width、padding属性都默认为0,这种情况下,所有四个同心矩形完全重合在一起。
background-image属性用于为小部件设置一张背景图片,默认情况下,background-image仅绘制border以内的区域,当然此特性也可以通过backgroundclip属性进行调整。此外,还可以通过background-repeat和background-origin属性来控制背景图片的重复方式以及原点位置。
背景图片默认不会跟随小部件尺寸进行伸缩,但是使用border-image则可以实现这一点,一旦使用该属性设置了背景图片,则可以无需再行使用background-image。如果border-image和background-image属性同时出现,则border-image将会覆盖background-image。
除此之外,image属性可以用来在border-image上面绘制图片,如果使用image指定的图片大小与部件的大小不匹配,那么它将不会平铺或者拉伸。图片的对齐方式可以使用image-position属性来设置,渲染一条样式规则的步骤如下列表所示:
为整个渲染操作设置剪裁(border-radius);
绘制背景(background-image);
绘制边框(border-image、border);
绘制叠加图像(image);
子控件
小部件被认为是一个由子控件组成的层次结构,例如:QComboBox绘制【下拉】子控件,然后是【向下箭头】子控件,因此最终的呈现效果如下所示:
渲染QComboBox{}规则;
渲染QComboBox::drop-down{}规则;
渲染QComboBox::down-arrow{}规则;
子控件会共享父子关系,在QComboBox当中,向下箭头的父元素是【下拉】,而【下拉】父元素是小部件自身。子控件通过subcontrol-position和subcontrol-origin属性定位其在父控件中的位置。一旦完成定位,子控件就可以使用盒子模型进行样式化表达。
注意 :对于QComboBox和QScrollBar之类的复杂小部件,如果一个属性或子控件是自定义的,那么其它所有的属性或者子控件也必须是自定义的。
示例:动态更换 .qss 样式
继续沿用上一步建立的 Qt Widgets
工程mystylesheets,首先向工程目录添加 4 张图片,然后再添加
1 个名为myresource的 Qt
资源文件,完成以后再添加/image前缀,并将工程目录下的slider.png、sliderHandle.png、image1.jpg、image2.jpg四张图片加载进来。
Qt
样式表可以存放在.qss文件当中,通过在程序中调用不同的.qss文件从而实现动态换肤功能。鼠标右键选择【Add
New...】向工程添加文件,然后选择【General】分类当中的【Empty
File】,分别建立style1.qss和style2.qss两个文件用于放置不同的样式规则。
鼠标右键选择myresource.qrc文件,选择弹出菜单中的【Open
With ->
资源编辑器】,打开资源文件添加一个/qss前缀,再选择工作区中的【Add
Files】将刚才建立的style1.qss和style2.qss文件分别添加到
Qt 工程当中。完成之后,程序运行的效果如下图所示:
mystylesheets.pro
1 2 3 4 5 6 7 8 9 10 11 12 13 14 15 16 17 18 19 20 QT += core gui greaterThan(QT_MAJOR_VERSION, 4 ): QT += widgets TARGET = mystylesheets TEMPLATE = app SOURCES += main.cpp\ mainwindow.cpp HEADERS += mainwindow.h FORMS += mainwindow.ui RESOURCES += \ myresource.qrc DISTFILES += \ style1.qss \ style2.qss
main.cpp
1 2 3 4 5 6 7 8 9 #include "mainwindow.h" #include <QApplication> int main (int argc, char *argv[]) QApplication a (argc, argv) ; MainWindow w; w.show (); return a.exec (); }
mainwindow.h
1 2 3 4 5 6 7 8 9 10 11 12 13 14 15 16 17 18 19 20 21 22 23 24 #ifndef MAINWINDOW_H #define MAINWINDOW_H #include <QMainWindow> class QFile ;namespace Ui { class MainWindow ; } class MainWindow : public QMainWindow { Q_OBJECT public : explicit MainWindow (QWidget *parent = 0 ) ~MainWindow (); private slots: void on_pushButton_clicked () private : Ui::MainWindow *ui; QFile *qssFile; }; #endif
mainwindow.cpp
1 2 3 4 5 6 7 8 9 10 11 12 13 14 15 16 17 18 19 20 21 22 23 24 25 26 27 28 29 30 #include "mainwindow.h" #include "ui_mainwindow.h" #include <QFile> MainWindow::MainWindow (QWidget *parent) : QMainWindow (parent), ui (new Ui::MainWindow) { ui->setupUi (this ); qssFile = new QFile (":/qss/style1.qss" , this ); qssFile->open (QFile::ReadOnly); QString styleSheet = QString (qssFile->readAll ()); qApp->setStyleSheet (styleSheet); qssFile->close (); } MainWindow::~MainWindow () { delete ui; } void MainWindow::on_pushButton_clicked () if (qssFile->fileName () == ":/qss/style1.qss" ) { qssFile->setFileName (":/qss/style2.qss" ); } else { qssFile->setFileName (":/qss/style1.qss" ); } qssFile->open (QFile::ReadOnly); QString styleSheet = QString (qssFile->readAll ()); qApp->setStyleSheet (styleSheet); qssFile->close (); }
mainwindow.ui
1 2 3 4 5 6 7 8 9 10 11 12 13 14 15 16 17 18 19 20 21 22 23 24 25 26 27 28 29 30 31 32 33 34 35 36 37 38 39 40 41 42 43 44 45 46 47 48 49 50 51 52 53 54 55 56 57 58 59 60 61 62 63 64 65 66 67 68 69 70 <?xml version="1.0" encoding="UTF-8" ?> <ui version ="4.0" > <class > MainWindow</class > <widget class ="QMainWindow" name ="MainWindow" > <property name ="geometry" > <rect > <x > 0</x > <y > 0</y > <width > 400</width > <height > 300</height > </rect > </property > <property name ="windowTitle" > <string > MainWindow</string > </property > <property name ="styleSheet" > <string notr ="true" /> </property > <widget class ="QWidget" name ="centralWidget" > <widget class ="QPushButton" name ="pushButton" > <property name ="geometry" > <rect > <x > 140</x > <y > 80</y > <width > 120</width > <height > 40</height > </rect > </property > <property name ="text" > <string > 切换qss文件</string > </property > </widget > <widget class ="QSlider" name ="horizontalSlider" > <property name ="geometry" > <rect > <x > 60</x > <y > 160</y > <width > 280</width > <height > 6</height > </rect > </property > <property name ="orientation" > <enum > Qt::Horizontal</enum > </property > </widget > </widget > <widget class ="QMenuBar" name ="menuBar" > <property name ="geometry" > <rect > <x > 0</x > <y > 0</y > <width > 400</width > <height > 22</height > </rect > </property > </widget > <widget class ="QToolBar" name ="mainToolBar" > <attribute name ="toolBarArea" > <enum > TopToolBarArea</enum > </attribute > <attribute name ="toolBarBreak" > <bool > false</bool > </attribute > </widget > <widget class ="QStatusBar" name ="statusBar" /> </widget > <layoutdefault spacing ="6" margin ="11" /> <resources /> <connections /> </ui >
style1.qss
1 2 3 4 5 6 7 8 9 10 11 12 13 14 15 16 17 18 19 20 21 22 23 24 25 26 27 28 29 30 31 32 33 34 35 36 37 38 39 40 41 42 43 44 45 46 47 48 49 QMainWindow{ background-image: url (:/image/image1. jpg); } QPushButton{ background-color: rgba (100 , 225 , 100 , 30 ); border-style: outset; border-width: 4 px; border-radius: 10 px; border-color: rgba (255 , 225 , 255 , 30 ); font: bold 14 px; color:rgba (0 , 0 , 0 , 100 ); padding: 6 px; } QPushButton:hover{ background-color:rgba (100 ,255 ,100 , 100 ); border-color: rgba (255 , 225 , 255 , 200 ); color:rgba (0 , 0 , 0 , 200 ); } QPushButton:pressed { background-color:rgba (100 ,255 ,100 , 200 ); border-color: rgba (255 , 225 , 255 , 30 ); border-style: inset; color:rgba (0 , 0 , 0 , 100 ); } QSlider::handle:horizontal { image: url (:/image/sliderHandle.png); } QSlider::sub-page:horizontal { border-image: url (:/image/slider.png); }
style2.qss
1 2 3 4 5 6 7 8 9 10 11 12 13 14 15 16 17 18 19 20 21 22 23 24 25 26 27 28 29 30 31 32 33 34 35 36 37 38 39 40 41 42 43 44 45 46 47 48 49 QMainWindow{ background-image: url (:/image/image2. jpg); } QPushButton{ background-color: rgba (100 , 100 , 100 , 30 ); border-style: outset; border-width: 4 px; border-radius: 10 px; border-color: rgba (255 , 120 , 120 , 30 ); font: bold 14 px; color:rgba (0 , 100 , 0 , 100 ); padding: 6 px; } QPushButton:hover{ background-color:rgba (200 ,255 ,100 , 100 ); border-color: rgba (255 , 225 , 255 , 200 ); color:rgba (0 , 0 , 0 , 200 ); } QPushButton:pressed { background-color:rgba (255 ,255 ,255 , 200 ); border-color: rgba (255 , 225 , 255 , 30 ); border-style: inset; color:rgba (0 , 0 , 0 , 100 ); } QSlider::handle:horizontal { image: url (:/image/sliderHandle.png); } QSlider::sub-page:horizontal { border-image: url (:/image/slider.png); }
调用 Python3
如果当前使用的是 Windows
,需要向.pro添加如下INCLUDEPATH和LIBS配置:
1 2 INCLUDEPATH += C :\Software\Tech\Python\include LIBS += C :\Software\Tech\Python\libs\python37.lib
如果当前使用的是 Linux
,则需要向.pro添加如下INCLUDEPATH和LIBS配置:
1 2 #INCLUDEPATH += /usr/i nclude/python3.7 #LIBS += /usr/ lib/python3.7 /config-3.7 m-arm-linux-gnueabihf/libpython3.7 .so
为了避免运行时由于命名冲突出现如下错误:
1 2 3 /usr/include/python3.7 /object.h :448 : error : expected unqualified-id before ‘;’ token PyType_Slot *slots; ^
需要按照下面方式,修改 Python
安装目录下的sudo vim /usr/include/python3.7/object.h头文件:
1 2 3 4 5 6 7 8 9 10 11 #undef slots typedef struct { const char * name; int basicsize; int itemsize; unsigned int flags; PyType_Slot *slots; } PyType_Spec; #define slots Q_SLOTS
初始化 Python 解释器
1 2 3 4 5 6 7 8 9 10 11 12 13 14 15 16 17 18 19 20 21 22 23 24 25 26 27 28 29 30 31 32 #include "widget.h" #include "ui_widget.h" #include <iostream> #include <Python.h> using namespace std;Widget::Widget (QWidget *parent) : QWidget (parent), ui (new Ui::Widget) { ui->setupUi (this ); Py_Initialize (); if (!Py_IsInitialized ()){ cout << "Python 初始化失败" << endl; } PyRun_SimpleString ("import sys" ); PyRun_SimpleString ("sys.path.append('./')" ); pModule = PyImport_ImportModule ("handler" ); if (!pModule) { cout << "Python 文件打开失败" << endl; } } Widget::~Widget () { delete ui; Py_Finalize (); }
注意:目前Py_Finalize()的功能已经被更新版本的int Py_FinalizeEx()函数所代替。
调用带返回值的 Python 函数
1 2 3 4 5 6 7 8 9 10 11 12 13 14 PyObject* pEncode = PyObject_GetAttrString (pModule, "compare" ); if (!pEncode) { cout << "Python 函数获取失败" << endl; } PyObject* result = PyObject_CallFunction (pEncode, NULL ); string code = PyUnicode_AsUTF8 (result); if (code == "True" ){ sendStatusBarMsg ("成功" ); } else if (code == "False" ) { sendStatusBarMsg ("失败" ); }
1 2 3 def compare (): return "True"
调用带有参数的 Python 函数
1 2 3 4 5 6 7 8 9 10 11 PyObject* pCompareByString = PyObject_GetAttrString(pModule, "compareByString" ); if (!pCompareByString) { cout << "Python 函数获取失败" << endl; } /* 生成 Python 参数对象 */ PyObject* args = Py_BuildValue("ss" , "serverCode" .toUtf8().data(), "clientCode" .toUtf8().data()); PyObject* compareResult = PyObject_CallObject(pCompareByString, args); string code = PyUnicode_AsUTF8(compareResult);
1 2 3 4 5 def compareByString (serverCode, clientCode ): print ("serverCode----->" + serverCode) print ("clientCode----->" + clientCode) return "False"